Customizing insideND
Q: Are there any tutorials available for insideND?
Add a Channel
Move or Delete a Channel
Add a Tab
Manage Columns
Using Webfile
Q: How do I delete a channel?
Click the X in the right hand corner of the channel. You can always restore a channel that you have deleted by following the "Add Channel" instructions below.
Q: How do I add a channel?
By default, the system provides great flexibility for you to customize the tabs and channels that you have in your layout. One of the options that you have is to add new channels to existing tabs or to new tabs that you have created. To add a new channel to your layout, use the following procedure:
1. In the top left-hand corner of the page above the system tabs, locate and click the Content/Layout link.
2. You see the Manage Content/Layout page, which allows you to change aspects of your user layout, such as adding tabs, moving or deleting channels, etc.
3. Locate the image of the system layout and select the tab to which you want to add a new channel by clicking its name.
4. You see an image containing icons for the existing channels contained on the tab.
5. Locate the column and position where you want to add the channel and click the Add Channel button.
![]()
6. You see the first of menus that you will use to add the channel.
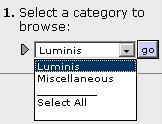
7. From the menu, select a category and click Go. If you are presented with a subcategory menu, select from it as appropriate and click Go. You see a second menu box.
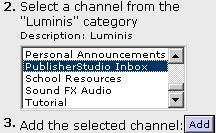
8. From the menu provided, highlight the channel that you want to add and click Add Channel. You are returned to the layout page where you see the new channel appear in the layout image.
9. Click the return button, which is located in the upper left-hand side of the screen.
10. You are returned to the tab where you elected to add the channel. From now on when you log on, you will see the new channel on this tab.
Q: Why can't I delete some channels?
Some of the channels have been designed to remain on the tab by the university. The channels that can not be removed the X in the upper right hand corner of the channel is grayed out.
Q: How do I add a tab?
By default, the system provides great flexibility for you to customize the tabs and channels that you have in your layout. One of the options that you have is to create new tabs and populate them with channels. To create a new tab, use the following procedure:
1. In the top left-hand corner of the page above the system tabs, locate and click the Content/Layout link.
2. You see the Manage Content/Layout page, which allows you to change aspects of your user layout, such as adding tabs, moving or deleting channels, etc.
3. To add a tab, locate the image of the system layout and click the Add New Tab icon.
![]()
You see a list of steps for adding the tab, which includes the following options:
Name the tab: Allows you to supply a name for the new tab.
Select the type: Allows you to specify one of two types for the tab content: Traditional, which preserves the channelized content; Framed, which allows you to fill the tab with the content of a specified URL.
Select a position for the tab: Allows you to set the order of the tab in the layout in relation to other tabs. Depending on how your institution has configured the system, some tabs may be locked and therefore unmovable.
4. To add the new tab, fill in these fields as appropriate and click Submit. You are returned to the layout screen where you see the new tab in the layout image. At this point you will need to add channels to the tab.
5. To exit without adding the tab, click "Cancel and return."
Q: How do I add a column?
By default, the system provides great flexibility for you to customize the tabs that you have in your layout. On a tab, you have the ability to add additional columns or move and delete columns. To add a new column to a tab, use the following procedure:
1. In the top left-hand corner of the page above the system tabs, locate and click the Content/Layout link.
2. You see the Manage Content/Layout page, which allows you to change aspects of your user layout, such as adding tabs, moving or deleting channels, etc.
3. Locate the image of the system layout and select the tab to which you want to add a new column by clicking its name.
4. You see an image containing icons for the existing channels and columns contained on the tab.
5. Locate the position where you want to add the new column and click the Add Column button.
![]()
6. You see a page with options that allow you to set the relative sizes of each column that the tab will contain.
7. Using the width fields, enter percentage values for each column.
8. To set the column widths, click Save Widths. You see the new column displayed in the layout image.
9. Click the return button, which is located in the upper left-hand side of the screen.
10. You are returned to the tab where you elected to add the column. At this point you may add channels to the column.
Q: How do I delete a column?
To delete a column, click the Select Column button.
![]()
The column now displays within a colored background indicating that it has been selected.
From the list of options provided, click "Delete this column."
Click the return button, which is located in the upper left-hand side of the screen.
You are returned to the tab where you elected to modify the column. From now on when you log on, you will see the modifications on this tab.
Q: Why can't I delete some columns?
If the column has a channel that you are not able to delete than you will not be able to delete that column.
Q: What happens to the channels in the column that I delete?
If you delete a column the channels in that column will be deleted as well. You can however re-add the channels.
Main FAQ Page |
Security |
Email |
Groups |
Supported Browsers |
Customizing insideND |
Errors |
Feedback |
General
Latest FAQ
How can I stop IE mixed content Popup?