DO NOT RUN THE CARD IF IT IS TOUCHING A METAL SURFACE!
Quick References
- Glossary of Arduino terms
- Ardunio Store Page
- Summary chip specs
- ATMEL ATSAM3X8E Full Data Sheet
- Getting Started
- Due Software Development Environment
- Arduino "Playground" wiki on using Arduinos
Hardware
- 32-b ARM core at 84MHz
- Program visible Memory
- Flash: 512KB in two 256KB banks
- SRAM: 96KB in a 64KB and separate 32KB bank
- Input/Output
- 54 digital I/O pins (3.3V only - will not drive 5V)
- 12 analog inputs; 2 digital to analog converters
- 4 serial I/O ports
- Power supply 7-12V: needed only for operation without programming connection
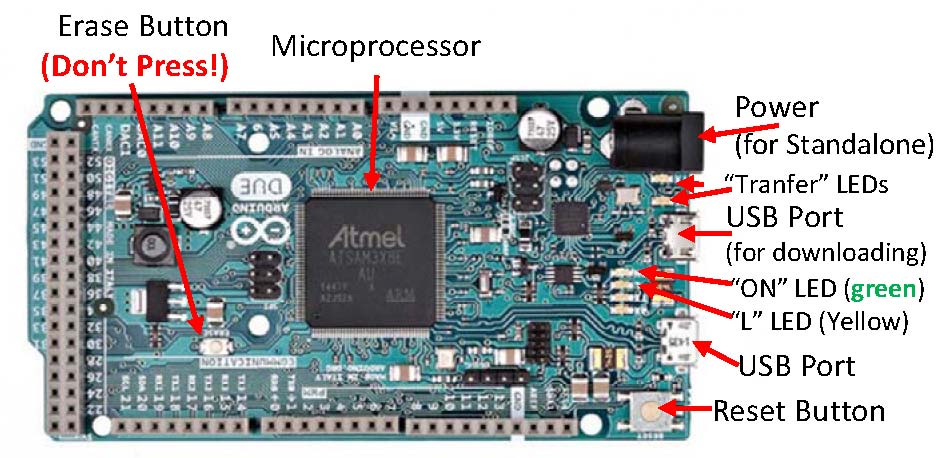
- The "Reset" button restarts the currently downloaded app
- The "Erase" button erases all the communication code to talk to the computer. DO NOT PRESS!!!!!!!
- A "Shield" is a board that plugs into an Arduino to provide some sort of additional capabilities, esp. I/O.
Arduino Programming Language
- Very C/C++ like
- Source files are called "sketches" and your set of files are stored in your "Sketchbook"
- When a sketch is downloaded to board, it is stored in Flash.
- Libraries are supported.
- Arduino Programming Tutorial
- void setup(){...body...} defines code that is executed only once at startup.
- https://www.arduino.cc/en/Reference/USBHost Package to allow Due card to serve as USB hub.
Sample Use of Web-based Software Development Environment
- You do not need to plug in a power supply to the board during programming.
- Attach the USB cable between you computer and the USB port on the board closest to the power plug. (Yellow and Green "L" and "On" LEDs should light)
- At least for Windows, you may need a Driver Plugin for your browser
- Create an account on the web server, and log in.
- You should now be at https://id.arduino.cc/
- Click on Software, then Web Editor - Try It Out
- When you are in the editor, select the "Select Board" in the upper middle, and scroll down to "Arduino Duw (Programming Port)" and select.
- Select "Examples," "Built-in", and then "Blink". There are two tabs "Blink.ino" is the code, "Blink.txt" is comments.
- The body of the "setup" function is executed once, and configures the I/O pin that will blink.
- The body of the main code is a loop that blinks the LED - see esp. the command "digitalWrite(LED_BUILTIN, ...)" that affects the selected LED on the board.
- Use the "Verify" window to check the code for correctness.
- Select the "->" (Upload) button in the upper middle. The "Rlink" button will show "busy" and the two LEDs next to the Programming USB will turn blink, showing communication between the board and computer is in progress.
- When download is complete, the "L" LED ("LED_BUILTIN" in the code) should start blinking slowly.
- Try modifying the on and off times, and reloading.
- You can save the modified file to your sketchbook. (select the "..." button)
- Now you can disconnect the USB cable, and plug in the power supply, and the app will continue to run.
Use Downloaded IDE
- Go to https://www.arduino.cc/en/Guide/ArduinoDue#toc2 to get to the "Download the Arduino IDE, select your platform, and install.
- Open "Tools," "Board," "Board Manager," and select "SAM Boards (32-bit ARM Cortex M3)" (should say for Arduino Due) boards. It takes a while to load. Note: after install, go back to Tools and select Arduino Due at bottom. You may also have to select "Ports" and select "COM3"
- Open the IDE.Select "File," Examples," "01.Blink" and compile and upload as before.
Basic Serial communication between IDE and board. (Useful for debugging projects)
- See the Tutorial on serial I/O
- Open the "Monitor" window on the left of the wed IDE screen or under the Tools tab of the downloaded IDE.
- If you copy, compile, and upload the sketch from the tutorial, a message appears in the Monitor Box "--- Start Serial Monitor SEND_RCVE ---"
- Enter a character string in the dialog box above the Monitor box and hit the "Send" button. You will see the characters echoed, along with decimal, hex formats
Basic Communication between program in host computer and Due
- TBA
- Flash: 512KB in two 256KB banks
- SRAM: 96KB in a 64KB and separate 32KB bank
- 54 digital I/O pins (3.3V only - will not drive 5V)
- 12 analog inputs; 2 digital to analog converters
- 4 serial I/O ports
- The body of the "setup" function is executed once, and configures the I/O pin that will blink.
- The body of the main code is a loop that blinks the LED - see esp. the command "digitalWrite(LED_BUILTIN, ...)" that affects the selected LED on the board.