The MicroStamp11 is a micro-controller module. Physically, the MicroStamp11 module is a small 1 by 2 inch printed circuit board (PCB) that is built around the Motorola 68HC11 micro-controller integrated circuit (IC). In addition to containing the micro-controller chip, the module holds a modest amount of circuitry devoted to power and memory management. The lefthand picture in figure 2 depicts a MicroStamp11 that has been plugged into a solderless breadboard. In the center of the module's front side is a large square IC. That IC is the 68HC11 micro-processor, the heart of the module. In addition to this large IC, however, you'll also see a number of smaller IC's.
In order to function the IC needs a power source. The power source for most IC's is a direct-current (DC) voltage of either 5 or 3.3 volts. The MicroStamp11 requires a 5 volt voltage source. If we were to apply a voltage in excess of this specified voltage level, then the IC would probably be destroyed. To prevent this from happening, the MicroStamp11 module has a voltage regulator that is capable of stepping down DC voltages to the required 5 volt level. The voltage regulator is one of the smaller components on the upper lefthand side of the MicroStamp11 module.
Micro-controllers are digital synchronous devices. By synchronous we mean that all instructions are executed in synchrony with a hardware clock. The speed of the micro-controller's hardware clock is set by an external crystal. The crystal is the silver cylinder on the righthand side of the micro-processor IC.
Finally, this particular micro-processor has a very limited amount of internal memory. For most of the programs you'll be writing, you'll need more memory than the chip possesses. Additional memory will be found on the back side of the module. The large IC on the back of the module is a 32 kilo-byte memory module. The other chips on the backside of the module help interface this memory chip to the 68HC11.
Finally, you'll find two sliding switches on the module. These switches are used to control the operational mode of the device. For our purposes there are two operational modes of interest: the boot mode and run mode. MicroStamp11 programs are written and compiled on a personal computer (PC) and then downloaded into the MicroStamp11 module over the PC's serial port using a special loader program. The downloaded program will only be stored in EEPROM, however, if the module is in boot mode. Once a program has been stored in memory, the application will begin running as soon as you switch the module into run-mode. You manually switch between boot and run mode using the switches shown in figure 2.
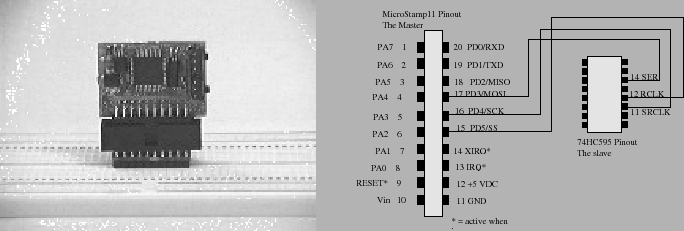
The MicroStamp11 module accesses the outside world through external pins. The righthand drawing in figure 2 shows the pin out for the module. This is a top down view of the device's pin out. Each pin on the device is labelled with one or two names. The precise function of these pins will be explained as needed in the labs.
In these labs, we've installed the MicroStamp11 into a docking module. The docking module is another PCB that has a special socket that accepts the MicroStamp11. The docking module also has a serial interface built onto it that can be used to connect the MicroStamp11 to a PC. It is through this serial interface that programs are downloaded into the module. In addition to the serial interface, the docking module has a ribbon cable that connects to the 20 pins coming out of the module. The ribbon cable terminates in a connector that can be plugged into a solderless breadboard, thereby allowing you to interface breadboarded circuits to the MicroStamp11 module. The docking module has a couple of light emitting diodes that provide visual indicators for "power" and module activity. Finally, the module has a "reset" button that allows you to restart a program that has been stored in the MicroStamp11.