Project 03: PlayIt
Overview
The goal of the third project is to allow you to practice build an interactive web application in Bootstrap and JavaScript. Therefore, this project requires you to use Python, Tornado, and SQLite on the server-side and Bootstrap and JavaScript on the client-side.
You are to work in your Raspberry Pi groups and your code should run on the provided machines (although you can do your development anywhere and using any resources you wish).
Once again, to keep track of your work and to facilitate collaboration, your group will use your Projects repository on Bitbucket. The starter code for the project has already been merged into your Projects repository. You simply need to do a git pull on your local clone to get the latest files.
After you have the files, you can see that the playit project as the
following layout:
playit
    \_ assets
            \_ css
                    \_ playit.css     PlayIt CSS
            \_ html
                    \_ playit.html    PlayIt HTML
            \_ js
                    \_ playit.js      PlayIt JavaScript
            \_ mp3                    MP3 Directory
            \_ yaml
                    \_ playit.yaml    PlayIt YAML
    \_ PlayIt
            \_ __init__.py
            \_ __main__.py            PlayIt Main Execution Module
            \_ database.py            PlayIt Database Module
            \_ web.py                 PlayIt Web Module
For this project, you need to modify the following files:
-
playit.css: This file contains your custom CSS styles. -
playit.html: This file contains the base HTML user interface. -
playit.js: This file contains the JavaScript code that adds interactivity to the web application. -
playit.yaml: This file contains information for the song database. -
database.py: This file contains the Python code for operating the SQlite database. -
web.py: This file contains the Python code that uses Tornado to handle HTTP requests.
Each of these files has a TODO marker that identifies what needs to be
implemented. Further details on what needs to be done are provided below.
The order in which you implement the different components is up to you. My recommendation is to get the HTML and CSS portions settled and then slowly add the JavaScript and Python support.
MP3 Files
In order for your application to play music, you will need to upload MP3
files to your Raspberry Pi. These files should go in the playit/assets/mp3
directory and be named 0001.mp3 for the track with TrackID of 1:
playit
    \_ assets
            \_ mp3                    MP3 Directory
                    \_ 0001.mp3       MP3 for Track 1
                    \_ 0002.mp3       MP3 for Track 2
                    \_ 0003.mp3       MP3 for Track 3
                    ...
While organizing and naming these files is tedious, it will allow us to avoid modifying our current database schema.
playit.yaml
You will need to modify the playit/assets/yaml/playit.yaml to reflect the
songs you have (as noted above). The format of this file is the same as in
Project 02.
To simplify your lives, do not include any tracks you don't have a MP3 for. Otherwise, the track will show up on the web application and the user will be confused when the song does not play.
HTML5 Audio
Only Chrome, Safari, and Internet Explorer support playing MP3 audio files. Due to patent restrictions, Firefox does not support this format.
User Interface
To construct the user interface, you will need to use Bootstrap and some custom CSS to stylize your HTML web page.
Custom CSS
Feel free to use any Bootswatch or custom CSS code.
playit.css
This file contains any custom CSS you wish to add on top of the existing Bootstrap theme. For instance, the provided file contains the following:
/* Sets top padding for fixed navigation bar */
body {
    padding-top: 140px;
}

/* Sets albumImage size */
#albumImage {
    width:  64px;
    height: 64px;
}

/* Sets sets song information color */
.song-information dl {
    color:  white;
}

/* Sets playlist image size */
.playlist-image {
    width:  64px;
    height: 64px;
}

/* Sets playlist cell vertical alignment */
.table > tbody > tr > td {
    vertical-align: middle;
}

/* Sets playlist active cell font weight */
.playlist-active {
    font-weight: bold;
}
Feel free to add, modify, or remove any of these as you see fit.
playit.html
This file provides the base HTML user interface as show below.
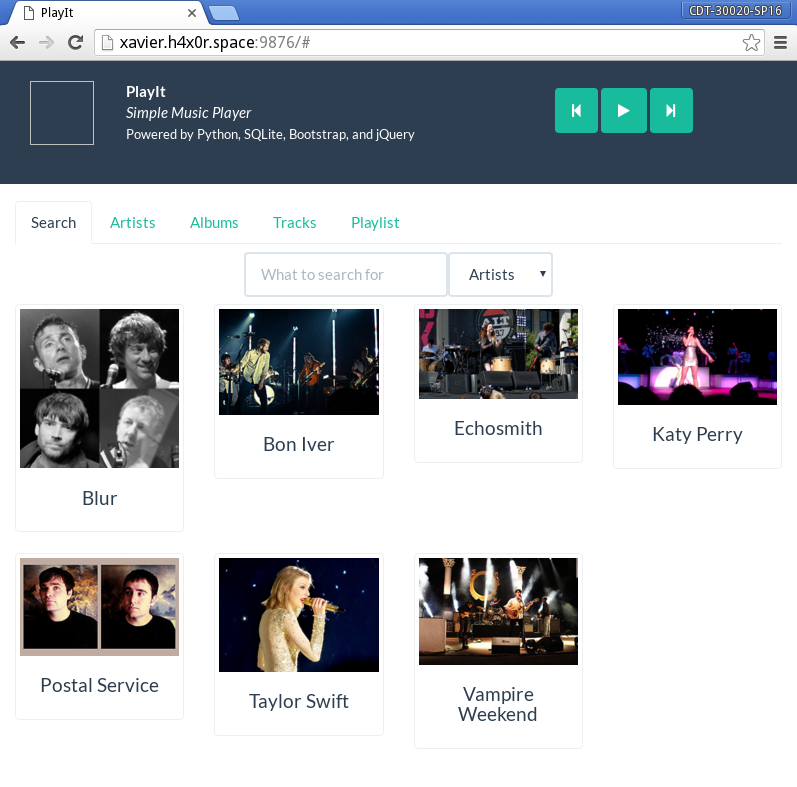
For this file, you will need to determine how to layout the application and then add the appropriate HTML elements with the appropriate identifiers.
In particular, you will need the following sections:
-
Current Song: This is a section on the page dedicated to displaying the current song information (album cover, track name, album name, artist) and the audio controls (previous song, play/pause, next song).
In the screenshot above, this is the blue bar at the top.
-
Music Library: This is a section of the page dedicated to displaying the music library and allows the user to browse by Artist, Albums, or Tracks and to search any of those categories.
In the screenshot above, this information is provided in the notebook tabs below the blue bar.
-
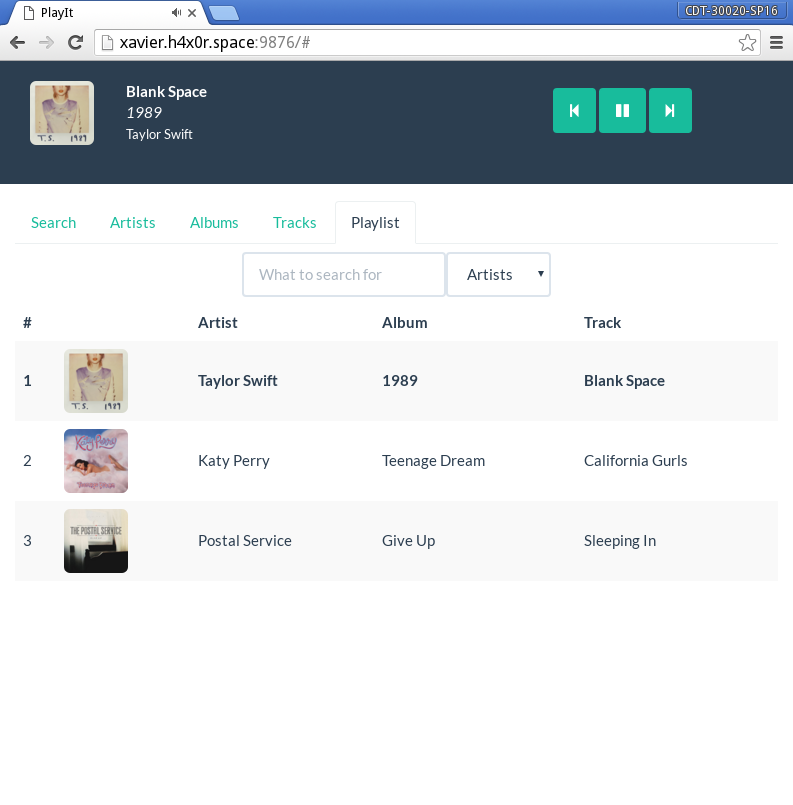
Playlist: This is a section of the page dedicated to displaying the current list of songs to be played.
In the screenshot below, this information is provided in a notebook tab.
Exactly how you arrange these elements is up to you, but the playit.html
has a set of TODOs that describe what elements you need to add and what to
identify them as.
Web Service
For the most part, the web back-end remains mostly the same except for the following:
-
We need to add another method to our
Databaseso we can return song information for a particular track. -
We need to return JSON data rather than HTML in our web application.
database.py
For the database, you will need to add one more method:
def song(self, track_id=None):
Given the
track_id, this method returns a single dict with the track name, artist name, album name, album image, track number, and song URL.
The dict should look something like this:
{
  'trackName'  :
  'artistName' :
  'albumName'  :
  'albumImage' :
  'trackNumber':
  'songURL'    :
}
The song URL should look something like this: /assets/mp3/XXXX.mp3 where is
the TrackId for the song.
Note, to grab the first result from a database query, you can use the fetchone method on the cursor after you execute it.
web.py
In the Tornado portion of the web application, the main changes are that the handlers now need to return JSON data rather than render HTML.
IndexHandler
This should simply render playit.html.
SearchHandler
This should perform a database search using the query for the appropriate
table and then return the results in the form of a JSON object:
self.write(json.dumps({
    'render' : 'gallery',       # Which render function to use
    'prefix' : table,           # Which prefix
    'results': list(results),   # Ensure we have a list
}))
ArtistHandler
This returns a JSON object with all the artists if artist_id is not
specified. Otherwise, it provides the album information about the specific
artist.
AlbumHandler
This returns a JSON object with all the albums if album_id is not
specified. Otherwise, it provides the track information about the specific
album.
TrackHandler
This returns a JSON object with all the tracks if track_id is not
specified. Otherwise, it provides the track information about the specific
track.
SongHandler
This returns a JSON object with the song information about the specific track.
Testing
As you develop these methods, you can test them by going to the appropriate URL and checking if you get back valid JSON data:
$ curl http://localhost:9876/song/1
Interactivity
The majority of the work will be done in playit.js, which is the
JavaScript file for adding interactivity to the web application. Below is
a walk-through of the provided JavaScript code and a description of what
you need to modify.
Incremental Development
You should build components and features one at a time and test them thoroughly, rather than trying to do everything at once.
playit.js - Constants
At the top of the playit.js file are three constants:
-
PlaylistQueue: This is the list that will contain the song information.When songs are added, they
pushedto the back of this list. -
PlaylistIndex: This is the index used to keep track of the current song in the Playlist.To go to the next song, we will increment this value. Conversely, when we go to the previous song, we will decrement this value. If we reach the front or back of the queue, we will wrap around to the other side.
-
CurrentNotebook: This is used to keep track of the currently visible notebook tab.
playit.js - AJAX Functions
This portion of the JavaScript file contains the requestJSON function
discussed in class.
playit.js - Display Functions
This portion of the JavaScript file contains functions for displaying the different user interface components of the application:
-
displayTab: This function displays the tab that was clicked on by the user by doing the following:-
Remove the
activetag from all the notebook tab elements.Hint: You can use
document.getElementsByClassNameto get a list of all thenav-tabelements, and then usegetElementsByTagNameto get a list of all the elements withlitag for the firstnav-tabelement. -
Add the
activetag to the current notebook tab element.Hint: You can use
this.classListto access the current element's list of classes. -
Check the current element's identifier and call the appropriate function:
displaySearch,displayArtist,displayAlbum,displayTrack,displayPlaylist.Hint: If you gave each notebook tab anchor an identifier, you can simply check
this.id.
-
-
displayResults: This is a helper function used by some of the other display functions that performs arequestJSONon the providedurland then checks the receiveddata'srenderfield to see whichrenderfunction to utilize:renderGallery,renderAlbum,renderTrack:function displayResults(url) { requestJSON(url, function(data) { if (data['render'] == 'gallery') { renderGallery(data['results'], data['prefix']); } else if (...) { ... } else if (...) { ... } }); }
-
displaySearch: This function displays the Search notebook tab by setting theCurrentNotebookto 'Search', updating thenotebook-body-navelement to display the search form, and then calling theupdateSearchResultsfunction.CurrentNotebook = 'Search'; var element = document.getElementById('notebook-body-nav'); var renderHTML = '<form class="navbar-form text-center">'; renderHTML += '<div class="form-group">'; renderHTML += ... renderHTML += '</div></form>'; element.innerHTML = renderHTML; return updateSearchResults();
Note: Be sure to register the
onkeyupeven of thequeryandtableinput elements to theupdateSearchResultsfunction. -
displayArtist: This function displays the Artist notebook tab by setting theCurrentNotebooktoArtists, settingartistto '' if it is undefined, and then calling thedisplayResultsfunction with the appropriate artist URL. -
displayAlbum: This function displays the Album notebook tab by setting theCurrentNotebooktoAlbums, settingalbumto '' if it is undefined, and then calling thedisplayResultsfunction with the appropriate album URL.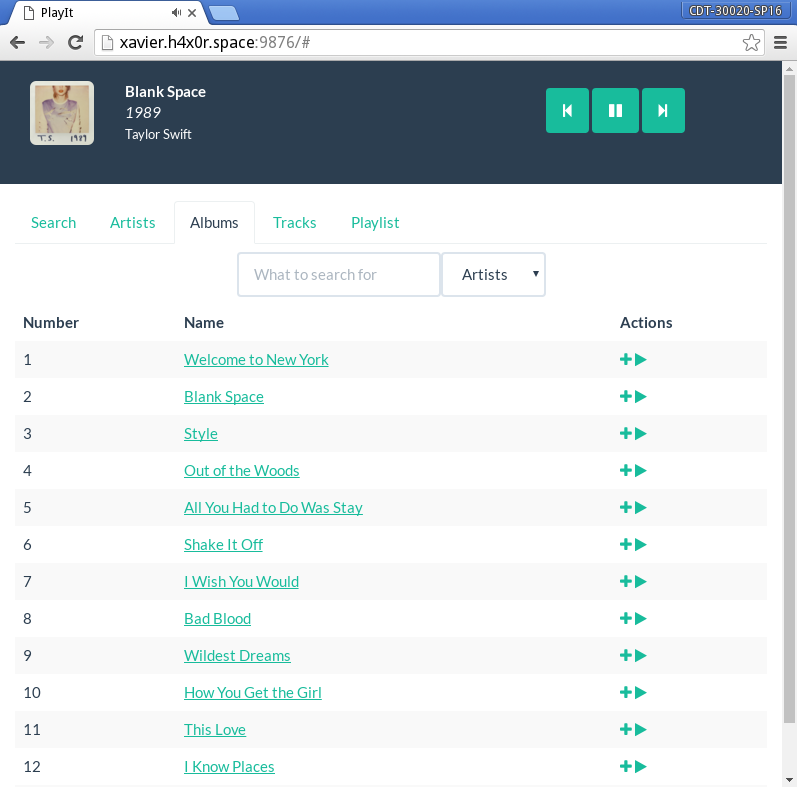
-
displayTrack: This function displays the Track notebook tab. setting theCurrentNotebooktoTracks, settingtrackto '' if it is undefined, and then calling thedisplayResultsfunction with the appropriate track URL.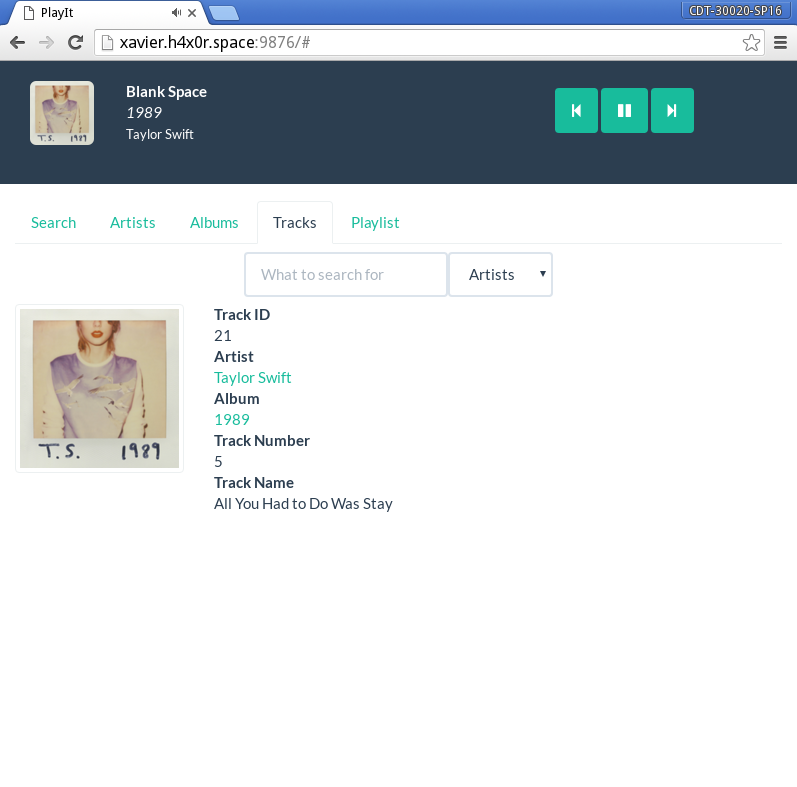
-
displayPlaylist: This function displays the Playlist notebook tab by setting theCurrentNotebooktoPlaylistand updating the contents ofnotebook-body-contentsto display a playlisttablethat displays the song number, song album cover, song artist, song album, and song track name.
playit.js - Render Functions
This portion of the JavaScript file contains helper functions for generating HTML:
-
renderGallery: This function is similar to thegallery.htmltemplate from Project 02 and should update thenotebook-body-contentselement with items from the givendataandprefix:<div class="row"> <div class="col-xs-3"> <a href="#" onclick="displayArtists(1)" class="thumbnail text-center"> <img src="..."> <div class="caption"><h4>...</h4></div> </a> </div> ... </div>
Note, you should create a new row every
4items. -
renderAlbum: This function is similar to thealbum.htmltemplate from Project 02 and should update thenotebook-body-contentselement with items from the givendata:<table class="table table-striped"> <thead> <th>Number</th> <th>Name</th> <th>Actions</th> </thead> <tbody> <tr> <td>TRACK_NUMBER</td> <td><a href="#" onclick="displayTrack(TRACK_ID)">TRACK_NAME</a></td> <td> <a href="#" onclick="addSong(TRACK_ID)"><i class="fa fa-plus"></i></a> <a href="#" onclick="playSong(TRACK_ID)"><i class="fa fa-play"></i></a> </td> </tr> ... </tbody> </table>
-
renderTrack: This function is similar to thetrack.htmltemplate from Project 02 and should update thenotebook-body-contentselement with items from the givendata:<div class="row"> <div class="col-sm-3" <a href="#" onclick="playSong(TRACK_ID)" class="thumbnail text-center"><img src="ALBUM_IMAGE"></a> </div> <div class="col-sm-6"> <dl> <dt>Track ID</dt> <dd>TRACK_ID</dd> <dt>Artist</dt> <dd><a href="#" onclick="displayArtist(ARTIST_ID)">ARTIST_NAME</a></dd> <dt>Album</dt> <dd><a href="#" onclick="displayAlbum(ALBUM_ID)">ALBUM_NAME</a></dd> <dt>Track Number</dt> <dd>TRACK_NUMBER</dd> <dt>Track Name</dt> <dd>TRACK_NAME</dd> </dl> </div> </div>
playit.js - Update Functions
This portion of the JavaScript file contains helper functions for updating portions of the user interface:
-
updateSearchResults: This function builds the URL for the/searchrequest by extracting the values form thequeryandtableelements and constructing the query string (ie. "/search?query=swift&table=Artists"). It then callsdisplayResultson this URL. -
updateSongInformation: This function gets the current song in thePlaylistQueueas noted byPlaylistIndex, and then:-
Updates the
trackName,albumName, andartistNameelements. -
Sets the
albumImagesource attribute. -
Sets the
playersource attribute. -
Calls
displayPlaylistif theCurrentNotebookisPlaylist.
-
playit.js - Audio Controls
This portion of the JavaScript file contains functions manipulating the playlist and audio control. The functions have been implemented for you, but you may modify them if you wish.
playit.js - Registrations
At the bottom of the playit.js file, you will need to register the callback
functions necessary to react to user events. In particular:
-
Tabs: You need to connect the
displayTabfunction to theonclickevents for each tab.Hint: You can use
document.getElementsByClassNameto get a list of all thenav-tabelements, and then usegetElementsByTagNameto get a list of all the elements withlitag for the firstnav-tabelement. -
Audio Buttons: You need to direct the
onclickevents for theprevButton,playButton, andnextButtonto the appropriate functions.Hint: You can use
documentElementByIdto get the specific button elements. -
Audio Player: You need to register the
endSongfunction to theonendedevent of theplayerelement.Hint: You can use
documentElementByIdto get the specific audio element.
Once the registrations are completed, you should call the displaySearch
function to display the initial page.
Running
To run web application, you can do the following:
$ python -m playit
A live example is provided at xavier.h4x0r.space:9876.
Submission
To submit your project, please commit your work to your Projects repository by the beginning of class, Tuesday, April 19, 2016.