Project 01: Networking
The goal of this project is to allow you to practice using low-level system calls related to networking along with object-oriented programming. To do this, you will create two new programs in Python:
-
thor.py: This is a basic HTTP client that will hammer a remote HTTP server by making multiple requests. -
spidey.py: This is a basic HTTP server that supports directory listings, static files, and CGI scripts.
Once you have these programs, you will conduct an experiment using
thor.py to test the latency and throughput of spidey.py.
For this assignment, you are to work in groups of 1, 2, or 3 and
record your source material in the project01 folder of your project
Bitbucket repository and push your work by 11:59 PM Wednesday, April 20,
2016.
Low-level Networking System Calls
For this project, you must use the low-level networking operations discussed in class: socket.socket, socket.bind, socket.listen, socket.connect, socket.accept, and socket.makefile.
This means that you cannot use the SocketServer framework or any other high-level networking libraries such as urllib.
Time Management and Incremental Development
This is a big project, which is why you have more time than usual and are allowed to work in groups. To complete this successfully, you will need to start early and work on it incrementally.
Activity 0: Readings + Bitbucket
Readings
The following readings provide a background into sockets and creating HTTP clients and servers in Python:
-
This provides a short introduction into programming sockets in Python.
-
Let's Build A Web Server. Part 1, Part 2, and Part 3
This is a series of articles that describe how to build a HTTP server in Python. It has much more information than you need (ie. we will not be implementing WSGI), but it provides a lot of illustrations and explanations. Read this to get an idea of what you will be doing, but don't get bogged down by the details.
-
Lecture 16 - Echo Client and Server
This is an example of a echo client and server. The
simple_echo_client.pyandsimple_echo_server.pyversions demonstrate the core socket operations required to to implement this simple protocol, while theecho_client.pyandecho_server.pydemonstrate more complete versions of these programs by incorporating object-oriented programming, error checking, logging, and command-line arguments.
Optional References:
-
This is an overview of the features of the socket module in Python.
Code re-use
You may use the echo_client.py and echo_server.py scripts as the basis
for thor.py and spidey.py respectively. In fact, you are encouraged to
do so, but you may also choose to write them in anyway you wish as long as
you only low-level system calls for sockets.
Bitbucket
Because you will be working in groups, one member of your group is to
fork the following projects repository on Bitbucket. Once you have
forked it, you should modify the README.md to include the name of the
group members and their netids.
For this project, the projects repository contains a project01/www
directory that can server as the DOCROOT for the spidey.py HTTP server.
Repository Access
Make sure that your repository is private and gives CSE-20189-SP16 at least write permissions to your repository.
To facilitate collaboration, the owner of the repository should also give team members write access as well.
Activity 1: Thor
The first program is thor.py, which is a basic HTTP client similar to
curl or wget that supports the following features:
-
Performs HTTP GET requests.
-
Performs multiple requests per process.
-
Supports utilizing multiple processes.
An example of thor.py can be found on the student machines at:
/afs/nd.edu/user15/pbui/pub/bin/thor
Usage
Given a
URL,thor.pyuses the HTTP protocol to fetch the contents of theURLand dumps them tostdout. The-rsets the number of HTTP request to be made per process (default is1), while-psets the number of processes (default is1). The-vflag sets the logging level to DEBUG.
Help Message
# Display help message
$ ./thor.py
Usage: thor.py [-r REQUESTS -p PROCESSES -v] URL

Options:

    -h           Show this help message
    -v           Set logging to DEBUG level

    -r REQUESTS  Number of requests per process (default is 1)
    -p PROCESSES Number of processes (default is 1)
Single Verbose Request
# Perform single request with debugging enabled
$ ./thor.py -v example.com
[2016-04-10 14:25:12] URL:  example.com
[2016-04-10 14:25:12] HOST: example.com
[2016-04-10 14:25:12] PORT: 80
[2016-04-10 14:25:12] PATH: /
[2016-04-10 14:25:12] Connected to 93.184.216.34:80...
[2016-04-10 14:25:12] Handle
[2016-04-10 14:25:12] Sending request...
[2016-04-10 14:25:12] Receiving response...
Accept-Ranges: bytes
Cache-Control: max-age=604800
Content-Type: text/html
Date: Sun, 10 Apr 2016 18:25:12 GMT
Etag: "359670651+gzip"
Expires: Sun, 17 Apr 2016 18:25:12 GMT
Last-Modified: Fri, 09 Aug 2013 23:54:35 GMT
Server: ECS (mdw/1275)
Vary: Accept-Encoding
X-Cache: HIT
x-ec-custom-error: 1
Content-Length: 1270
Connection: close

<!doctype html>
<html>
<head>
    <title>Example Domain</title>

    <meta charset="utf-8" />
    <meta http-equiv="Content-type" content="text/html; charset=utf-8" />
    <meta name="viewport" content="width=device-width, initial-scale=1" />
    <style type="text/css">
    body {
        background-color: #f0f0f2;
        margin: 0;
        padding: 0;
        font-family: "Open Sans", "Helvetica Neue", Helvetica, Arial, sans-serif;

    }
    div {
        width: 600px;
        margin: 5em auto;
        padding: 50px;
        background-color: #fff;
        border-radius: 1em;
    }
    a:link, a:visited {
        color: #38488f;
        text-decoration: none;
    }
    @media (max-width: 700px) {
        body {
            background-color: #fff;
        }
        div {
            width: auto;
            margin: 0 auto;
            border-radius: 0;
            padding: 1em;
        }
    }
    </style>
</head>

<body>
<div>
    <h1>Example Domain</h1>
    <p>This domain is established to be used for illustrative examples in documents. You may use this
    domain in examples without prior coordination or asking for permission.</p>
    <p><a href="http://www.iana.org/domains/example">More information...</a></p>
</div>
</body>
</html>
[2016-04-10 14:25:12] Finish
[2016-04-10 14:25:12]  14863 | Elapsed time: 0.02 seconds
[2016-04-10 14:25:12]  14863 | Average elapsed time: 0.02 seconds
[2016-04-10 14:25:12] Process 14863 terminated with exit status 0
Multiple Verbose Requests with multiple processes
# Hammer time with 10 processes doing 10 requests each
$ ./thor.py -v -p 10 -r 10 example.com 2>&1 > /dev/null | grep Average
[2016-04-10 14:31:58]  15124 | Average elapsed time: 0.02 seconds
[2016-04-10 14:31:58]  15119 | Average elapsed time: 0.02 seconds
[2016-04-10 14:31:58]  15122 | Average elapsed time: 0.02 seconds
[2016-04-10 14:31:58]  15121 | Average elapsed time: 0.02 seconds
[2016-04-10 14:31:58]  15118 | Average elapsed time: 0.02 seconds
[2016-04-10 14:31:58]  15127 | Average elapsed time: 0.02 seconds
[2016-04-10 14:31:58]  15123 | Average elapsed time: 0.02 seconds
[2016-04-10 14:31:58]  15120 | Average elapsed time: 0.02 seconds
[2016-04-10 14:31:58]  15126 | Average elapsed time: 0.02 seconds
[2016-04-10 14:31:58]  15125 | Average elapsed time: 0.02 seconds
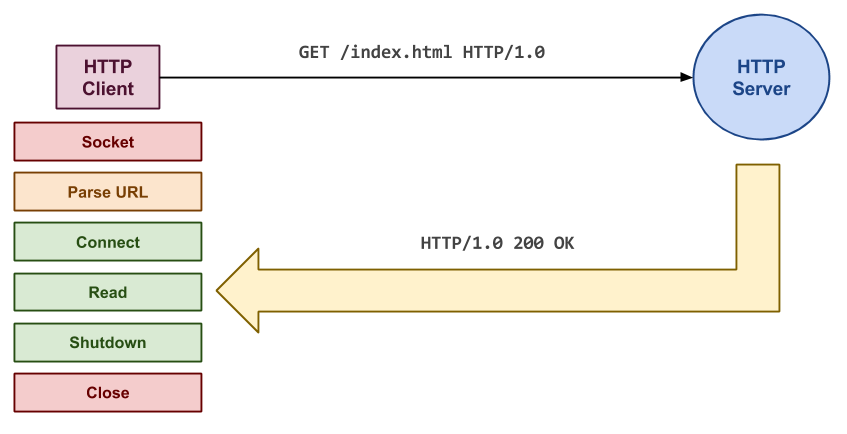
HTTP
Wikipedia has a decent overview of HTTP or the Hypertext Transfer Protocol. A basic client/server session looks like this:
# HTTP Client request
GET /index.html HTTP/1.0
Host: www.example.com

# HTTP Server Response
HTTP/1.0 200 OK
Date: Mon, 23 May 2005 22:38:34 GMT
Server: Apache/1.3.3.7 (Unix) (Red-Hat/Linux)
Last-Modified: Wed, 08 Jan 2003 23:11:55 GMT
ETag: "3f80f-1b6-3e1cb03b"
Content-Type: text/html; charset=UTF-8
Content-Length: 138
Accept-Ranges: bytes
Connection: close

<html>
<head>
<title>An Example Page</title>
</head>
<body>
Hello World, this is a very simple HTML document.
</body>
</html>
To implement the [client], we suggest that you build off the echo_client.py
example. Using this as a base, you will need to create a custom HTTPClient
class that derives from the TCPClient class.
Client Request
Given the URL, http://www.example.com/index.html, the client will
connect to the host www.example.com at port 80 and send the text:
GET /index.html HTTP/1.0<CRLF>
Host: www.example.com<cr><CRLF>
<CRLF>
Above, the <CRLF> represent the carriage return and line feed character
because the HTTP standard requires that each line end with \r\n. To
signal the end of the client request, the client must send an empty line as
shown above.
Your thor.py should accept URLs in the following format:
http://www.example.com
www.example.com
www.example.com/
www.example.com:80/
www.example.com:80/index.html
www.example.com/index.html
www.example.com/index.html?name=value
Server Response
Once the server receives the request, it will return a response consisting of some headers followed by an empty line and then the contents of the resource requested.
Your thor.py should simply dump the server response to STDOUT.
The gory details of HTTP can be found in the HTTP 1.0 RFC 1945.
Hints
-
Use
echo_client.pyas a base for your implementation. -
Use nc, curl, and wget to explore how HTTP requests are performed.
-
Your core control flow should look like this:
# Pseudo-code of core control flow for process in PROCESS: for request in REQUESTS: client = HTTPClient(URL) client.run() -
To support multiple processes, you should os.fork the specified number of
PROCESSES, perform the specified number ofREQUESTS, and then perform the necessary number of os.waits to cleanup the child processes. -
You should create a
HTTPClientclass similar to theEchoClientin theecho_client.pyexample. You will have to create your own contructor since theHTTPClienttakes a URL rather than theaddressandport:# HTTPClient class class HTTPClient(TCPClient): def __init__(self, url): TCPClient.__init__(self, None, None) # Initialize base class -
The trickiest part of this program will probably be parsing the URL. As shown above, you need to be able to support a wide variety of URLs. I recommend heavily using the str.split method to slice and dice the provided URL. Here is an example:
# Parsing URL
self.url = url.split('://')[-1]

if '/' not in self.url:
    self.path = '/'
else:
    self.path = '/' + self.url.split('/', 1)[-1]
In addition to the
pathyou will want to determine thehost,address, andportof the HTTP server from the given URL.Alternatively, you can use regular expressions and matching to extract groups using the re module.
-
If the user provides a domain name instead of an ip address, then you will need to use socket.gethostbyname to determine the
addressof the server. -
The core logic of the
HTTPClient.handlemethod is to write the HTTP request to the server as demonstrated above, and then read the response from the server and dump it toSTDOUT. -
To measure the time for each request, you can use the time.time function to get the start and end times.
-
You should handle errors gracefully and use the logging module to print debugging messages.
Activity 2: Spidey
The second program is spidey.py, which is a basic HTTP server similar to
Apache or NGINX that supports the following features:
-
Executing in either single connection mode or forking mode
-
Displaying directory listings
-
Serving static files
-
Running CGI scripts
-
Showing error messages
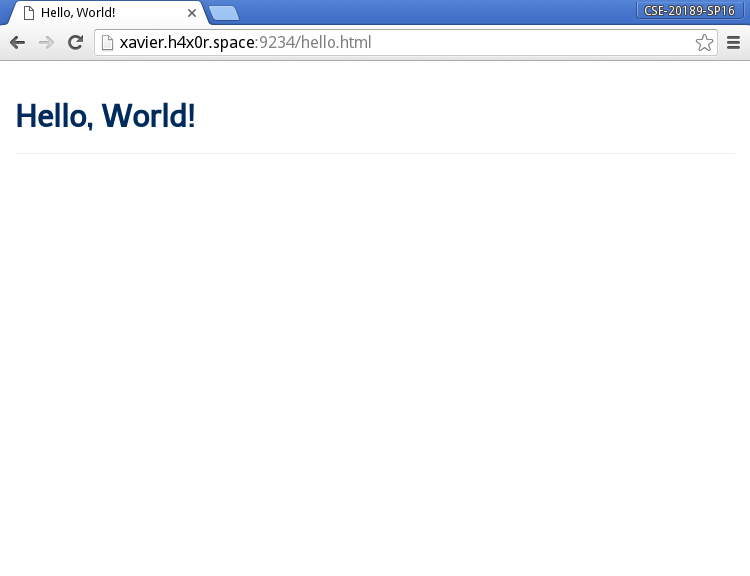
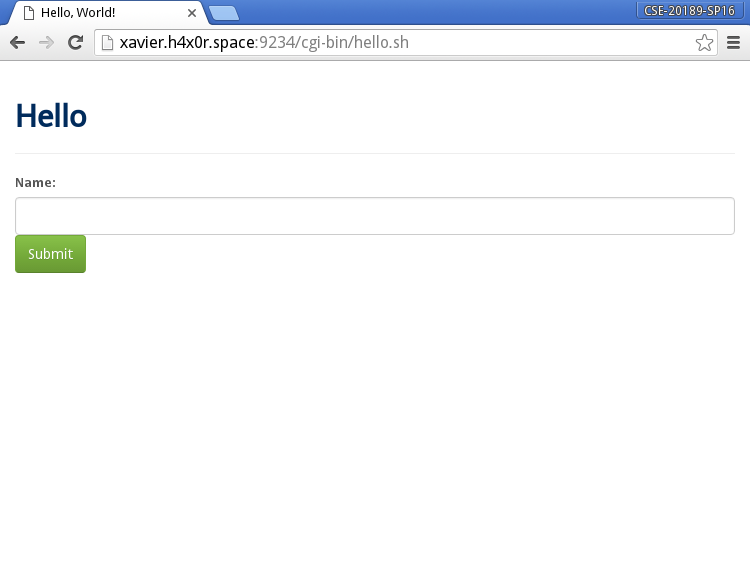
An example of spidey.py in action can be found at:
xavier.h4x0r.space:9234.
Usage
When executed,
spidey.pyopens a socket on thePORTspecified by the-pflag (default is9234) and handles HTTP requests for files in theDOCROOTdirectory specified by the-dflag (default is current directory). If-fis specified, thenspidey.pywill for a child process for each incoming client request. The-vflag sets the logging level to DEBUG.
Help Message
# Display help message
$ ./spidey.py -h
Usage: spidey.py [-d DOCROOT -p PORT -f -v]

Options:

    -h         Show this help message
    -f         Enable forking mode
    -v         Set logging to DEBUG level

    -d DOCROOT Set root directory (default is current directory)
    -p PORT    TCP Port to listen to (default is 9234)
Verbose Single Connection Mode
# Serve content one connection at a time with debugging enabled
$ ./spidey -v
[2016-04-10 16:28:55] Listening on 0.0.0.0:9234...
[2016-04-10 16:29:01] Accepted connection from 10.63.11.140:59770
[2016-04-10 16:29:01] 10.63.11.140:59770 | Connect
[2016-04-10 16:29:01] 10.63.11.140:59770 | Parsing ['GET', '/', 'HTTP/1.1']
[2016-04-10 16:29:01] 10.63.11.140:59770 | Handle Directory
[2016-04-10 16:29:01] 10.63.11.140:59770 | Finish
[2016-04-10 16:29:01] Accepted connection from 10.63.11.140:59772
[2016-04-10 16:29:01] 10.63.11.140:59772 | Connect
[2016-04-10 16:29:01] 10.63.11.140:59772 | Parsing ['GET', '/favicon.ico', 'HTTP/1.1']
[2016-04-10 16:29:01] 10.63.11.140:59772 | Handle Error
[2016-04-10 16:29:01] 10.63.11.140:59772 | Finish
[2016-04-10 16:29:03] Accepted connection from 10.63.11.140:59774
[2016-04-10 16:29:03] 10.63.11.140:59774 | Connect
[2016-04-10 16:29:03] 10.63.11.140:59774 | Parsing ['GET', '/asdf', 'HTTP/1.1']
[2016-04-10 16:29:03] 10.63.11.140:59774 | Handle Error
[2016-04-10 16:29:03] 10.63.11.140:59774 | Finish
[2016-04-10 16:29:03] Accepted connection from 10.63.11.140:59776
[2016-04-10 16:29:03] 10.63.11.140:59776 | Connect
[2016-04-10 16:29:27] 10.63.11.140:59776 | Finish
Verbose Forking Mode with DOCROOT
# Serve content concurrently via forking from specified directory with debugging enabled
$ ./spidey -v -f -d www
[2016-04-10 16:35:58] Listening on 0.0.0.0:9234...
[2016-04-10 16:36:04] Accepted connection from 10.63.11.140:59822
[2016-04-10 16:36:04] 10.63.11.140:59822 | Connect
[2016-04-10 16:36:04] 10.63.11.140:59822 | Parsing ['GET', '/', 'HTTP/1.1']
[2016-04-10 16:36:04] 10.63.11.140:59822 | Handle Directory
[2016-04-10 16:36:04] 10.63.11.140:59822 | Finish
[2016-04-10 16:36:07] Accepted connection from 10.63.11.140:59834
[2016-04-10 16:36:07] 10.63.11.140:59834 | Connect
[2016-04-10 16:36:07] 10.63.11.140:59834 | Parsing ['GET', '/songs', 'HTTP/1.1']
[2016-04-10 16:36:07] 10.63.11.140:59834 | Handle Directory
[2016-04-10 16:36:07] 10.63.11.140:59834 | Finish
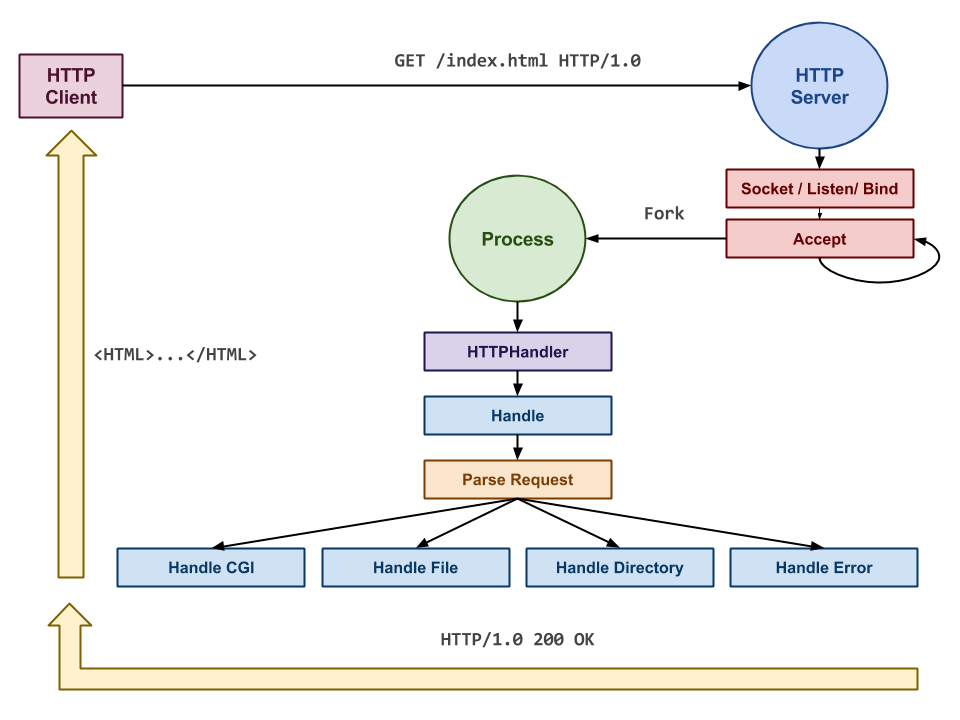
HTTP
As noted above, HTTP works in a request and response communication
model. To implement the server, we suggest that you build off the
echo_server.py example. Using this as a base, you will need to create a
custom HTTPHandler that derives from the BaseHandler class.
Client Request
Once a connection is established, then the HTTPHandler.handle method should
call an internal _parse_request method that reads and parses the HTTP
request. For instance, given the following HTTP request:
GET /cgi-bin/env.sh?name=value HTTP/1.1
Host: xavier.h4x0r.space:9234
Connection: keep-alive
Cache-Control: max-age=0
Accept: text/html,application/xhtml+xml,application/xml;q=0.9,image/webp,*/*;q=0.8
Upgrade-Insecure-Requests: 1
User-Agent: Mozilla/5.0 (X11; Linux x86_64) AppleWebKit/537.36 (KHTML, like Gecko) Chrome/49.0.2623.110 Safari/537.36
Accept-Encoding: gzip, deflate, sdch
Accept-Language: en-US,en;q=0.8
This information should get parsed and exported to the process environment (ie. os.environ) in the following manner:
-
The first line contains request with information for
REQUEST_METHOD,REQUEST_URI, andQUERY_STRING.QUERY_STRING=name=value REQUEST_METHOD=GET REQUEST_URI=/cgi-bin/env.sh -
All of the lines after the request are the HTTP headers, which should be parsed by splitting the key and value, capitalizing the key, replacing
-with_, and prefixing the key withHTTP_. For instance, the key, value pairs above should get translated into:HTTP_ACCEPT_ENCODING=gzip, deflate, sdch HTTP_ACCEPT_LANGUAGE=en-US,en;q=0.8 HTTP_ACCEPT=text/html,application/xhtml+xml,application/xml;q=0.9,image/webp,*/*;q=0.8 HTTP_CONNECTION=keep-alive HTTP_HOST=xavier.h4x0r.space:9234 HTTP_REFERER=http://xavier.h4x0r.space:9234/cgi-bin HTTP_UPGRADE_INSECURE_REQUESTS=1 HTTP_USER_AGENT=Mozilla/5.0 (X11; Linux x86_64) AppleWebKit/537.36 (KHTML, like Gecko) Chrome/49.0.2623.110 Safari/537.36
Likewise, the [TCP] connection address should be parsed into REMOTE_ADDR,
REMOTE_HOST for the remote client's address, and REMOTE_PORT for the port
they are using.
REMOTE_ADDR=10.63.11.140
REMOTE_HOST=10.63.11.140
REMOTE_PORT=60138
All of these pairs need to be exported to os.environ because the CGI scripts will read those variables in order to learn about the current request.
Once the HTTP request and headers have been parsed, the HTTPClient.handle
method will need to then constructor the uripath of the request and then
check what type of file it is and dispatch off of that:
# HTTPClient.handle Pseudo-code
def handle(self):
    # Parse HTTP request and headers
    self._parse_request()

    # Build uripath by normalizing REQUEST_URI
    self.uripath = os.path.normpath(self.docroot + os.environ['REQUEST_URI'])

    # Check path existence and types and then dispatch
    if self.uripath does not exist or self.uripath does not start with self.docroot:
        self._handle_error(404) # 404 error
    elif self.uripath is a file and is executable
        self._handle_script()   # CGI script
    elif self.uripath is a file and is readable
        self._handle_file()     # Static file
    elif self.uripath is a directory and is readable
        self._handle_directory()# Directory listing
    else:
        self._handler_error(403)# 403 error
The reason why we need to construct the uripath is so we know how the
requested URL maps to the local filesystem. To prevent a malicious user
from being able to explore files outside the DOCROOT, we use os.path.normpath
to normalize the paths and check that the resolved path starts with the
DOCROOT.
Server Response
As shown above, there are four different types of HTTP responses that
spidey.py should support:
-
Directory Listing: This displays a listing of the entries in a directory. At the minimum it should show the name, size, and type of each entry.

-
Static File: This opens the contents of the specified file and streams it back to the client via the socket:
-
CGI Scripts: This executes a script on the server and streams the results back to the client via the socket:
-
Errors: This displays a HTTP error and a funny picture:

Note: a valid HTTP response looks like this:
HTTP/1.0 200 OK
Content-Type: text/html

<html>
...
</html>
The first line contains the HTTP status code for the request. The second
line instructs the client (i.e. web browser) what type of data to expect
(i.e. mimetype). Each of these lines should be terminated with \r\n.
Additionally, it is important that after the Content-Type line you include
a blank line consisting of only \r\n. Most web clients will expect this
blank line before parsing for the actual content.
Hints
-
Use
echo_server.pyas a base for your implementation. -
You should create a
HTTPHandlerclass similar to theEchoHandlerin theecho_server.py. You will have to create your own constructor since theBaseHandlerdoes not set adocrootinstance variable:# HTTPHandler class class HTTPHandler(BaseHandler): def __init__(self, fd, address, docroot=None): BaseHandler.__init__(self, fd, address) -
To implement
HTTPHandler._parse_request, you will once again want to heavily utilize str.split and other string utilities. For example:# Set REMOTE_ADDR from address os.environ['REMOTE_ADDR'] = self.address.split(':', 1)[0] # Read stream and set REQUEST_METHOD data = self.stream.readline().strip().split() os.environ['REQUEST_METHOD'] = data[0]Alternatively, you can use regular expressions and matching to extract groups using the re module.
-
To implement
HTTPHandler._handle_fileyou will need to determine the file's mimetype using the followingmimetype, _ = mimetypes.guess_type(self.uripath) if mimetype is None: mimetype = 'application/octet-stream'This uses the mimetypes.guess_type function to guess the mimetype and if that fails, then it defaults to
application/octet-stream.Once you know the mimetype, then you should write the HTTP response status to the socket, open the requested file in binary mode, and then read from the file and write to the socket until everything has been read from the file.
-
To implement
HTTPHandler._handle_directory, you will need to construct a HTML page that lists the contents of the directory. To get the contents of the directory, you can use os.listdir and then use the sorted function to order the list.To sort the contents of the directory so that directories come before files, you will need to implement a custom comparison function and pass that into the sorted call.
-
To implement
HTTPHandler._handle_script, you will need to use the os.popen command to execute the script and stream the output of the command to the socket:# Pseudo-code Set SIGCHLD to Default for line in Popen(uripath): Write line to socket Set SIGCHLD to IgnoreThe reason why we need to set
SIGCHLDto the default handler is that os.popen needs to catchSIGCHLD(it interally forks and execs) otherwise we will get an exception. After the os.popen we revert back to ignoring our children. -
To implement
HTTPHandler._handle_error, you will need to construct a HTML page that displays the specified error code. I also recommend you insert a jovial picture for the visitor's amusement. -
To support forking mode, you will need to modify the
runmethod of theTCPServerclass to have the following control flow:# Pseudo-code Bind and Listen on Socket Ignore Children while True: Accept Socket into client, address if not self.forking: self._handle(client, address) else: Fork if Process is Child: self._handle(client, address) os._exit(0) else: client.close()In this model, we bind and listen to the socket as normal. Rather than wait for each child, we will simply tell the OS that we wish to ignore them and let
initadopt them.When we accept a connection, we will then check if we have forking enabled. If not, we do what we normally do. Otherwise, we fork and in the child process we handle the connection and then exit via os._exit. In the parent, we simply close the client connection.
Activity 3: Experiments
Once you have completed both thor.py and spidey.py, you are to conduct
expermients that answer the following questions:
-
What is the average latency of
spidey.pyin single connection vs forking mode for: directory listings, static files, CGI scripts? -
What is the average throughput of
spidey.pyin single connection vs forking mode for: small static files (1KB), medium static files (1MB), and large static files (1GB)?
For each question, you must determine how you want to explore the question
and how you wish to use thor.py to test spidey.py.
You should create shell scripts to automate running your experiments multiple times to generate a reasonable amount of data.
Report
After you have conducted your experiments and collected your data, you are to generate a charts and diagrams using gnuplot and then use LaTeX to write a report that answers the following questions:
-
Summary:
Summarize what was accomplished in the project (ie. what worked and what didn't work) and how the work was divided among the group members.
-
Latency:
Describe how your group went about measuring the average latency of the different types of requests. You should have at least one diagram that illustrates the results of your experiments.
-
Throughput:
Describe how your group went about measuring the average throughput of the different file sizes. You should have at least one diagram that illustrates the results of your experiments.
-
Analysis:
Discuss the results of your experiments and explain why you received the results you did. What are the advantages and disadvantages to the forking model?
-
Conclusions:
Wrap up the report by describing what you learned from not only the experiments but also the lab assignment as a whole.
Guru Point (Point 1)
For extra credit, you are to extend your spidey.py web server to do any of
the following:
Directory Listings
-
Display thumbnails for images.
-
Display HTML5 audio element for audio files.
CGI Scripts
-
Write a guest book script that allows users to add entries to a running message board.
-
Write a survey or personality test script.
-
Write a multiple-choice quiz script of the topic of your choice.
To receive credit, you must show a TA or the instructor your code and a demonstration of it in action.
Submission
To submit your assignment, please commit your work to the project01 folder
in your projects Bitbucket repository by 11:59 PM Wednesday, April
20, 2016. Your project01 folder should contain at least the following
files:
README.mdMakefilethor.pyspidey.pyreport.tex
You also should include any data you collected for the report, along with the scripts you used to run the experiments and process the data.