Homework 05: Processing Data
The goal of this homework assignment is to allow you to practice using Python to process data using functional programming techniques and MapReduce. In this assignment, you will write a script that brute-force attacks a large collection of passwords using multiple processes and a pair of scripts that implements an inverted index.
For this assignment, record your scripts and any responses to the following
activities in the in the homework05 folder of your assignments GitLab
repository and push your work by 11:59 PM Wednesday, March 8, 2017.

Activity 1: Hulk Smash (10 Points)
With various password leaks being announced on a daily basis, there has been a lot of discussion on password hygiene and password strength. There is even a website to check have i been pwned.
In all decent password accounting systems, the raw password is rarely stored. Instead a cryptographic hash such as MD5 or SHA1 is used to record a user's password digest or checksum and it is these hashes that are leaked to outsiders in these all too frequent breaches. Because these cryptographic hash functions are generally considered one-way functions, attackers cannot directly obtain the original input password even though they know the output of the cryptographic hash.
For instance, the MD5 digest of goirish is:
$ printf goirish | md5sum
c761cc3341c91238ba735b26874572a0  -
As you can see, the string c761cc3341c91238ba735b26874572a0 does not
provide an attacker any clues about the original password goirish. To
obtain the original text, attackers often employ various
techniques
such as brute-force cracking.
Task 1: hulk.py
For the first activity, you are to create hulk.py, which is a script that
uses brute-force to smash a set of MD5 hashes:
$ ./hulk.py -h
Usage: hulk.py [-a alphabet -c CORES -l LENGTH -p PATH -s HASHES]
    -a ALPHABET Alphabet to use in permutations
    -c CORES    CPU Cores to use
    -l LENGTH   Length of permutations
    -p PREFIX   Prefix for all permutations
    -s HASHES   Path of hashes file
Given, an ALPHABET (default is abcdefghijklmnopqrstuvwxyz0123456789),
hulk.py will compute the MD5 hash of every permutation of the
ALPHABET for the specified LENGTH and check if it is in the set of
HASHES. If a PREFIX is specified, then this should be inserted before
each candidate permutation.
For instance, suppose we had a hashes.txt file that contained the following
MD5 checksums:
0cc175b9c0f1b6a831c399e269772661
92eb5ffee6ae2fec3ad71c777531578f
4a8a08f09d37b73795649038408b5f33
900150983cd24fb0d6963f7d28e17f72
If we executed hulk.py with a LENGTH of 1, we should get the following
result:
$ ./hulk.py -l 1 -s hashes.txt
a
b
c
That is, hulk.py determined that three of the hashes correspond to the
passwords a, b, and c.
If we executed hulk.py with a LENGTH of 2 and a PREFIX of a, we
should get the following result:
$ ./hulk.py -l 2 -s hashes.txt -p a
abc
That is, hulk.py determined that 1 of the hashes corresponds to the
password abc. Note, we could have achieved the same results by executing:
$ ./hulk.py -l 3 -s hashes.txt
abc
The difference is the former searches each permutation in the form aXX
where X is a letter from the ALPHABET due to the PREFIX of a, while
the latter searches each permutation in the form XXX.
Finally, if CORES is greater than 1 and the LENGTH is greater than 1,
the script will use the multiprocessing module to brute-force passwords
in parallel with the specified number of CORES:
$ ./hulk.py -l 1 -c 2 -s hashes.txt
a
b
c
Starter Code
To help you get started, the instructor has provided you with the following starter code:
# Download and display starter code
$ curl -O https://www3.nd.edu/~pbui/teaching/cse.20289.sp17/static/py/hulk.py
The starter code contains the following:
#!/usr/bin/env python2.7

import functools
import hashlib
import itertools
import multiprocessing
import os
import string
import sys

# Constants

ALPHABET    = string.ascii_lowercase + string.digits
ARGUMENTS   = sys.argv[1:]
CORES       = 1
HASHES      = 'hashes.txt'
LENGTH      = 1
PREFIX      = ''

# Functions

def usage(exit_code=0):
    print '''Usage: {} [-a alphabet -c CORES -l LENGTH -p PATH -s HASHES]
    -a ALPHABET Alphabet to use in permutations
    -c CORES    CPU Cores to use
    -l LENGTH   Length of permutations
    -p PREFIX   Prefix for all permutations
    -s HASHES   Path of hashes file'''.format(os.path.basename(sys.argv[0]))
    sys.exit(exit_code)

def md5sum(s):
    ''' Generate MD5 digest for given string.

    >>> md5sum('abc')
    '900150983cd24fb0d6963f7d28e17f72'

    >>> md5sum('wake me up inside')
    '223a947ce000ce88e263a4357cca2b4b'
    '''
    # TODO: Implement

def permutations(length, alphabet=ALPHABET):
    ''' Yield all permutations of alphabet of specified length.

    >>> list(permutations(1, 'ab'))
    ['a', 'b']

    >>> list(permutations(2, 'ab'))
    ['aa', 'ab', 'ba', 'bb']

    >>> list(permutations(1))       # doctest: +ELLIPSIS
    ['a', 'b', ..., '9']

    >>> list(permutations(2))       # doctest: +ELLIPSIS
    ['aa', 'ab', ..., '99']
    '''
    # TODO: Implement as a generator

def smash(hashes, length, alphabet=ALPHABET, prefix=''):
    ''' Return all password permutations of specified length that are in hashes

    >>> smash([md5sum('ab')], 2)
    ['ab']

    >>> smash([md5sum('abc')], 2, prefix='a')
    ['abc']

    >>> smash(map(md5sum, 'abc'), 1, 'abc')
    ['a', 'b', 'c']
    '''
    # TODO: Implement with list or generator comprehensions

# Main Execution

if __name__ == '__main__':
    # TODO: Parse command line arguments

    # TODO: Load hashes set

    # TODO: Execute smash function to get passwords

    # TODO: Print passwords

# vim: set sts=4 sw=4 ts=8 expandtab ft=python:
You are to complete the sections marked TODO in order to complete the
hulk.py script.
Notes
-
For
md5sum, you must compute the MD5 hash of a string by using the hashlib library. -
For
permutations, you must implement a generator using the yield statement. Consider a recursive algorithm for generating the permutations. -
For
smash, you must implement the function using only list or generator comprehensions (you can use multiple ones). -
You can parse the command line options as we have done in the past, or you can investigate using argparse or getopt.
-
You must use either a dict or set to store the collection of MD5 hashes.
-
You should execute the
smashfunction to get a list of passwords for the specified command line options.As noted above, if
CORESis greater than1and theLENGTHis greater than1, you must use the multiprocessing module to brute-force the passwords in parallel.To allow for parallel execution, you will need to do divide up the work normally done by one process. The easiest way to accomplish this is by taking advantage of the
prefixfeature ofsmash.For instance, if the specified
LENGTHis4, you cansmashpasswords of length3withprefixes of [a,b, ...,9]. Likewise if the specifiedLENGTHis5, you cansmashpasswords of length3withprefixes of [aa,ab, ...,zz].Because the
imapfunction of the multiprocessing.Pool object only allows passing one argument to the function to apply, you will need to use the functools.partial function to curry the arguments:subsmash = functools.partial(smash, hashes, ..., ALPHABET)
The functools.partial basically creates a new function that already has the initial
hashes,length, andalphabetparameters set. This means thatsubsmashonly takes theprefixargument.You can then use this new
subsmashfunction along with itertools.chain.from_iterable to produce a list of passwords:passwords = itertools.chain.from_iterable(pool.imap(subsmash, ...))
Task 2: Testing
To aid you in testing the hulk.py script, we are providing you with
test_hulk.sh, which you can use as follows:
# Download script
$ curl -O http://www3.nd.edu/~pbui/teaching/cse.20289.sp17/static/sh/test_hulk.sh

# Download hashes.txt
$ curl -O http://www3.nd.edu/~pbui/teaching/cse.20289.sp17/static/txt/hashes.txt

# Make script executable
$ chmod +x test_hulk.sh

# Run test script
$ ./test_hulk.sh
hulk.py tests successful!
In addition to the test script, the starter code contains embedded doctests, which you can verify by doing the following:
$ python -m doctest -v hulk.py
...
3 items passed all tests:
   2 tests in hulk.md5sum
   4 tests in hulk.permutations
   3 tests in hulk.smash
9 tests in 5 items.
9 passed and 0 failed.
Test passed.
This will test each of the three functions individually and thus allow you to build and test your program one function at a time.
Incremental Development
Do not try to write the whole program at once. Implement one feature at a
time and verify that it works. The doctests are unit tests that
allow you to test individual components, while the test_hulk.sh allows you
to test the completed solution.
Task 3: Deadpool
Once you are confident that your program is correct, you are to use hulk.py
to brute-force crack set of 10268 password hashes found at:
http://www3.nd.edu/~pbui/teaching/cse.20289.sp17/static/txt/hashes.txt
To keep track of who has cracked the most passwords, you can submit your set of discovered passwords to the deadpool:
$ cat PASSWORDS | curl --data-binary @- http://xavier.h4x0r.space:9111/NETID
Replace PASSWORDS with the name of the file with your passwords and NETID
with your Notre Dame NetID:
# Generate passwords of length 1 and store them in passwords.txt
$ ./hulk.py -l 1 | tee passwords.txt
...

# Upload passwords.txt
$ cat passwords.txt | curl --data-binary @- http://xavier.h4x0r.space:9111/pbui
{"timestamp": 1488333215.967784, "passwords": 36}
For full credit, you must crack at least 6000 passwords. There are
10268 total hashes. Each password is no more than 8 characters long and
only consists of lowercase letters and numeric digits.
NSFW Passwords
Many of the passwords in the password hashes collection were pulled from a set of the top 10,000 most commonly used passwords on the Internet, so the set may contain some vulgar and offensive words.
Parallel Universe
To speed up your computations, consider using different values of for
CORES:
$ ./hulk.py -l 6 -c 2 # Use 2 processes
To find out how many cores a Linux machine has, you can do:
$ cat /proc/cpuinfo | grep processor | wc -l
Task 4: README.md
In your README.md, respond to the following prompts:
-
Describe how you implemented the
hulk.pyscript. In particular, briefly discuss:-
How you generated all the candidate password combinations.
-
How you filtered the candidates to only contain valid passwords.
-
How you handled processing on multiple cores.
-
How you verified that your code works properly.
-
-
Complete the following table for passwords of length
6:Processes Time 1 2 4 8 16 How does the number of processes utilized affect the amount of time required to crack passwords?
-
From your experience in this project and recalling your Discrete Math knowledge, what would make a password more difficult to brute-force: more complex alphabet or longer password? Explain.
Activity 2: Inverted Index
For this activity, you are to write both the map and reduce components for generating an Inverted Index:
The map function parses each line in an input file, and emits a sequence of
<word, line number>pairs. The reduce function accepts all pairs for a given word, sorts the corresponding line numbers, and emits a<word, list(line numbers)>pair. The set of all the output pairs forms a simple inverted index.
Inspiration
Note, this problem is inspired by the description of an Inverted Index in the MapReduce: Simplified Data Processing on Large Clusters paper.
Local Map-Reduce
As discussed in class, the canonical Map-Reduce example is performing a word count on a large collection of documents as shown below:
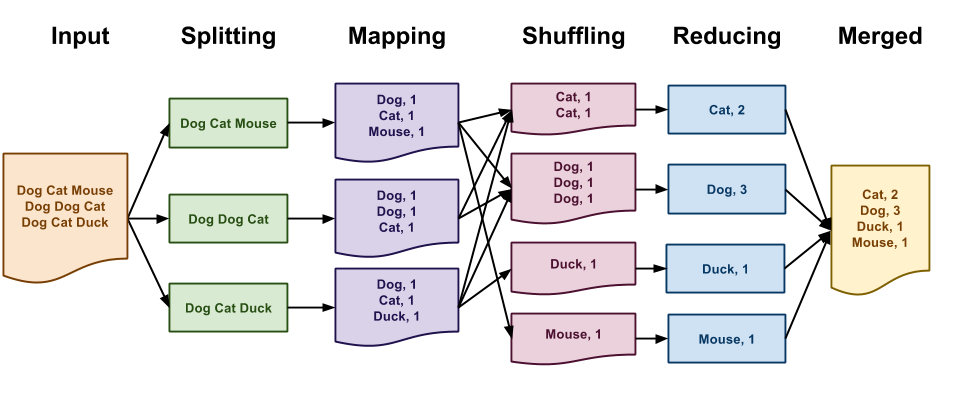
In the Map-Reduce programming model, you must define two functions:
-
A map function that transforms, filters, or selects input data
-
A reduce function that aggregates, combines, or collections results.
While Map-Reduce is normally performed on massive datasets using many networked machines, we can use the Hadoop Streaming interface to write Map-Reduce programs that run on small datasets on our local machines. The Hadoop Streaming interface simply specifies that both the map and reduce functions must emit key value pairs in the following format:
key\tvalue
That is, each line of output consists of the key followed by a tab
character (i.e. \t) and then the value.
With this in mind, we can implement the word count application using the Hadoop Streaming interface with the following Python scripts:
# map.py
import sys

for line in sys.stdin:
    for word in line.strip().split():
        print '{}\t{}'.format(word, 1)

# reduce.py
import sys

counts = {}
for line in sys.stdin:
    k, v  = line.split('\t', 1)
    counts[k] = counts.get(k, 0) + int(v)

for k, v in sorted(counts.items()):
    print '{}\t{}'.format(k, v)
Given these two Python scripts, we can simulate Map-Reduce on a local machine by doing the following:
$ cat inputs.txt | ./map.py | sort | ./reduce.py
The end result will be a stream of key value pairs in the Hadoop Streaming format.
Task 1: iv_map.py and iv_reduce.py
For this activity, you will have to write two separate scripts iv_map.py
and iv_reduce.py that uses the Hadoop Streaming interface to generate an
Inverted Index.
The iv_map.py script will receive the text of a document via standard
input, while the iv_reduce.py script will receive the results of the
iv_map.py program via standard input in Hadoop Streaming format. This
means that both the iv_map.py and the iv_reduce.py programs should emit
key value pairs in the Hadoop Streaming format.
For example, given the following input file:
'Beware the Jabberwock, my son!
      The jaws that bite, the claws that catch!
Beware the Jubjub bird, and shun
      The frumious Bandersnatch!"
Running ./iv_map.py < input.sample should yield the following intermediate
outputs:
beware  1
the     1
jabberwock      1
my      1
son     1
the     2
jaws    2
that    2
bite    2
the     2
claws   2
that    2
catch   2
beware  3
the     3
jubjub  3
bird    3
and     3
shun    3
the     4
frumious        4
bandersnatch    4
That is, each line contains the word and the line number on which it
occurs.
Note, we start counting the line numbers at 1, we ignore
punctuation other than -, and we ignore case by making everything
lower-case.
Running ./iv_map.py < input.sample | sort | ./iv_reduce.py should yield the
following results:
and     3
bandersnatch    4
beware  1 3
bird    3
bite    2
catch   2
claws   2
frumious        4
jabberwock      1
jaws    2
jubjub  3
my      1
shun    3
son     1
that    2
the     1 2 3 4
That is, each line contains the word and the line numbers on which it
appears.
Note, the words are in lexicographical order and the line numbers are sorted from lowest to highest and are unique.
Hints
-
For
iv_map.py, you can use list comprehensions to filter out undesirable characters. -
For
iv_reduce.py, you can use a set to remove duplicates.
Task 2: Testing
To aid you in testing the iv_map.py and iv_reduce.py scripts, we are
providing you with test_iv.sh, which you can use as follows:
# Download script
$ curl -O http://www3.nd.edu/~pbui/teaching/cse.20289.sp17/static/sh/test_iv.sh

# Make script executable
$ chmod +x test_iv.sh

# Run test script
$ ./test_iv.sh
iv tests successful!
After you download and execute the test_iv.sh script, you will have the
iv_input.txt, iv_output.map, and iv_output.reduce files which you can
use to manually test the scripts:
# Test iv_map.py
$ ./iv_map.py < iv_input.txt | diff - iv_output.map

# Test iv_reduce.py
$ ./iv_reduce.py < iv_output.map | diff - iv_output.reduce

# Test whole pipeline
$ ./iv_map.py < iv_input.txt | sort | ./iv_reduce.py | diff - iv_output.reduce
Debugging with Grep
You can use grep to check the results of your Inverted Index by doing the
following:
$ grep -n -i beware iv_input.txt
1:"Beware the Jabberwock, my son!
3:Beware the Jubjub bird, and shun
As can be seen, the word beware does appear on lines 1 and 3 as the
Map-Reduce application claims.
Task 3: README.md
In your README.md, describe how you implemented the iv_map.py and
iv_reduce.py scripts. In particular, briefly discuss:
-
How does the
iv_map.pyscript work.-
How does it keep track of line numbers.
-
How does it remove undesirable characters.
-
-
How does the
iv_reduce.pyscript work.-
How does it aggregate the results for each word.
-
How does it output the results in the correct format.
-
Guru Point: Fury (1 Point)
For extra credit, you are to use fury.py to completely crack all of the password hashes from Activity 1. This is a Python script that uses Work Queue to distribute work across multiple machines in a HTCondor pool.
Environment
To utilize fury.py on the student machines you must first setup the following environment variables:
# CSH
$ setenv PATH ~condor/software/sbin:$PATH
$ setenv PATH ~condor/software/bin:$PATH
$ setenv PATH ~ccl/software/cctools/bin:$PATH
$ setenv PYTHONPATH ~ccl/software/cctools/lib/python2.6/site-packages:$PYTHONPATH

# Bash
$ export PATH=~condor/software/sbin:$PATH
$ export PATH=~condor/software/bin:$PATH
$ export PATH=~ccl/software/cctools/bin:$PATH
$ export PYTHONPATH=~ccl/software/cctools/lib/python2.6/site-packages:$PYTHONPATH
Note: if PYTHONPATH is not set, then simply leave off the last :$PYTHONPATH.
To check if your environment is setup properly, you can try the following commands:
# Show all Condor submissions from current machine
$ condor_q
-- Submitter: student00.cse.nd.edu : <129.74.152.73:9618?sock=3137_dc95_4> : student00.cse.nd.edu
  ID      OWNER            SUBMITTED     RUN_TIME ST PRI SIZE CMD
1063343.0   cshinave        9/29 00:05   0+00:00:00 H  0   0.0  measure ./distance
1063402.0   cshinave        9/30 19:02   0+00:00:00 H  0   0.0  measure ./distance
1100331.0   pbui            4/17 09:39   0+05:05:00 R  0   463.9 work_queue_worker
...
1100334.198 pbui            4/17 09:57   0+04:45:54 R  0   170.9 work_queue_worker

414 jobs; 0 completed, 0 removed, 1 idle, 402 running, 11 held, 0 suspended

# Show all Work Queue masters
$ work_queue_status
PROJECT            HOST                   PORT WAITING RUNNING COMPLETE WORKERS
lobster_shuffle    earth.crc.nd.edu       9000       0       0     1317      56
lobster_shuffle    earth.crc.nd.edu       9002       0       0     1327      19
...
hulk-pbui          student00.cse.nd.edu   9123    4312     295    21628     402
Execution
To execute fury.py, you simply need to execute the script:
$ ./fury.py
Since fury.py uses Work Queue, you will need to connect workers to
fury.py. To start a single local work_queue_worker, you can use the
following command:
$ work_queue_worker -d all -N hulk-NETID
This will start one worker with debugging enabled on the local machine that
will communicate to the master with the name hulk-NETID.
Alternatively, you can connect directly to the master by specifying the
hostname and port:
$ work_queue_worker -d all studentXX.cse.nd.edu 9XXX
This bypasses the catalog server, which can get slow when there are many users.
Baby Steps
Do not start by submitting many workers at once. Instead, test by having
fury.py dispatch a few tasks and then use a single local worker. Once you
are confident that things are working, submit progressively more workers.
To start many workers on the HTCondor pool, you can use the following command:
$ condor_submit_workers -N hulk-NETID 200
This will submit 200 workers to the [Condor] pool that will communicate to
the master with the name hulk-NETID.
To check the status of your workers, you can use the condor_q command.
This Might Take Awhile
Cracking 10268 passwords in the collection of password hashes took the
instructor about 12 hours using between 100 and 200 workers.
Monitoring
To help you monitor the progress of fury.py, you can use the
work_queue_monitor script created by the instructor:
$ ~pbui/pub/bin/work_queue_monitor fury.log
Start Time:     1460920763603631
Elasped Time:   7.94 minutes
Task Rate:      135.49 (task/min)
Workers Init:   0
Workers Idle:   47
Workers Busy:   336
Progress:       1076 / 15828 (6.80%)
Estimated Time: 1.81 hours
This script will give you information about the Work Queue application based on the data stored in the Work Queue log generated by the master.
Journal
fury.py will store the results of its computations in the fury.txt file
which is in the following forwmat:
CMD ./hulk.py -c 2 -l 1 -p ""
PWD ...
PWD ...
PWD ...
That is, there are CMD lines which specify the commands used to generate
the passwords that follow. These passwords are prefixed with PWD.
For extra credit, you must crack at least 10000 passwords and submit to the
deadpool.
Submission
To submit your assignment, please commit your work to the homework05 folder
in your assignments GitLab repository. Your homework5 folder should
only contain at the following files:
README.mdhulk.pypasswords.txtiv_map.pyiv_reduce.py
The passwords.txt should contain a list of all all the passwords you found
from the password hashes collection.