Homework 07: Dynamic Memory + Data Representation
The goal of this homework assignment is to allow you to practice using dynamic memory allocation to implement algorithms and build data structures in C99. In particular, you will be implementing a library and utility that computes the Huffman Coding for a stream of text. This encoding is a mapping from each character in the input stream to a unique bit sequence or prefix code, which unlike say ASCII is variable-length rather than fixed size. The purpose of the Huffman Coding is to utilize a greedy algorithm to produce an encoding that uses less space than the fixed-size ASCII encoding as show below:
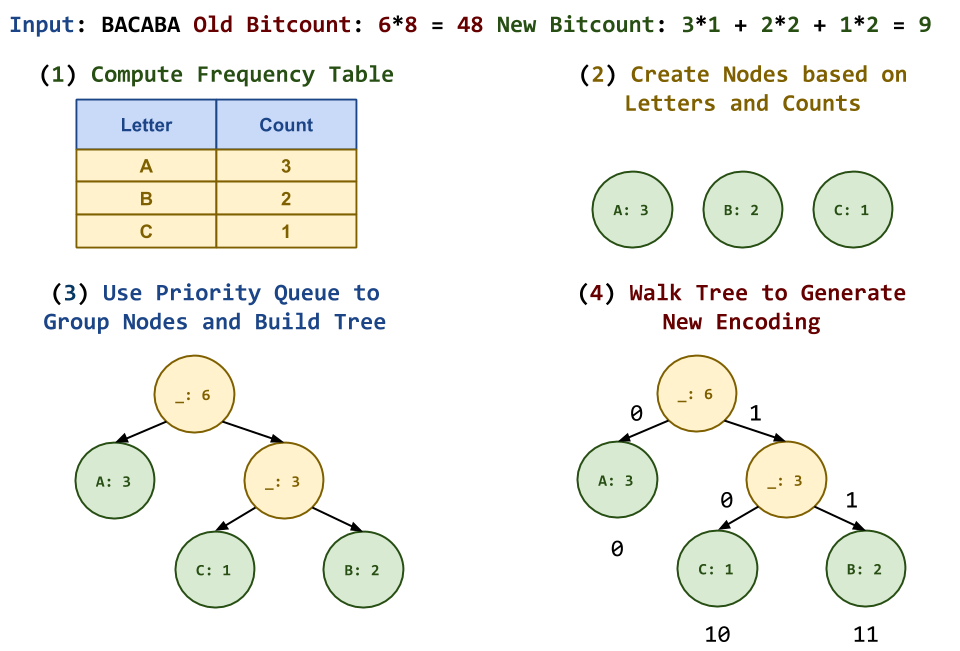
In the example above, our input sequence is: BACABA, which in ASCII would
consist of a total of 48 bits (e.g. 6 bytes):
010000100100000101000011010000010100001001000001 # ASCII Representation
To generate a more compressed version of this text, we would need to construct a Huffman coding by performing the following process:
-
Frequency Table: First, read in the input stream and count the occurrences of each character to create a frequency table.
-
Priority Queue: Next, represent each letter and count pairs as a node and push them into a priority queue.
-
Tree: Afterwards, we construct the Huffman tree by doing the following:
while q.size() > 1:
    l = q.pop()                                           # Pop nodes with smallest counts
    r = q.pop()
    n = Node(count=l.count + r.count, left=l, right=r)    # Construct new composite node

    q.push(n)                                             # Push new node into priority queue

t.root = q.pop()                                          # Last node is root of Huffman tree
Basically, as long there is more than one node in the priority queue, we will pop off the two smallest items, create a new node with the combined count of these two nodes, and insert this new node back into the priority queue. We repeat this process until there is only one node left in the priority queue, which we then set as the root of our Huffman tree.
By constantly grouping nodes with the smallest counts, we use a greedy problem solving approach in order to maximize the path from the root to the nodes with the lowest occurrences (and thus minimize the path from the root to the nodes with the highest occurrences.
-
Walk: To actually produce the Huffman Coding, we must walk the Huffman tree we constructed in the previous step and record the path we took to the leaf nodes (ie. our original nodes from step
2). To ensure a consistent prefix code, we can use the convention where the left child gets a0and the right child gets a1when we take the path from parent to child. In the example above, using this traversal mechanism yields the following encoding:Letter Count Encoding A 3 0 B 2 11 C 1 10
Using this new Huffman Coding, our original text, BACABA, can be encoding as follows:
110100110 # Huffman Encoding
This means the Huffman Coding was about to compress down to about 20% of
the original ASCII representation. This is the reason why many real-world
data compression schemes such as PKZIP, JPEG, and MP3 use elements of
the Huffman Coding technique to achieve smaller file sizes for different
types of data.
To keep things manageable, we will only worry about the construction of the Huffman Coding in this assignment and leave out the actual compression and decompressing process (though you are free to implement that on your own!).
For this assignment, record your source code and any responses to the
following activities in the homework07 folder of your assignments
GitLab repository and push your work by noon Saturday, April 7.
Activity 0: Preparation
Before starting this homework assignment, you should first perform a git
pull to retrieve any changes in your remote GitLab repository:
$ cd path/to/repository                   # Go to assignments repository

$ git checkout master                     # Make sure we are in master branch

$ git pull --rebase                       # Get any remote changes not present locally
Next, create a new branch for this assignment:
$ git checkout -b homework07 # Create homework07 branch and check it out
Starter Code
To help you get started, the instructor has provided you with some starter code.
# Download starter code tarball
$ curl -LO https://www3.nd.edu/~pbui/teaching/cse.20289.sp18/static/tar/homework07.tar.gz

# Extract starter code tarball
$ tar xzvf homework07.tar.gz

# Add and commit starter code
$ git add homework07
$ git commit -m "homework07: starter code"
Once downloaded and extracted, you should see the following files in your
homework07 directory:
homework07
    \_ Makefile                   # This is the Makefile for building all the project artifacts
    \_ README.md                  # This is the README file for recording your responses
    \_ debug.h                    # This is the C99 header file with debugging macros
    \_ huff.c                     # This is the C99 implementation file for the Huffman utility
    \_ node.c                     # This is the C99 implementation file for the Huffman Node
    \_ node.h                     # This is the C99 header file for the Huffman Node
    \_ queue.c                    # This is the C99 implementation file for the Priority Queue
    \_ queue.h                    # This is the C99 header file for the Priority Queue
    \_ test_huff.sh               # This is the Shell test script for the Huffman utility
    \_ test_node.c                # This is the C99 test file for the Huffman Node
    \_ test_node.sh               # This is the Shell test script for the Huffman Node
    \_ test_queue.c               # This is the C99 test file for the Priority Queue
    \_ test_queue.sh              # This is the Shell test script for the Priority Queue
    \_ test_tree.c                # This is the C99 test file for the Huffman Tree
    \_ test_tree.sh               # This is the Shell test script for the Huffman Tree
    \_ tree.c                     # This is the C99 implementation file for the Huffman Tree
    \_ tree.sh                    # This is the C99 header file for the Huffman Tree
The details on what you need to implement are described in the following sections.
Activity 1: Huffman Library (9.5 Points)
In order to follow the process described above, we will need to build a library that consists of the three following data structure components:
-
Huffman Node: This represents the symbols in the text stream along with their corresponding frequency counts.
-
Priority Queue: This is a binary heap that allows us to efficiently extrac the smallest Huffman Nodes so we can build our Huffman Tree.
-
Huffman Tree: This computes the table of frequencies, makes a priority queue of nodes, and then constructs a binary tree using a greedy approach.
The following tasks will walk you through implementing each of these
components as part of the Huffman Library, libhuff.a.
Task 0: Makefile (1 Point)
Before you implement any of the data structures, you should first complete
the provided Makefile. Remeber, the Makefile contains all the rules or
recipes for building the project artifacts (e.g. libhuff.a, huff, etc.).
Although the provided Makefile contains most of the variable definitions
and test recipes, you must add the appropriate rules for libhuff.a
test_node, test_queue, test_tree, huff, and any intermediate
objects. The dependencies for these targets are shown in the DAG below:
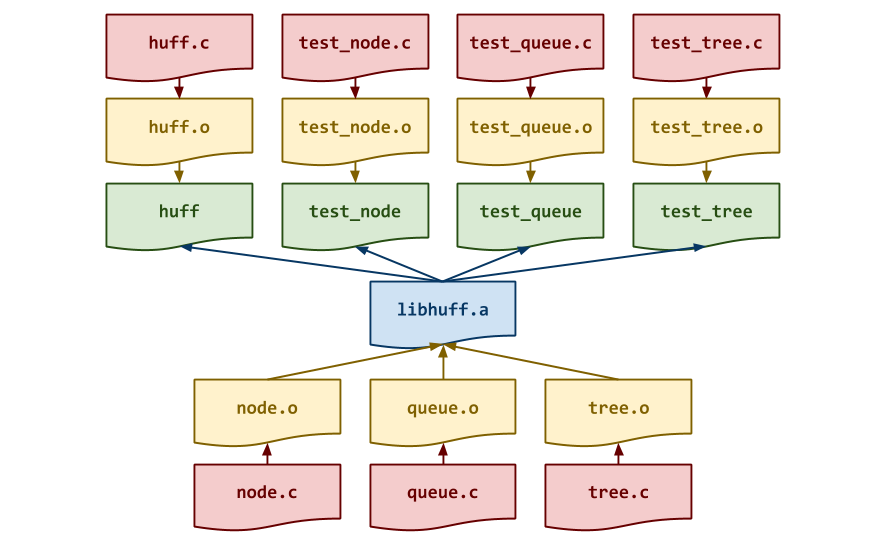
Note: Although we are producing a static library in the form of
libhuff.a, we will not be statically linking our executables. Instead,
we will use the libhuff.a as another object file when we link our
executables.
Makefile Variables
You must use the CC, CFLAGS, LD, LDFLAGS, AR, and ARFLAGS
variables when appropriate in your rules.
Moreover, since there are a lot of object files, it is recommend that you
use a pattern rule for compiling *.c files into *.o files (rather than
explicitly specifying each object rule).
Once you have a working Makefile, you should be able to run the following
commands:
$ make                    # Build all targets
Compiling huff.o...
Compiling node.o...
Compiling queue.o...
Compiling tree.o...
Linking libhuff.a...
Linking huff...

$ make clean              # Clean targets and intermediate files
Cleaning...

$ make -n                 # Simulate build with tracing output
echo Compiling huff.o...
gcc -g -gdwarf-2 -Wall -std=gnu99 -fPIC -o huff.o -c huff.c
echo Compiling node.o...
gcc -g -gdwarf-2 -Wall -std=gnu99 -fPIC -o node.o -c node.c
echo Compiling queue.o...
gcc -g -gdwarf-2 -Wall -std=gnu99 -fPIC -o queue.o -c queue.c
echo Compiling tree.o...
gcc -g -gdwarf-2 -Wall -std=gnu99 -fPIC -o tree.o -c tree.c
echo Linking libhuff.a...
ar rcs libhuff.a node.o queue.o tree.o
echo Linking huff...
gcc -L. -o huff huff.o libhuff.a

$ make test               # Run all tests
...
Depending on your compiler, you may see some warnings with the initial starter code. Likewise, the test programs will all fail in some fashion.
Warnings
You must include the -Wall flag in your CFLAGS when you compile. This
also means that your code must compile without any warnings, otherwise points
will be deducted.
Task 1: node.c (1.5 Points)
Once you can build the project artifacts, your first task is to implement the
Node structure, which is used to represent individual letter and
count pairs in text stream. This structure is defined in the node.h
header, which in addition to declaring function prototypes, also defines
the following types:
#define NODE_NOT_SYMBOL (-1)
The
NODE_NOT_SYMBOLconstant is used as thesymbolfor internal Huffman tree nodes (ie. non-leaf nodes), which do not correspond to any particularsymbol.
typedef union {
    int64_t letter;
    char    string[sizeof(int64_t)];
} Symbol;
The
Symbolunion stores thesymbolof theNodestructure. It can be accessed as either an integer or a string. In general, we use theletterfield for initializing theSymbol, but then use thestringfor printing since thestringrepresentation handles escaping thesymbolfor printing.
typedef struct node Node;
struct node {
    Symbol  symbol;
    size_t  count;
    Node   *left;
    Node   *right;
};
The
Nodestruct represents our letter and count pairs and contains the following attributes:
symbolis a union type that consists of either a string or an integer letter.
countis an unsigned integer that stores the number of occurrences of thesymbolin the text stream.
leftandrightare pointers to the corresponding childNodestructures.
typedef void (*NodeFunc)(const Node *n, char *encoding, void *arg);
The
NodeFunctype definition is used for declaring function arguments in functions such astree_walk.
Type Definitions
The use of typedef in this header file allow us to simply say Node *n
rather than struct Node *n. While there is some controversary over whether
or not this is good practice, we will use these type definitions to make
our code clearer and more compact.
Note: In C++, you do not need to typedef in order to do this since a struct is really just a public class.
Functions
To manipulate a Node struct, the node.c file defines the following
functions:
/**
* Create Node structure.
* @param   symbol      Symbol letter.
* @param   count       Initial count.
* @param   left        Left Node child.
* @param   right       Right Node child.
* @return  Newly allocated Node structure with specified attributes.
*/
Node *  node_create(int64_t symbol, size_t count, Node *left, Node *right);
The
node_createfunction constructs a newNodestruct and initializes its attributes to the specifiedsymbol,count,leftandrightarguments.
Notes:
-
You must check if memory allocation fails and handle those situations appropriately.
-
You should use the internal
node_set_symbolfunction to record thesymbolargument.
/**
* Delete Node structure.
* @param   n           Node structure.
* @return  NULL.
*/
Node *  node_delete(Node *n);
The
node_deletefunction destructs the specifiedNodestruct by recursively deleting its children and then deallocating itself.
/**
* Dump Node structure.
* @param   n           Node structure.
* @param   stream      I/O to write to.
*/
void    node_dump(const Node *n, FILE *stream);
The
node_dumpfunction prints theNodestructures attributes to the specifiedstreamin the following format:Node{symbol: A, count: 0, left: 0x0, right: 0x0}
Notes:
-
The
symbolshould be thestringattribute of theValueunion. -
The
leftandrightpointers should be displayed in hexadecimal format (prefixed with0x).
/**
* Set symbol attribute of Node structure.
* @param   n           Node structure.
* @param   letter      Node symbol letter value.
*/
void    node_set_symbol(Node *n, int64_t letter);
The internal
node_set_symbolfunction is used bynode_createto store theletterand then escape thelettervalue into a string (both stored in thesymbolunion).
Notes:
- The following
lettersneed to be escaped:",\,\b,\f,\n,\r, and\t.
Testing
As you implement node.c, you can test it by running the test-node target:
$ make test-node
Testing Huffman Node...
 node_create                              ... Success
 node_create    (valgrind)                ... Success
 node_delete                              ... Success
 node_delete    (valgrind)                ... Success
 node_dump                                ... Success
 node_dump      (output)                  ... Success
 node_dump      (valgrind)                ... Success
   Score 1.50
Debugging Macros
To help you with debugging, the debug.h header file includes the debug
macro that you can use to insert debugging statements into your code. The
advantage of this macro over printf is that debug displays information
such as the file name, line number, and function name, along with the
formatted message you specified. To take advantage of it, you simply use it
as if it were printf:
debug("n->symbol = %s", n->symbol.string);
Note: debug will automatically append a \n so you don't need to
include that in your message.
Task 2: queue.c (3 Points)
The next component you need to implement for the Huffman Library is the
priority queue. In this project, we will use a binary heap with an
array representation to implement an efficient priority queue. This
Queue structure is defined in the queue.h header, which in addition to
declaring function prototypes, also defines the following types:
#define PRIORITY_QUEUE_CAPACITY (1<<8)
The
PRIORITY_QUEUE_CAPACITYconstant is used whenever the user specifies acapacityof0to thequeue_createfunction.
#define PARENT(i)       ((i-1)/2)
#define LEFT_CHILD(i)   (2*(i) + 1)
#define RIGHT_CHILD(i)  (2*(i) + 2)
These macros are used to access the
PARENT,LEFT_CHILD, andRIGHT_CHILDof aNodelocated in an array at indexi. This assumes that the binary tree is complete.
typedef struct queue {
    Node   **nodes;         /* Array of Node pointers */
    size_t   size;          /* Number of Nodes in Queue */
    size_t   capacity;      /* Total number of slots allocated */
} Queue;
The
Queuestructure stores represents the priority queue ofNodestructures contains of the following attributes:
sizeis an unsigned integer that records the number ofNodesin the priority queue.
capacityis an unsigned integer that records the maximum number ofNodespossible in thenodesarray.
Because of this design, the priority queue is implemented as a binary
heap and grows like a vector in C++ when size reaches capacity.
Functions
To manipulate a Queue struct, the queue.c file defines the following
functions:
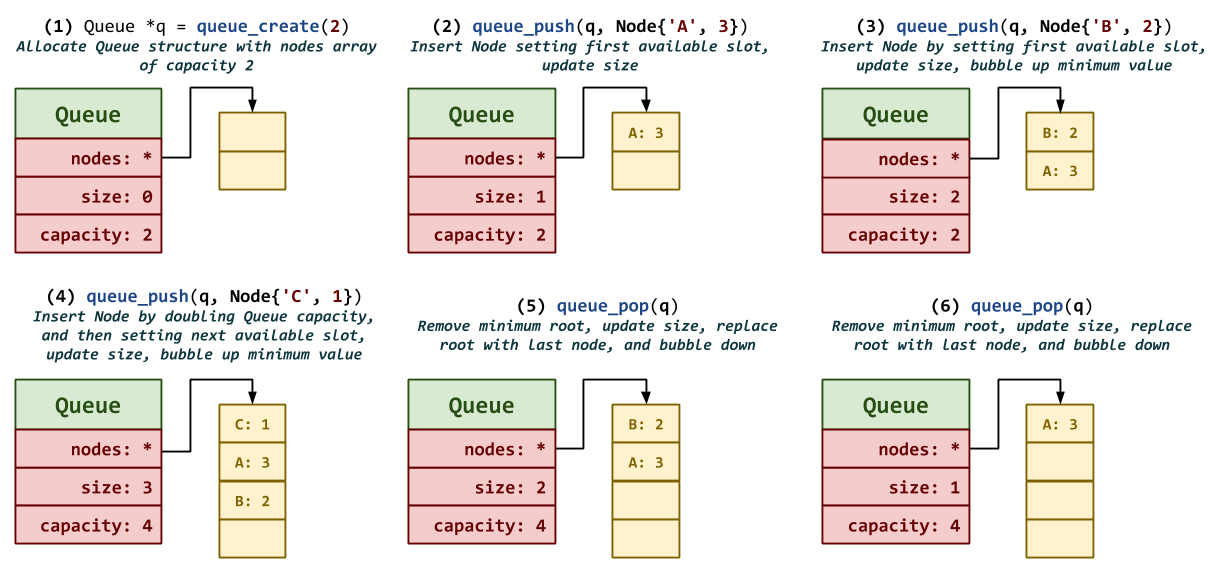
/**
* Create Queue structure.
* @param   capacity        Initial capacity.
* @return  Newly allocated Queue structure with specified capacity.
*/
Queue * queue_create(size_t capacity);
The
queue_createfunction constructs aQueuestruct with the specified initialcapacity.
Note:
-
You must check if memory allocation fails and handle those situations appropriately.
-
Use
PRIORITY_QUEUE_CAPACITYif the specifiedcapacityis0. -
Consider using calloc instead of malloc to get zeroed chunk of memory.
/**
* Delete Queue structure.
* @param   q           Queue structure.
* @return  NULL.
*/
Queue * queue_delete(Queue *q);
The
queue_deletefunction destructs the specifiedQueuestruct by deallocating thenodesarray and itself.
/**
* Push Node into Queue structure.
* @param   q           Queue structure.
* @param   n           Node structure.
* @return  Whether or not the operation was successful.
*/
bool    queue_push(Queue *q, Node *n);
The
queue_pushfunction inserts the specifiedNodestruct into the priority queue.
Notes:
-
This operation can be accomplished by placing the
Nodeat the end of thenodesarray and then bubbling up theNodeusing the internalqueue_bubble_upfunction. -
Be sure to grow the
nodesarray using the internalqueue_resizefunction ifsizehas reachedcapacity.
/**
* Pop minimum Node into Queue structure.
* @param   q           Queue structure.
* @return  Minimum Node structure (by count) or NULL.
*/
Node *  queue_pop(Queue *q);
The
queue_popfunction removes and returns theNodestruct with the smallest value in priority queue.
Notes:
- This operation can be accomplished by replacing the root
Nodewith the lastNodein thenodesarray and then bubbling down theNodeusing the internalqueue_bubble_downfunction. Return the original rootNodeas the minimum value.
/**
* Dump Queue structure.
* @param   q           Queue structure.
* @param   stream      I/O stream to write to.
*/
void    queue_dump(const Queue *q, FILE *stream);
The
queue_dumpfunction prints all theNodestructures in the priority queue using thenode_dumpfunction.
/**
* Resize Queue structure.
* @param   q           Queue structure.
* @param   capacity    New capacity.
* @return  Whether or not operation succeeded.
*/
bool    queue_resize(Queue *q, size_t capacity);
The internal
queue_resizefunction grows thenodesarray by the specifiedcapacity.
Notes:

/**
* Bubble up Node in Queue structure.
* @param   q           Queue structure.
* @param   i           Index to current Node structure.
*/
void    queue_bubble_up(Queue *q, size_t i);
The internal
queue_bubble_upfunction continuously swaps the currentNodewith its parent if it is smaller than its parent, in order to maintain the binary heap invariant.
/**
* Bubble down Node in Queue structure.
* @param   q           Queue structure.
* @param   i           Index to current Node structure.
*/
void    queue_bubble_down(Queue *q, size_t i);
The internal
queue_bubble_downfunction continuously swaps the currentNodewith its minimum child if it is greater than this childNode, in order to maintain the binary heap invariant.
Notes:
- You should use the
queue_minimum_childfunction to determine which child has the minimum value (e.gcount).
/**
* Determines index of child with minimum value.
* @param   q           Queue structure.
* @param   i           Index to current Node structure.
*/
size_t  queue_minimum_child(Queue *q, size_t i);
The internal
queue_minimum_childfunction returns the index of the minimum child of the specifiedNode.
Testing
As you implement queue.c, you can test it by running the test-queue target:
$ make test-queue
Testing Priority Queue...
 queue_create                             ... Success
 queue_create   (valgrind)                ... Success
 queue_delete                             ... Success
 queue_delete   (valgrind)                ... Success
 queue_push 0                             ... Success
 queue_push 0   (valgrind)                ... Success
 queue_push 1                             ... Success
 queue_push 1   (valgrind)                ... Success
 queue_push 2                             ... Success
 queue_push 2   (valgrind)                ... Success
 queue_pop                                ... Success
 queue_pop      (valgrind)                ... Success
 queue_dump                               ... Success
 queue_dump     (output)                  ... Success
 queue_dump     (valgrind)                ... Success
   Score 3.00
GDB and Valgrind
If your program fails any of the tests, you can use gdb and valgrind to track down any of your bugs. To run a specific test case, simply pass the appropriate number as a command-line argument to the test program:
$ ./test_queue                # List all test cases
Usage: ./test_queue NUMBER

Where NUMBER is one of the following:
    0. Test queue_create
    1. Test queue_delete
    2. Test queue_push 0
    3. Test queue_push 1
    4. Test queue_push 2
    5. Test queue_pop
    6. Test queue_dump

$ ./test_queue 0              # Run queue_create test
Task 3: tree.c (4 Points)
The last component of the Huffman Library is the binary tree required
to construct the Huffman Coding. This Tree structure is defined in the
tree.h header, which in addition to declaring function prototypes, also
defines the following types:
#define TREE_COUNTS_SIZE (1<<8)
The
TREE_COUNTS_SIZEconstant sets the size of thecountstable, which is the total number ofcharvalues (ie.256).
typedef struct {
    Node   *root;
    int64_t counts[TREE_COUNTS_SIZE];
} Tree;
The
Treestruct represents the Huffman Tree and contains the following attributes:
rootis the rootNodestruct of the binary tree.
countsis an array that represents the frequency counts of each letter in the data stream.
Functions
To manipulate a Tree struct, the tree.c file defines the following
functions:
/**
* Create Tree structure.
* @return  Newly allocated and initialized Tree structure.
*/
Tree *  tree_create();
The
tree_createfunction constructs aTreestruct with an initializedcountsarray.
/**
* Delete Tree structure.
* @param   t           Tree structure.
* @return  NULL.
*/
Tree *  tree_delete(Tree *t);
The
tree_deletefunction destructs the specifiedTreestruct by deallocatingrootand theTreeitself.
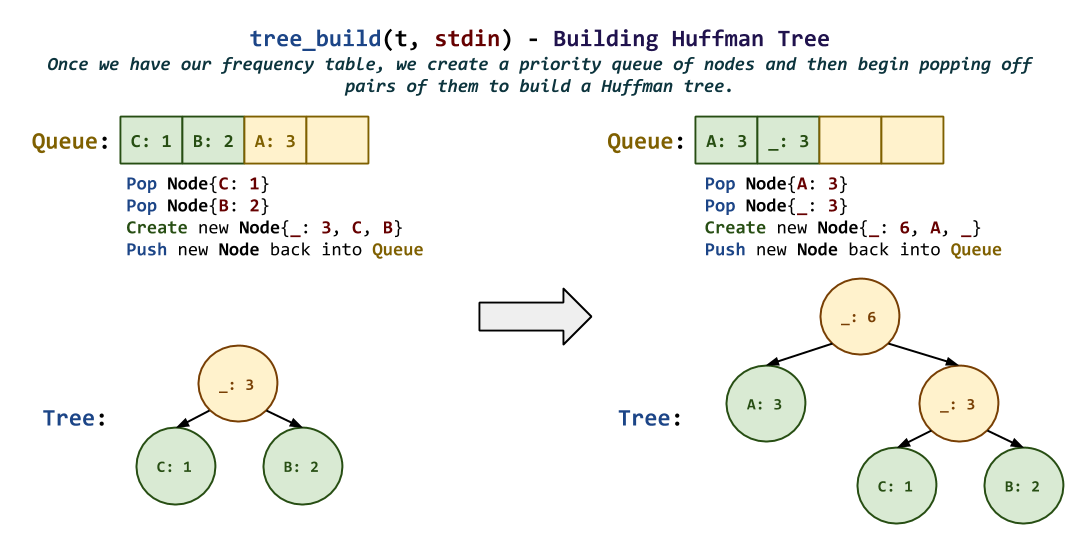
/**
* Build internal Tree structure.
* @param   t           Tree structure.
* @param   stream      I/O stream to read from.
* @return  Whether or not the operation succeeded.
*/
bool    tree_build(Tree *t, FILE *stream);
The
tree_buildfunction builds the Huffman tree from the specified textstream.
Notes:
This can be accomplished by following the process described at the beginning of the document:
-
Use the internal
tree_countfunction to construct the frequencies table. -
Use the internal
tree_queuefunction to construct a priority queue ofNodestructs based on thecountsarray. -
Process the priority queue using the greedy algorithm described above until there is only one
Nodeleft in the priority queue.
/**
* Walk Tree structure.
* @param   t           Tree structure.
* @param   f           Node function.
* @param   arg         Ndoe function argument.
* @return  Whether or not the operation succeeded.
*/
void    tree_walk(const Tree *t, NodeFunc f, void *arg);
The
tree_walkfunction walks the Huffman tree and calls the specifiedNodeFuncon each leafNodeby passing the currentencodingand the specifiedarg.
Notes:
This can be accomplished by using the internal tree_walk_node to
recursively walk the binary tree.
/**
* Build internal counts table in Tree structure.
* @param   t           Tree structure.
* @param   stream      I/O stream to read from.
* @return
*/
void    tree_count(Tree *t, FILE *stream);
The internal
tree_countfunction builds thecountsfrequency table using data from the specifiedstream.
/**
* Create Priority Queue out of counts table in Tree structure.
* @param   t           Tree structure.
* @return  Priority Queue of Nodes corresponding to counts in Tree.
*/
Queue * tree_queue(Tree *t);
The internal
tree_queuefunction creates aQueuestruct and inserts newNodestructs with values from thecountsarray.
Notes:
- You must check if memory allocation fails and handle those situations appropriately.
/**
* Recursively walk Tree nodes.
* @param   n           Node structure.
* @param   f           Node function.
* @param   arg         Node function argument.
* @param   encoding    Node encoding.
*/
void    tree_walk_node(const Node *n, NodeFunc f, void *arg, char *encoding);
The internal
tree_walk_nodefunction recursively walks the binary tree, calling theNodeFuncwith the specifiedencodingandargwhen it reaches a leafNode.
Notes:
-
To build the
encodingyou should concatentate a0when you recurse to the left and a1when you recurse to the right. -
Be sure to handle the case where there is only one
Nodeand an emptyencodingby emitting a0.
Testing
As you implement tree.c, you can test it by running the test-tree target:
$ make test-tree
Testing Huffman Tree...
 tree_create                              ... Success
 tree_create    (valgrind)                ... Success
 tree_delete                              ... Success
 tree_delete    (valgrind)                ... Success
 tree_build 0                             ... Success
 tree_build 0   (valgrind)                ... Success
 tree_build 1                             ... Success
 tree_build 1   (valgrind)                ... Success
 tree_walk 0                              ... Success
 tree_walk 0    (valgrind)                ... Success
 tree_walk 1                              ... Success
 tree_walk 1    (valgrind)                ... Success
 tree_walk 2                              ... Success
 tree_walk 2    (valgrind)                ... Success
 tree_walk 3                              ... Success
 tree_walk 3    (valgrind)                ... Success
 tree_walk 4                              ... Success
 tree_walk 4    (valgrind)                ... Success
 tree_walk 5                              ... Success
 tree_walk 5    (valgrind)                ... Success
 tree_walk 6                              ... Success
 tree_walk 6    (valgrind)                ... Success
   Score 4.00
Activity 2: Huffman Utility (5.5 Points)
After completing the Huffman library, you can then implemet the Huffman
utility, huff, which has the following command-line arguments:
$ ./huff -h
Usage: ./huff FILES...
Flags:

    -f FORMAT    Output format (tsv, csv, yaml, json)
-
By default,
huffwill read in standard input, but the user may specify a series of file arguments the command-line. -
By default,
huffwill output the Huffman coding in tab-separated values format, but the user may specify either CSV, YAML, or JSON format.
Here are some examples of huff in action:
$ ./huff <<< "BACABA"             # <<< Syntax only works on bash
A       0       3
B       10      2
\n      110     1
C       111     1

$ ./huff -f csv <<< "BACABA"
"A","0",3
"B","10",2
"\n","110",1
"C","111",1

$ ./huff -f yaml <<< "BACABA"
"A": {"encoding": "0", "count": 3}
"B": {"encoding": "10", "count": 2}
"\n": {"encoding": "110", "count": 1}
"C": {"encoding": "111", "count": 1}

$ ./huff -f json <<< "BACABA"
{
  "A": {"encoding": "0", "count": 3},
  "B": {"encoding": "10", "count": 2},
  "\n": {"encoding": "110", "count": 1},
  "C": {"encoding": "111", "count": 1},
}
Task 1: huff.c (2.5 Points)
To implement the Huffman utility, you will need to complete the
provided huff.c, which is pretty bare bones. It is recommended that you
review cat.c from Reading 08 and use it as the basis for your
implementation of huff.
Notes:
-
Consider using an enumeration to create constants you can check for the various output formats.
-
You will probably want to define your own
NodeFuncthat prints out the Huffman coding and use it with thetree_walkfunction after you build the Huffman tree.
Testing
As you implement huff.c, you can test it by running the test-huff target:
$ make test-huff
Testing Huffman utility...
 Usage                                    ... Success
 Input 0 (TSV)                            ... Success
 Input 0 (TSV)  (valgrind)                ... Success
 Input 0 (CSV)                            ... Success
 Input 0 (CSV)  (valgrind)                ... Success
 Input 0 (JSON)                           ... Success
 Input 0 (JSON) (valgrind)                ... Success
 Input 0 (YAML)                           ... Success
 Input 0 (YAML) (valgrind)                ... Success
 Input 1 (TSV)                            ... Success
 Input 1 (TSV)  (valgrind)                ... Success
 Input 1 (CSV)                            ... Success
 Input 1 (CSV)  (valgrind)                ... Success
 Input 1 (JSON)                           ... Success
 Input 1 (JSON) (valgrind)                ... Success
 Input 1 (YAML)                           ... Success
 Input 1 (YAML) (valgrind)                ... Success
   Score 2.50
Task 2: huff.py (1.5 Points)
Once you have a working Huffman utility, you are to revisit our friend
Python to make a script, huff.py, which utilizes the huff program to
compute the Huffman Coding of a series of text files and then generates a
table of the results in Markdown format:
|        FILE        | OLD SIZE | NEW SIZE |   RATIO   |
|--------------------|----------|----------|-----------|
|     data/1342-0.txt|   5712512|   3238771|     56.70%|
|      data/219-0.txt|   1866312|   1065343|     57.08%|
|       data/84-0.txt|   3579736|   2005500|     56.02%|
|        data/844.txt|   1139056|    672349|     59.03%|
|       data/98-0.txt|   6298288|   3575868|     56.78%|
|       data/data.txt|       328|       127|     38.72%|
|      data/ideas.txt|      8360|      4934|     59.02%|
As can be seen, the huff.py should emit the name of the file, the old size
of the file (in terms of bits), the new size of the file using the Huffman
coding (in terms of bits), and then the compression ratio if we were to use
the Huffman coding.
You must use this script on at least five different text files (of varying sizes).
Notes:
-
For your input dataset, you need to use at least five text files from Project Gutenberg such as:
-
Consider using YAML as the data exchange format and os.popen to execute
huffand read its output. -
Don't forget about our friends list comprehensions and generator expressions.
UTF-8 to ASCII
Most of the files from Project Gutenberg are in Unicode format rather
than ASCII, which can cause your program to segfault. To avoid these
errors, convert the Unicode files into plain ASCII by using the following
command:
$ iconv -sc -f utf-8 -t iso-8859-1 unicode.txt > new.ascii
Replace unicode.txt with the name of the Unicode file and new.ascii
with the name of the new file you want to create.
Task 3: README.md (1.5 Points)
In your README.md, include the Markdown table your huff.py script
generated and then answer the following questions:
-
Describe how the
symbolis stored in theNodestruct by diagramming the memory layout of the followingNodestructure:Node *n = node_create('\n', 2, NULL, NULL);
Be sure to indicate how much memory each
Nodestructure occupies and how much is allocated for each attribute in the struct.-
Explain what the code
assert(n->symbol.letter == '\n')would result in? -
Given that
symbolis a union type, is it ever possible for both theletterandstringof the symbol\nto co-exist (that is, thestringdoesn't clobber theletter)?Hint: Consider alternative architectures.
-
-
To construct the Huffman code, you had to utilize both a priority queue (aka. min-heap) and a Huffman Tree, both of which were binary trees. For the former, you used an array representation while for the later you used a linked node representation. With this in mind, answer the following questions:
-
Would it have been easier to implement the priority queue with a linked node representation? Explain why this would be better or worse than the array representation.
-
Would it have been easier to implement the Huffman Tree with an array representation? Explain why this would be better or worse than the linked node representation.
-
-
Analyze the results of your experiements with you
huff.pyPython script. What sort of compression ratios were you able to achieve? How does this compare to standard utilities such asgzip,bzip2, andxz?
Guru Point: ShareLaTeX (1 Point)
So far this semester, you have been using Markdown to format your README
files and have dabbled a little bit with HTML, which powers the World Wide
Web. For academic papers, many scholars and researchers use a language
called LaTeX to create crisp documents such as this PhD Dissertation.
For extra credit, you are to use LaTeX to produce a document that contains
a few sections, a few paragraphs, at least one diagram, and at
least one table. You may choose, for instance, to write-up the responses
to the questions in this assigment using LaTeX (just be sure to include the
generated PDF and make a note of it in your README) or you may create a
document for another class (or anything you want).
To produce a PDF from a LaTeX document, you first use your favorite
$EDITOR to compose the LaTeX source and then you compile the document
using the following commands:
$ pdflatex article.tex
$ pdflatex article.tex        # Run it twice
If you'd rather have a more graphical and real-time editing experience, you should consider ShareLaTeX. Notre Dame has a site license for this website, which is a great tool for interactive and collaborative LaTeX document editting. The website also provides great documentation:
You should skim these tutorials and take a look at the sample LaTeX file which will generate this sample PDF.
To get credit, show the final document and the LaTeX source code to either the instructor or one of the TAs.
Submission
To submit your assignment, please commit your work to the homework07 folder
of your homework07 branch in your assignments GitLab repository.
Your homework07 folder should only contain the following files:
MakefileREADME.mddebug.hhuff.cnode.cnode.hqueue.cqueue.htest_huff.shtest_node.ctest_node.shtest_queue.ctest_queue.shtest_tree.ctest_tree.shtree.ctree.h
Note: Don't include any object files or executables.
#--------------------------------------------------
# BE SURE TO DO THE PREPARATION STEPS IN ACTIVITY 0
#--------------------------------------------------

$ cd homework07                           # Go to Homework 07 directory
...
$ git add Makefile                        # Mark changes for commit
$ git add node.c                          # Mark changes for commit
$ git commit -m "homework07: node"        # Record changes
...
$ git add Makefile                        # Mark changes for commit
$ git add queue.c                         # Mark changes for commit
$ git commit -m "homework07: queue"       # Record changes
...
$ git add Makefile                        # Mark changes for commit
$ git add tree.c                          # Mark changes for commit
$ git commit -m "homework07: tree"        # Record changes
...
$ git add Makefile                        # Mark changes for commit
$ git add huff.c                          # Mark changes for commit
$ git commit -m "homework07: huff"        # Record changes
...
$ git add huff.py                         # Mark changes for commit
$ git commit -m "homework07: huff.py"     # Record changes
...
$ git add README.md                       # Mark changes for commit
$ git commit -m "homework07: README"      # Record changes
...
$ git push -u origin homework07           # Push branch to GitLab
Remember to create a merge request and assign the appropriate TA from the Reading 09 TA List.