This Is Not The Course Website You Are Looking For
This course website is from a previous semester. If you are currently in the class, please make sure you are viewing the latest course website instead of this old one.
Homework 10: nmapit, curlit
The goal of this homework assignment is to allow you to practice using system calls involving networking with sockets in C by implementing simplified versions of two familiar Unix utilities:
-
nmapit: The first utility implements a simple port scanning utility similar to nmap. -
curlit: The second utility implements a simple HTTP client similar to curl.
For this assignment, record your source code and any responses to the
following activities in the homework10 folder of your assignments
GitHub repository and push your work by noon Saturday, April 27.
Frequently Asked Questions
Activity 0: Preparation
Before starting this homework assignment, you should first perform a git
pull to retrieve any changes in your remote GitHub repository:
$ cd path/to/repository                   # Go to assignments repository

$ git switch master                       # Make sure we are in master branch

$ git pull --rebase                       # Get any remote changes not present locally
Next, create a new branch for this assignment:
$ git checkout -b homework10 # Create homework10 branch and check it out
Task 1: Skeleton Code
To help you get started, the instructor has provided you with the following skeleton code:
# Create homework10 folder
$ mkdir homework10

# Go to homework10 folder
$ cd homework10

# Create README
$ echo "# Homework 10" > README.md

# Download Makefile
$ curl -LO https://www3.nd.edu/~pbui/teaching/cse.20289.sp24/static/txt/homework10/Makefile

# Download C skeleton code
$ curl -LO https://www3.nd.edu/~pbui/teaching/cse.20289.sp24/static/txt/homework10/curlit.c
$ curl -LO https://www3.nd.edu/~pbui/teaching/cse.20289.sp24/static/txt/homework10/nmapit.c
$ curl -LO https://www3.nd.edu/~pbui/teaching/cse.20289.sp24/static/txt/homework10/socket.c
$ curl -LO https://www3.nd.edu/~pbui/teaching/cse.20289.sp24/static/txt/homework10/socket.h
$ curl -LO https://www3.nd.edu/~pbui/teaching/cse.20289.sp24/static/txt/homework10/socket.unit.c
Once downloaded, you should see the following files in your homework10
directory:
homework10
    \_ Makefile           # This is the Makefile for building all the assignment artifacts
    \_ nmapit.c           # This is the nmapit utility C source file
    \_ curlit.c           # This is the curlit utility C source file
    \_ socket.c           # This is the timeit library C source file
    \_ socket.h           # This is the socket library C header file
    \_ socket.unit.c      # This is the socket library C unit test source file
Task 2: Initial Import
Now that the files are downloaded into the homework10 folder, you can
commit them to your git repository:
$ git add Makefile                            # Mark changes for commit
$ git add *.c *.h *.md
$ git commit -m "Homework 10: Initial Import" # Record changes
Task 3: Unit and Functional Tests
After downloading these files, you can run make test to run the tests.
# Run all tests (will trigger automatic download)
$ make test
You will notice that the Makefile downloads these additional test data and scripts:
homework10
    \_ curlit.test.sh   # This is the curlit utility test shell script
    \_ nmapit.test.sh   # This is the nmapit utility test shell script
    \_ socket.unit.sh   # This is the socket library unit test shell script
You will be using these unit tests and functional tests to verify the correctness and behavior of your code.
Automatic Downloads
The test scripts are automatically downloaded by the Makefile, so any
modifications you do to them will be lost when you run make again. Likewise,
because they are automatically downloaded, you do not need to add or commit
them to your git repository.
Task 4: Makefile
The Makefile contains all the rules or recipes for building the
project artifacts (e.g. moveit, timeit):
CC=       gcc
CFLAGS=   -Wall -g -std=gnu99
LD=       gcc
LDFLAGS=  -L.
TARGETS=  nmapit curlit

all:    $(TARGETS)

#------------------------------------------------------------------------------
# TODO: Rules for object files and executables
#------------------------------------------------------------------------------

socket.o:

nmapit.o:

curlit.o:

nmapit:

curlit:

#------------------------------------------------------------------------------
# DO NOT MODIFY BELOW
#------------------------------------------------------------------------------

...
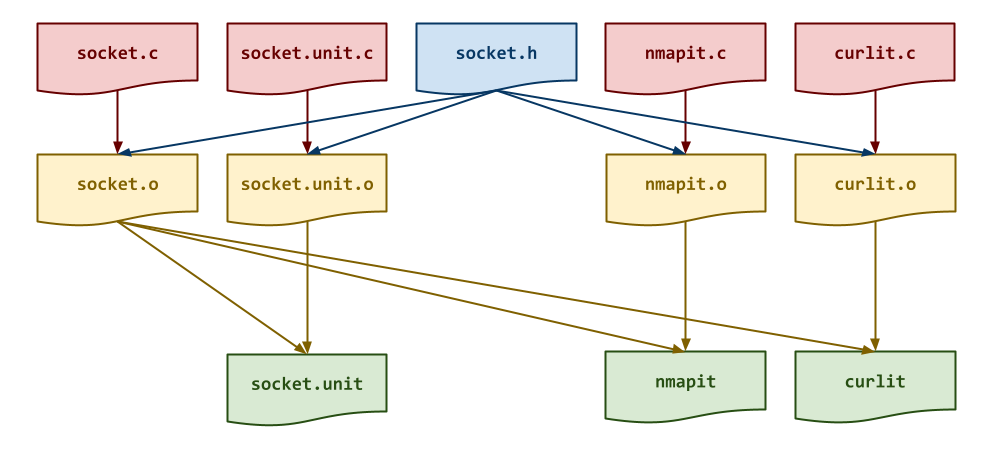
For this task, you will need to add rules for building the intermediate
object files, and the nmapit and curlit executables with the
appropriate dependencies as shown in the DAG below:
Makefile Variables
You must use the CC, CFLAGS variables when appropriate in your
rules. You should also consider using automatic variables such as
$@ and $< as well.
Once you have a working Makefile, you should be able to run the following commands:
# Build all TARGETS
$ make
gcc -Wall -g -std=gnu99 -c -o nmapit.o nmapit.c
gcc -Wall -g -std=gnu99 -c -o socket.o socket.c
gcc -L. -o nmapit nmapit.o socket.o
gcc -Wall -g -std=gnu99 -c -o curlit.o curlit.c
gcc -L. -o curlit curlit.o socket.o

# Run all tests
$ make test
Testing socket ...
...

Testing nmapit utility...
...

Testing curlit utility...
...

# Remove generated artifacts
$ make clean
Note: The tests will fail if you haven't implemented all the necessary functions appropriately.
Warnings
You must include the -Wall flag in your CFLAGS when you compile. This
also means that your code must compile without any warnings, otherwise
points will be deducted.
Activity 1: socket (1 Point)
Both nmapit and curlit will require using sockets in C to communicate
with a remote host. To simplify the process of establishing a
connection, you are to make consolidate all the code for connecting to a
remote host into a single socket_dial function.
Task 1: socket.c
To implement the socket library, you are to complete the provided
socket.c source file which contains the following function:
/**
 * Create socket connection to specified host and port.
 * @param   host        Host string to connect to.
 * @param   port        Port string to connect to.
 * @return  Socket file stream of connection if successful, otherwise NULL.
 **/
FILE *socket_dial(const char *host, const char *port)`
This function uses socket to connect to the given
hostandportusing TCP and returns a read/writableFILEstream corresponding to the socket connection.
Hints:
-
You must check if any of the system calls fail.
-
You should use getaddrinfo, socket, connect, freeaddrinfo, and fdopen.
Task 2: Testing
As you implement the functions in socket.c, you should use the
socket.unit executable with the socket.unit.sh script to test each of
your functions:
# Build test artifacts and run test scripts
$ make test-socket
Testing socket ...
 socket_dial_success                                          ... Success
 socket_dial_failure                                          ... Success
 socket_dial_mode                                             ... Success

   Score 1.00 / 1.00
  Status Success
You can also run the testing script manually:
# Run shell unit test script manually
$ ./socket.unit.sh
...
To debug your socket functions, you can use gdb on the socket.unit executable:
# Start gdb on socket.unit
$ gdb ./socket.unit
(gdb) run 0     # Run socket.unit with the "0" command line argument (ie. socket_dial_success)
...
You can also use valgrind to check for memory errors:
# Check for memory errors on first test case
# $ valgrind --leak-check=full ./socket.unit 0
Activity 2: nmapit (3 Points)
Once you have the socket_dial function implemented, you can complete the
nmapit utility, which scans a range of ports on a remote host and
reports which ones are active (ie. establish a connection) as shown below:
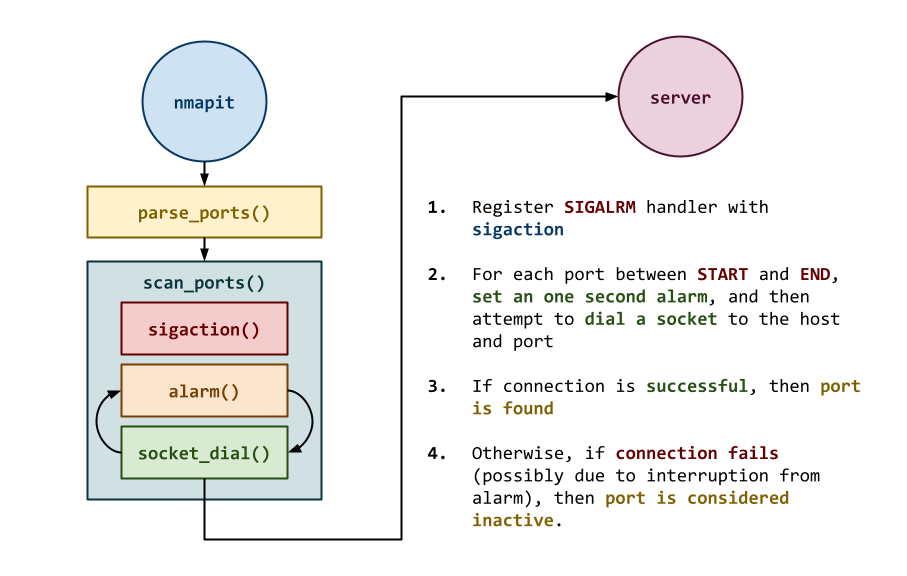
Because some hosts have firewalls which can cause connect to hang for
long periods of time, you will use a one second alarm to interrupt
socket_dial. This interruption will cause socket_dial to fail, which
means the port is considered inactive.
Here are some examples of nmapit in action:
# Display usage message
$ ./nmapit -h
Usage: nmapit [-p START-END] HOST
Options:
    -p START-END    Specifies the range of port numbers to scan

# Scan student05.cse.nd.edu with default ports (1-1023)
$ ./nmapit student05.cse.nd.edu
22
80
111

# Return success if at least one port is found
$ echo $?
0

# Scan student05.cse.nd.edu with ports 9000-9999
$ ./nmapit -p 9000-9999 student05.cse.nd.edu

# Return failure if no active ports are found
$ echo $?
1
By default, nmapit will scan ports 1 through 1023 on the remote
host. The user may specify a range of ports via the -p START-END flag.
If any port is found during the scan, then nmap will return success.
Otherwise, if no port is found, then it will return failure.
Task 1: nmapit.c
To implement the nmapit utility, you are to complete the provided
nmapit.c source file which contains the following functions:
/**
 * Display usage message and exit.
 * @param   status      Exit status
 **/
void    usage(int status);
This provided
usagefunction displays the help message and terminates the process with the specifiedstatuscode.
/**
 * Handle alarm signal.
 * @param   signum      Signal number
 **/
void sigalrm_handler(int signum);
This function is called whenever a
SIGALRMis delivered to the process. When this happens, the current alarm should be cancelled.
Hint: Use alarm.
/**
 * Parse port range string into start and end port integers.
 * @param   range       Port range string (ie. START-END)
 * @param   start       Pointer to starting port integer
 * @param   end         Pointer to ending port integer
 * @return  true if parsing both start and end were successful, otherwise false
 **/
bool parse_ports(char *range, int *start, int *end);
This function parses the
rangestring (ie."START-END") into individualstartandendintegers. It returnstrueif parsing both thestartandendintegers from therangestring is successful, otherwise it returnsfalse.
/**
 * Scan ports at specified host from starting and ending port numbers
 * (inclusive).
 * @param   host        Host to scan
 * @param   start       Starting port number
 * @param   end         Ending port number
 * @return  true if any port is found, otherwise false
 **/
bool scan_ports(const char* host, int start, int end);
This function scans the
hostfrom thestartport through theendport. As it scans the ports, it will print the number if the port is active on thehost. If any ports are found, then the function returnstrue. Otherwise, it returnsfalseif no active ports are found.
Hints:
Task 2: Testing
Once you have implemented nmapit, you can test it by running the
test-nmapit target:
$ make test-nmapit
Testing nmapit utility...
 nmapit                                                       ... Success
 nmapit (valgrind)                                            ... Success
 nmapit -h                                                    ... Success
 nmapit -h (valgrind)                                         ... Success
 nmapit -p 9000                                               ... Success
 nmapit -p 9000 (valgrind)                                    ... Success
 nmapit -p 9000-                                              ... Success
 nmapit -p 9000- (valgrind)                                   ... Success
 nmapit -p -9000                                              ... Success
 nmapit -p -9000 (valgrind)                                   ... Success
 nmapit xavier.h4x0r.space                                    ... Success
 nmapit xavier.h4x0r.space (valgrind)                         ... Success
 nmapit -p 9000-9999 xavier.h4x0r.space                       ... Success
 nmapit -p 9000-9999 xavier.h4x0r.space (valgrind)            ... Success
 nmapit -p 9005-9010 weasel.h4x0r.space                       ... Success
 nmapit -p 9005-9010 weasel.h4x0r.space (valgrind)            ... Success
 nmapit -p 9895-9900 weasel.h4x0r.space                       ... Success
 nmapit -p 9895-9900 weasel.h4x0r.space (valgrind)            ... Success

   Score 3.00 / 3.00
  Status Success
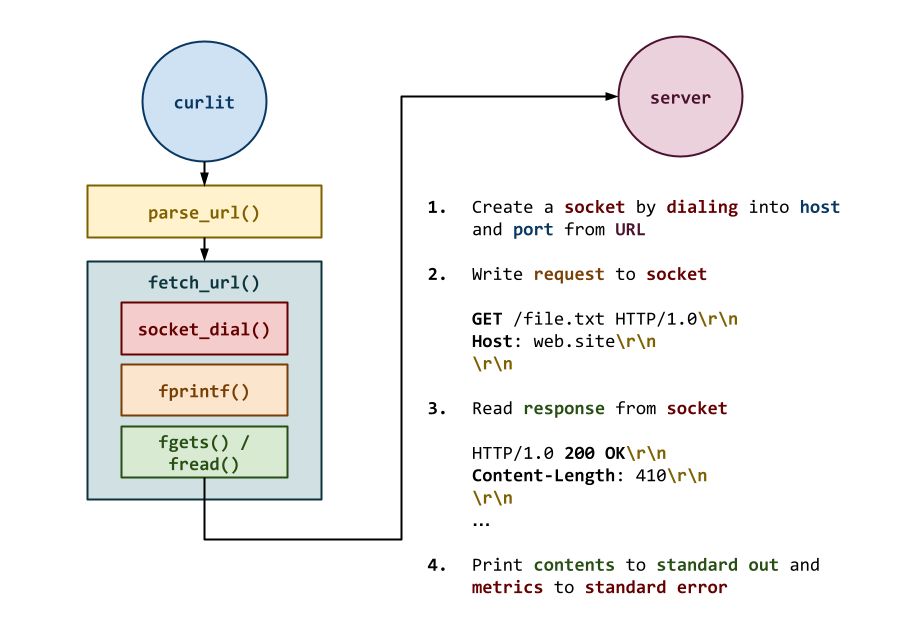
Activity 3: curlit (6 Points)
Once you have the socket_dial function implemented, you can complete the
curlit utility, which performs a HTTP request at the specified URL.
Here are some examples of curlit in action:
# Display usage message
$ ./curlit -h
Usage: curlit [-h ] URL

# Make HTTP request to http://example.com
$ ./curlit http://example.com
<!doctype html>
<html>
<head>
    <title>Example Domain</title>

    <meta charset="utf-8" />
    <meta http-equiv="Content-type" content="text/html; charset=utf-8" />
    <meta name="viewport" content="width=device-width, initial-scale=1" />
    ...
</head>

<body>
<div>
    <h1>Example Domain</h1>
    <p>This domain is for use in illustrative examples in documents. You may use this
    domain in literature without prior coordination or asking for permission.</p>
    <p><a href="https://www.iana.org/domains/example">More information...</a></p>
</div>
</body>
</html>
Elapsed Time: 0.03 s
Bandwidth:    0.05 MB/s

# Return success if status was 200 OK
$ echo $?
0

# Make HTTP request to google.com
$ ./curlit google.com
<HTML><HEAD><meta http-equiv="content-type" content="text/html;charset=utf-8">
<TITLE>301 Moved</TITLE></HEAD><BODY>
<H1>301 Moved</H1>
The document has moved
<A HREF="http://www.google.com/">here</A>.
</BODY></HTML>
Elapsed Time: 0.07 s
Bandwidth:    0.00 MB/s

# Return failure if status was not 200 OK
$ echo $?
1
Missing URL Components
Note: Not all URLs will specify every component explicitly. Some may be missing the protocol or the port or even the path (the host must always be given).
For instance, here are some valid URLs you will need to support:
example.comhttp://example.comhttp://example.com:8888http://example.com/dataexample.com:9999/data
If the port is not specified, then you are to assume the default HTTP
port: 80. If a path is not specified, then you can assume an empty
path: "".
Task 1: curlit.c
To implement the curlit utility, you are to complete the provided
curlit.c source file which contains the following functions:
/**
 * Display usage message and exit.
 * @param   status      Exit status
 **/
void    usage(int status);
This provided
usagefunction displays the help message and terminates the process with the specifiedstatuscode.
/**
 * Parse URL string into URL structure.
 * @param   s       URL string
 * @param   url     Pointer to URL structure
 **/
void    parse_url(const char *s, URL *url);
This function parses the
sURL string to extract thehost,port, andpathcomponents and copies them into the corresponding attributes of theURLstructure.
Hints:
-
Copy the URL
sstring to a local buffer that you can manipulate. -
Use strstr and strchr to search the local buffer for the appropriate delimiters (e.g.
HOST_DELIMITER,PATH_DELIMITER, andPORT_DELIMITER) and split the string into different components. -
Use strcpy to copy the found components to the
URLstructure.
/**
 * Fetch contents of URL and print to standard out.
 *
 * Print elapsed time and bandwidth to standard error.
 * @param   s       URL string
 * @param   url     Pointer to URL structure
 * @return  true if client is able to read all of the content (or if the
 * content length is unset), otherwise false
 **/
bool    fetch_url(URL *url);
This function performs a HTTP request with the given
URLby usingsocket_dialto form a TCP connection. It writes the response body or contents to standard out, and the elapsed time and bandwidth metrics to standard error. It returnsfalseif any error was experienced during the HTTP transaction or if the server response was not200 OK.
Hints:
-
You must check if any of the system calls fail.
-
You will want to follow the HTTP transaction steps described above and outlined below:
- Connect to remote host and port.
- Send HTTP request to remote server.
- Read response status and verify success.
- Read response headers (until there is an empty line).
- Read response body and copy to
stream. - Close connection.
Return number of bytes written to
stream.
-
Remember that HTTP uses DOS line endings and terminates each line with
\r\n. -
Use strstr to check the response status.
-
Use sscanf to parse the response headers for the value of
Content-Length. -
Use fgets to read the response status and headers.
-
Use fread and fwrite to read the response body since it may contain binary data.
-
If the server does not return a HTTP status of
200 OKor it provides aContent-Lengthand the number of bytes written tosteamdoes not match, then the function should returnfalseto indicate an error. Otherwise, if the HTTP status is200 OKand there is noContent-Lengthor the number of bytes written matches, then it should returntrue. -
Only a HTTP status of
200 OKis considered successful.
Task 2: Testing
Once you have implemented curlit, you can test it by running the
test-curlit target:
$ make test-curlit
Testing curlit utility...
 curlit                                                       ... Success
 curlit -h                                                    ... Success
 curlit -?                                                    ... Success
 curlit http://fake.host                                      ... Success
 curlit http://example.com                                    ... Success
 curlit http://nd.edu                                         ... Success
 curlit h4x0r.space                                           ... Success
 curlit h4x0r.space:9898/mind.txt                             ... Success
 curlit h4x0r.space:9898/txt/walden.txt                       ... Success
 curlit h4x0r.space:9898/txt/gatsby.txt                       ... Success
 curlit http://h4x0r.space:9898/txt/warandpeace.txt           ... Success
 curlit http://h4x0r.space:9898/img/appa.png                  ... Success

   Score 6.00 / 6.00
  Status Success
Activity 4: Quiz (2 Points)
Once you have completed all the activities above, you are to complete the following reflection quiz:
As with Reading 01, you will need to store your answers in a
homework10/answers.json file. You can use the form above to generate the
contents of this file, or you can write the JSON by hand.
To test your quiz, you can use the check.py script:
$ ../.scripts/check.py
Checking homework10 quiz ...
    Q01 0.80
    Q02 0.40
    Q03 0.40
    Q04 0.40
  Score 2.00 / 2.00
 Status Success
Guru Point: IRC Bot, VPS (2 Points)
For this week, there are two Guru Point opportunities.
Self-Service Extension
Remember that you can always forgo these Guru Points for two
extra days to do the homework. That is, if you need an extension, you can
simply skip the Guru Points and you will automatically have until Monday to
complete the assignment for full credit.
Just leave a note on your Pull Request of your
intensions.
Note: For this week, we will waive forgoing the Guru Points in order to get two extra days to do the homework. This means, that you can take the self-service extension and still do all of the Guru Points.
IRC Bot (1 Point)
For extra credit, you are to use Python and sockets to implement your own
version of bobbit, an IRC chat bot. Your bot should connect to the
chat.ndlug.org server and join the #bots channel. It should be able to
respond to at least one type of command or message. The particular operation
is up to you.
To help you get started, here are some resources:
NDLUG IRC
To connect to the NDLUG server yourself, you can use the following anonymous web client:
Alternatively, if you wish to have access to more chat features such as history, you can register via regserv.ndlug.org, which will setup a Lounge and IRC account for you.
The Lounge is a web-based IRC client that you can use from any web
browser, but you are free to connect to the IRC server from any IRC
client such as Weechat, Hexchat, or Textual using chat.ndlug.org as
the hostname and 6697 as the port.
A basic IRC client session looks like this:
USER ircle-pbui 0 * :pbui's bot
NICK ircle-pbui
JOIN #bots
PRIVMSG #bots :I've fallen and I can't get up!
-
The
USERcommand sets the users real name and registers the user. -
The
NICKcommand sets the users nickname. -
The
JOINcommand allows the user to join in a channel (in this case#bots). -
The
PRIVMSGcommand allows the user to send a message (in this case to the channel#bots).
Here is a basic skeleton, ircle.py, that you can start with:
import os
import socket
import ssl

# Constants

HOST = 'chat.ndlug.org'
PORT = 6697
NICK = f'ircle-{os.environ["USER"]}'

# Functions

def ircle():
    # Connect to IRC server
    ssl_context = ssl.create_default_context()
    tcp_socket  = socket.create_connection((HOST, PORT))
    ssl_socket  = ssl_context.wrap_socket(tcp_socket, server_hostname=HOST)
    ssl_stream  = ssl_socket.makefile('rw')

    # Identify ourselves
    ssl_stream.write(f'USER {NICK} 0 * :{NICK}\r\n')
    ssl_stream.write(f'NICK {NICK}\r\n')
    ssl_stream.flush()

    # Join #bots channel
    ssl_stream.write(f'JOIN #bots\r\n')
    ssl_stream.flush()

    # Write message to channel
    ssl_stream.write(f"PRIVMSG #bots :I've fallen and I can't get up!\r\n")
    ssl_stream.flush()

    # Read and display
    while True:
        message = ssl_stream.readline().strip()
        print(message)

# Main Execution

def main():
    ircle()

if __name__ == '__main__':
    main()
Alternatively, if you are interested in using the new asyncio features of Python 3 to perform event-driven and concurrent programming, you can use the following skeleton ircle-async.py:
import asyncio
import os
import sys

# Constants

HOST = 'chat.ndlug.org'
PORT = 6697
NICK = f'ircle-{os.environ["USER"]}'

# Functions

async def ircle():
    # Connect to IRC server
    reader, writer = await asyncio.open_connection(HOST, PORT, ssl=True)

    # Identify ourselves
    writer.write(f'USER {NICK} 0 * :{NICK}\r\n'.encode())
    writer.write(f'NICK {NICK}\r\n'.encode())
    await writer.drain()

    # Join #bots channel
    writer.write(f'JOIN #bots\r\n'.encode())
    await writer.drain()

    # Write message to channel
    writer.write(f"PRIVMSG #bots :I've fallen and I can't get up!\r\n".encode())
    await writer.drain()

    # Read and display
    while True:
        message = (await reader.readline()).decode().strip()
        print(message)

# Main execution

def main():
    asyncio.run(ircle())

if __name__ == '__main__':
    main()
Verification
To get credit for this Guru Point, you must have your IRC bot join the
#bots channel on the chat.ndlug.org server and demonstrate its
functionality yourself (by logging into the server with your own account) and
showing the instructor (pnutzh4x0r). You have up until Friday, May 3
to verify your guru point.
VPS (1 Point)
For extra extra credit, you are to sign up for virtual private server on a service such as Digital Ocean, Linode, Amazon Web Services, Microsoft Azure, Google Cloud, or Vultr and run the http_server.c server discussed in class from that VPS.
GitHub Student Developer Pack
As mentioned in class, you are eligible for the GitHub Student Developer Pack, which provides you with credits to Digital Ocean and Microsoft Azure (among many other free goodies).
Verification
To get credit for this Guru Point, you must show a TA a demonstration of
using curlit making a successful request to http_server.c running on your
VPS (or attach a video / screenshot to your Pull Request). You have up
until Friday, May 3 to verify your guru point.
Submission
To submit your assignment, please commit your work to the homework10 folder
of your homework10 branch in your assignments GitHub repository.
Your homework10 folder should only contain the following files:
MakefileREADME.mdanswers.jsoncurlit.cnmapit.csocket.csocket.hsocket.unit.c
Note: You do not need to commit the test scripts because the Makefile
automatically downloads them.
#-----------------------------------------------------------------------
# Make sure you have already completed Activity 0: Preparation
#-----------------------------------------------------------------------
...
$ git add Makefile                        # Mark changes for commit
$ git add socket.c                        # Mark changes for commit
$ git commit -m "homework10: Activity 1"  # Record changes
...
$ git add Makefile                        # Mark changes for commit
$ git add nmapit.c                        # Mark changes for commit
$ git commit -m "homework10: Activity 2"  # Record changes
...
$ git add Makefile                        # Mark changes for commit
$ git add curlit.c                        # Mark changes for commit
$ git commit -m "homework10: Activity 3"  # Record changes
...
$ git add answers.json                    # Mark changes for commit
$ git commit -m "homework10: Activity 4"  # Record changes
...
$ git push -u origin homework10           # Push branch to GitHub
Pull Request
Remember to create a Pull Request and assign the appropriate TA from the Reading 13 TA List.
DO NOT MERGE your own Pull Request. The TAs use open Pull Requests to keep track of which assignments to grade. Closing them yourself will cause a delay in grading and confuse the TAs.