Homework 07: Seqit, Tailit
The goal of this homework assignment is to allow you to practice memory management in C by building a linked list. The first activities involve implementing a doubly linked list with a sentinel node, while the last two activities requires you to use this data structure to implement your own versions of seq and tail.
For this assignment, you are to do your work in the homework07 folder of
your assignments GitHub repository and push your work by noon
Saturday, March 29.
Frequently Asked Questions
Activity 0: Preparation
Before starting this homework assignment, you should first perform a git
pull to retrieve any changes in your remote GitHub repository:
$ cd path/to/repository                   # Go to assignments repository

$ git switch master                       # Make sure we are in master branch

$ git pull --rebase                       # Get any remote changes not present locally
Next, create a new branch for this assignment:
$ git checkout -b homework07 # Create homework07 branch and check it out
Task 1: Skeleton Code
To help you get started, the instructor has provided you with the following skeleton code:
# Go to homework07 folder
$ cd homework07

# Download Makefile
$ curl -LO https://www3.nd.edu/~pbui/teaching/cse.20289.sp25/static/txt/homework07/Makefile

# Download C skeleton code
$ curl -LO https://www3.nd.edu/~pbui/teaching/cse.20289.sp25/static/txt/homework07/list.c
$ curl -LO https://www3.nd.edu/~pbui/teaching/cse.20289.sp25/static/txt/homework07/list.h
$ curl -LO https://www3.nd.edu/~pbui/teaching/cse.20289.sp25/static/txt/homework07/list.unit.c
$ curl -LO https://www3.nd.edu/~pbui/teaching/cse.20289.sp25/static/txt/homework07/node.c
$ curl -LO https://www3.nd.edu/~pbui/teaching/cse.20289.sp25/static/txt/homework07/node.unit.c
$ curl -LO https://www3.nd.edu/~pbui/teaching/cse.20289.sp25/static/txt/homework07/seqit.c
$ curl -LO https://www3.nd.edu/~pbui/teaching/cse.20289.sp25/static/txt/homework07/tailit.c
Once downloaded and extracted, you should see the following files in your
homework07 directory:
homework07
    \_ Makefile     # This is the Makefile for building all the assignment artifacts
    \_ list.c       # This is the List structure C source file
    \_ list.h       # This is the List library C header file
    \_ list.unit.c  # This is the List structure C unit test source file
    \_ node.c       # This is the Node structure C source file
    \_ node.unit.c  # This is the Node structure C unit test source file
    \_ seqit.c      # This is the seqit utility C source file
    \_ list.c       # This is the tailit utility C source file
Task 2: Initial Import
Now that the files are downloaded into the homework06 folder, you can
commit them to your git repository:
$ git add Makefile                            # Mark changes for commit
$ git add *.c *.h                             # Mark changes for commit
$ git commit -m "Homework 07: Initial Import" # Record changes
Task 3: Unit Tests
After downloading these files, you can run make test to run the tests.
# Run all tests (will trigger automatic download)
$ make test
You will notice that the Makefile downloads these additional test files and scripts:
homework07
    \_ list.unit.sh   # This is the List structure unit test shell script
    \_ node.unit.sh   # This is the Node structure unit test shell script
    \_ seqit.test.sh  # This is the seqit utility test shell script
    \_ tailit.test.sh # This is the tailit utility test shell script
You will be using these unit tests to verify the correctness and behavior of your code.
Automatic Downloads
The test scripts are automatically downloaded by the Makefile, so any
modifications you do to them will be lost when you run make again. Likewise,
because they are automatically downloaded, you do not need to add or commit
them to your git repository.
The details on what you need to implement for this assignment are described in the following sections.
Task 4: Makefile
The Makefile contains all the rules or recipes for building the project
artifacts (e.g. node.unit, list.unit, seqit, tailit, etc.):
CC=       gcc
CFLAGS=   -Wall -g -std=gnu99
LD=       gcc
LDFLAGS=  -L.
TARGETS=  seqit tailit

all:      $(TARGETS)

#-------------------------------------------------------------------------------
# TODO: Add rules for node.o, list.o, seqit.o, tailit.o, seqit, tailit
#-------------------------------------------------------------------------------

node.o:

list.o:

seqit.o:

tailit.o:

seqit:

tailit:

#-------------------------------------------------------------------------------
# DO NOT MODIFY BELOW
#-------------------------------------------------------------------------------

...
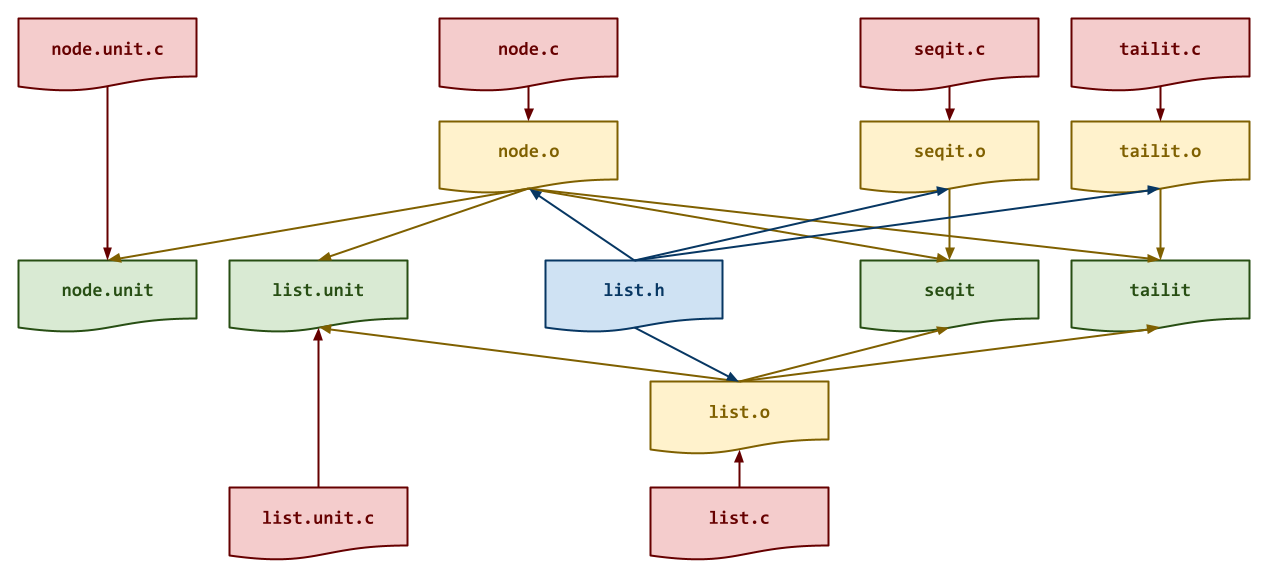
For this task, you will need to add rules for building the programs seqit
and tailit. Be sure to have a recipe for any intermediate object
files that programs require as shown in the DAG below:
Makefile Variables
You must use the CC, CFLAGS, LD, and LDFLAGS variables when
appropriate in your rules. You should also consider using automatic
variables such as $@ and $< as well.
Once you have a working Makefile, you should be able to run the following
commands:
# Build all TARGETS
$ make
gcc -Wall -g -std=gnu99 -c -o seqit.o seqit.c
gcc -Wall -g -std=gnu99 -c -o node.o node.c
gcc -Wall -g -std=gnu99 -c -o list.o list.c
gcc -L. -o seqit seqit.o node.o list.o
gcc -Wall -g -std=gnu99 -c -o tailit.o tailit.c
gcc -L. -o tailit tailit.o node.o list.o

# Run all tests
$ make test
Testing node ...
...

# Remove generated artifacts
$ make clean
Note: The tests will fail if you haven't implemented Node or List
structures, or the seqit or tailit programs.
Warnings
You must include the -Wall flag in your CFLAGS when you compile. This
also means that your code must compile without any warnings, otherwise
points will be deducted.
Task 5: list.h
The list.h file is the header file for the doubly linked list library, which
contains the following structs and function prototypes:
/* list.h: Doubly Linked List Library */

#pragma once

#include <stdbool.h>
#include <stdint.h>
#include <stdlib.h>

/* Value Union */

typedef union {
    int64_t number;     // Value as number
    char   *string;     // Value as string
} Value;

/* Node Structure */

typedef struct Node Node;
struct Node {
    Value   value;      // Value
    Node   *next;       // Pointer to next Node
    Node   *prev;       // Pointer to previous Node
};

Node *  node_create(Value v, Node *next, Node *prev);
void    node_delete(Node *n, bool release);

/* List Structure */

typedef struct {
    Node    sentinel;   // Sentinel Node at head and tail of List
    size_t  size;       // Number of Nodes in List
} List;

List *  list_create();
void    list_delete(List *l, bool release);

void    list_append(List *l, Value v);
Value   list_pop(List *l, size_t index);
Other programs will #include this file in order to use the functions we
will be implementing in this library.
Value Union
The Value union is used by the Node structure to store either an
integer or a string:
// Declare a Value union with an integer
Value v = (Value)10L;

// Alternatively
Value v = {.number = 10};

// Access number
printf("%ld\n", v.number);

// Declare a Value union with a string
Value v = (Value)"reasonable";

// Alternatively
Value v = {.string = "reasonable"};

// Access string
puts(v.string);
The details of the Node structure and List structure, and what you need
to implement are provided in the following sections.
Note: For this task, you do not need to modify this file. Instead, you should review it and ensure you understand the provided code.
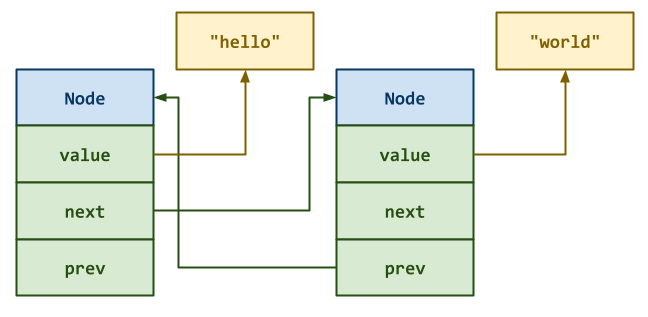
Activity 1: Node Structure (1 Point)
For the first activity, you are to implement a Node structure to be
used in a doubly linked list. Each Node structure will have the
following attributes:
-
value: This is a union that can either be a number (ie.int64_t) or a string (ie.char *). -
next: This is a pointer to the nextNodestruct in the sequence. -
prev: This is a pointer to the previousNodestruct in the sequence.
Task 1: node.c
The node.c file contains the C implementation for the Node
structure described above. For this task, you will need to implement the
following functions:
-
Node * node_create(Value v, Node *next, Node *prev)This function allocates a new
Nodestruct and initializes its attributes:value,next,prevas described above. -
void node_delete(Node *n, bool release)This function deallocates the given
Nodestruct along with its internalvalueas a string ifreleaseistrue.
Task 2: Testing
As you implement the functions in node.c, you should use the node.unit
executable with the node.unit.sh script to test each of your functions:
# Build test artifacts and run test scripts
$ make test-node
Testing node ...
 node_create                              ... Success
 node_delete                              ... Success

   Score 1.00 / 1.00
  Status Success
You can also run the testing script manually:
# Run Shell unit test script manually
$ ./node.unit.sh
...
To debug your Node functions, you can use gdb on the node.unit executable:
# Start gdb on node.unit
$ gdb ./node.unit
(gdb) run 0     # Run node.unit with the "0" command line argument (ie. node_create)
...
You can also use valgrind to check for memory errors:
# Check for memory errors on node_create test case
$ valgrind --leak-check=full ./node.unit 0
Iterative Development
You should practice iterative development. That is, rather than writing a bunch of code and then debugging it all at once, you should concentrate on one function at a time and then test that one thing at a time. The provided unit tests allow you to check on the correctness of the individual functions without implementing everything at once. Take advantage of this and build one thing at a time.
Activity 2: List Structure (2 Points)
In high-level languages such as Python, we have built-in implementations of lists which support a variety of methods:
# Declare a list
>>> data = [5, 7, 4]

# Add a new value to the back of list
>>> data.append(0)
>>> data
[5, 7, 4, 0]

# Remove value from front of list
>>> data.pop(0)
5
>>> data
[7, 4, 0]

# Remove value from middle of list
>>> data.pop(1)
4
>>> data
[7, 0]
As you already know, lists in Python provide an append method to add
values to the back of the list and a pop method to remove a value at a
specified index from the list.
For the second activity, you are to use the Node structure from the
previous activity to construct a List structure that implements a
doubly linked list with a sentinel node to mimic the functionality of
lists in Python.
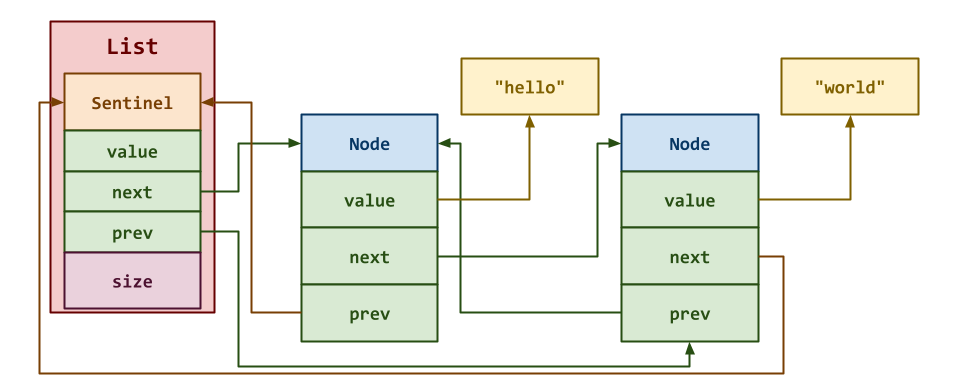
The List struct you are to implement has the following attributes:
-
sentinel: This is a sentinelNodestruct embedded inside theListstruct. It is used to simplify our internalListmethods by ensuring that there will always be an allocatedNodein the doubly linked list. -
size: This is the number of values in theListstructure.
Note: The sentinel node is not considered part of the actual list.
It does not store any value nor does it contribute to the size of the
List.
Instead, it is there so that its next pointer is the head of the
doubly linked list and its prev pointer is the tail of the doubly
linked list.
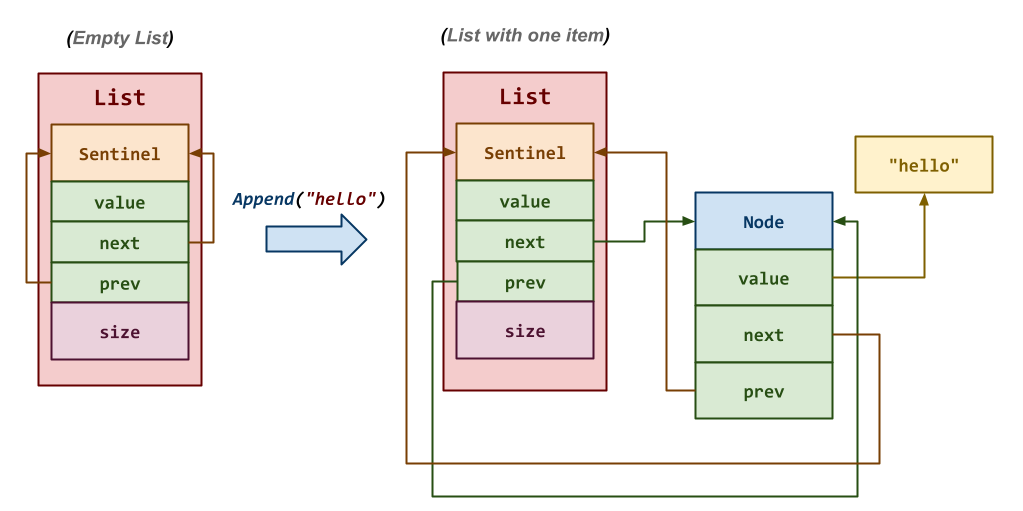
With this List struct in mind, you are to complete the doubly linked
list library, which contains functions such as list_append and list_pop
that implement some of the functionality present in Python but missing in
C.
Task 1: list.c
The list.c file contains the C implementation for the List
structure described above. For this task, you will need to implement the
following functions:
For this task, you will need to implement the following functions:
-
List* list_create()This function allocates a new
Liststruct and initializes its attributes:sentinelandsizeas described above. -
void list_delete(List *l, bool release)This function deallocates the given
Liststruct along with its internalNodestructs.Hint: Use
node_deleteto delete the internalNodestruct`s.To loop through the internal
Nodestructures, you will want to start with the firstNodethesentinelpoints to and then stop once you return to thesentinel. -
void list_append(List *l, Value v)This function creates a new
Nodestruct with the givenValuevand adds it to the back of the internal doubly linked list (e.g.l.append(s)in Python).Hint: Use
node_createand take advantage of thesentinelin theListstruct. -
Value list_pop(List *l, size_t index)This function removes the
Nodestruct at the specifiedindexfrom the internal doubly linked list and returns the associatedValuefrom theNodestruct (e.g.l.pop(index)in Python).Hint: Use
node_deleteand take advantage of thesentinelin theListstruct.If the
indexis beyond the bounds of theList, then return-1Las the `Value.
Task 2: Testing
As you implement the functions in list.c, you should use the list.unit
executable with the list.unit.sh script to test each of your functions:
# Build test artifacts and run test scripts
$ make test-list
Testing list ...
 list_create                              ... Success
 list_delete                              ... Success
 list_append                              ... Success
 list_pop                                 ... Success

   Score 2.00 / 2.00
  Status Success
You can also run the testing script manually:
# Run Shell unit test script manually
$ ./list.unit.sh
...
To debug your list functions, you can use gdb on the list.unit executable:
# Start gdb on list.unit
$ gdb ./list.unit
(gdb) run 0     # Run list.unit with the "0" command line argument (ie. list_create)
...
You can also use valgrind to check for memory errors:
# Check for memory errors on list_create test case
$ valgrind --leak-check=full ./list.unit 0
Activity 3: Seqit (2 Points)
Once you have implemented both doubly linked list library, you are to
complete the seqit.c program, which is a simplified version of the seq
utility:
# Show usage
$ ./seqit
Usage: seqit LAST
       seqit FIRST LAST
       seqit FIRST INCREMENT LAST

# Show sequence of numbers start from 1 through 10
$ ./seqit 10
1
2
3
4
5
6
7
8
9
10

# Show sequence of numbers start from 5 through 10
$ ./seqit 5 10
5
6
7
8
9
10

# Show sequence of odd numbers start from 5 through 10
$ ./seqit 5 2 10
5
7
9
As can be seen, the seqit program emits a sequence of numbers (one number
per line) based on the specified FIRST, INCREMENT, and LAST arguments.
By default, FIRST is 1 and INCREMENT is 1.
Task 1: seqit.c
The seqit.c file contains the C implementation of the seqit program
described above. You will need to implement the following functions:
-
List *generate_sequence(ssize_t first, ssize_t increment, ssize_t last)This function generates a sequence of numbers going from
firsttolastusing the specifiedincrementby building aListwith these numbers and returning it.Hint: Take advantage of the
list_createandlist_appendfunctions you wrote above.Think carefully how you should handle negative
incrementparameters. -
int main(int argc, char *argv[])This function parses command line arguments for
FIRST,INCREMENT, orLAST, generates a sequence of numbers, and then prints out that sequence (one number per line).Hint: Take advantage of the
list_create,list_pop,list_deletefunctions you wrote above.
Task 2: Testing
As you implement seqit.c, you can test it by running the test-seqit
target:
# Build artifact and run test
$ make test-seqit
Testing seqit ...
 seqit 1                                  ... Success
 seqit 10                                 ... Success
 seqit 100                                ... Success
 seqit 1 100                              ... Success
 seqit 1 2 100                            ... Success
 seqit 100 -3 1                           ... Success
 seqit 1 2 3 4                            ... Success

   Score 2.00 / 2.00
  Status Success
Activity 4: Tailit (2 Points)
Once you have implemented both doubly linked list library, you are to
complete the tailit.c program, which is a simplified version of the tail
utility:
# Show usage
$ ./tailit -h
Usage: tailit [-n NUMBER]

    -n NUMBER  Output the last NUMBER of lines (default is 10)

# Show last 10 lines
$ ./seqit 100 | ./tailit
91
92
93
94
95
96
97
98
99
100

# Show last 5 lines
$ ./seqit 100 | ./tailit -n 5
96
97
98
99
100
As can be seen, the tailit program reads [standard input] line by line and
only emits the last 10 lines by default. If the user specifies another
limit via the -n flag, then only that number of lines is shown.
Task 1: tailit.c
The tailit.c file contains the C implementation of the tailit program
described above. You will need to implement the following functions:
-
List *tail_stream(FILE *stream, size_t limit)This function reads the
streamline by line and returns aListcontaining the lastlimitnumber of lines from thestream.Hint: Take advantage of the
list_create,list_append, andlist_popfunctions you wrote above.Think carefully how you should handle storing only the
limitnumber of lines in yourList.Consider using strdup to ensure the [strings] you read with [fgets] persist between function calls.
-
int main(int argc, char *argv[])This function parses the command line arguments, creates a list of the last
NUMBERof lines, and then prints out the items in the list.Hint: Take advantage of the
list_create,list_pop,list_deletefunctions you wrote above.
Task 2: Testing
As you implement tailit.c, you can test it by running the test-tailit
target:
# Build artifact and run test
$ make test-tailit
Testing tailit ...
 tailit -h                                ... Success
 tailit -p                                ... Success
 tailit                                   ... Success
 tailit -n 1                              ... Success
 tailit -n 5                              ... Success
 tailit -n 10                             ... Success
 tailit -n 25                             ... Success
 tailit -n 100                            ... Success

   Score 2.00 / 2.00
  Status Success
Activity 5: Quiz (3 Points)
Once you have completed all the activities above, you are to complete the following reflection quiz:
As with Reading 01, you will need to store your answers in a
homework07/answers.json file. You can use the form above to generate the
contents of this file, or you can write the JSON by hand.
To check your quiz directly, you can use the check.py script:
$ ../.scripts/check.py
Checking homework07 quiz ...
     Q01 0.20
     Q02 0.20
     Q03 1.50
     Q04 0.60
     Q05 0.25
     Q06 0.25

   Score 3.00 / 3.00
  Status Success
Code Review (Optional, 1 Point)
For one point of extra credit, you may perform a code review with either an AI agent (of your choice) or with a TA by Wednesday, April 2:
-
AI Code Review: Once the whole assignment is completed, pick one or two of the most challenging functions and ask the AI agent to review your original code by suggesting improvements, optimizations, or alternative implementations.
Test and verify these suggestions and then decide whether or not you wish to keep them. Discuss in the
README.mdwhat you think of the AI code review and explain your decision.AI Code Review: Verification
To receive credit for the AI Code Review, you must:
-
Link a transcript or include sufficient screenshots of the code review in the Pull Request of your conversation with the AI agent.
-
This conversation must show your original code and the suggested improvements by the AI agent.
-
Discuss the code review and explain your decision in the
README.md. -
Update your Pull Request based on the feedback.
-
-
TA Code Review: Once the whole assignment is completed, meet with one of the teaching assistants from the course in-person and have them review your whole assignment.
To document this process, make the teaching assistant who is reviewing your code a reviewer on your Pull Request and have them record their suggestions as they discuss them with you in-person.
After the code review, you can decide whether or not you wish to incorporate this feedback into your implementation and update your Pull Request.
Note: The TA performing the code review does not need to be the same TA responsible for grading your assignment.
TA Code Review: Verification
To receive credit for the TA Code Review, you must:
-
Meet with a teaching assistant in-person.
-
Make this teaching assistant a reviewer in your Pull Request.
-
Have the teaching assistant record their suggestions on the Pull Request.
-
Update your Pull Request based on the feedback.
-
Guru Point: Zines (Optional, 1 Point)
For one point of extra credit, you may create an original zine (ala Julia Evans) related to the topics for Exam 03 by Wednesday, April 2:
- Compiling and Building: Compiler pipeline, dynamic vs static executables, Makefiles
- Pointers, Arrays, Strings: Declaration, initialization, dereferencing, accessing, iterating
- Memory Allocation: Address space, stack vs heap, structs, unions
- Bitsets: Integer sizes, boolean operations
- Linked Lists: Construction, destruction, iteration, inserting, deletion, access
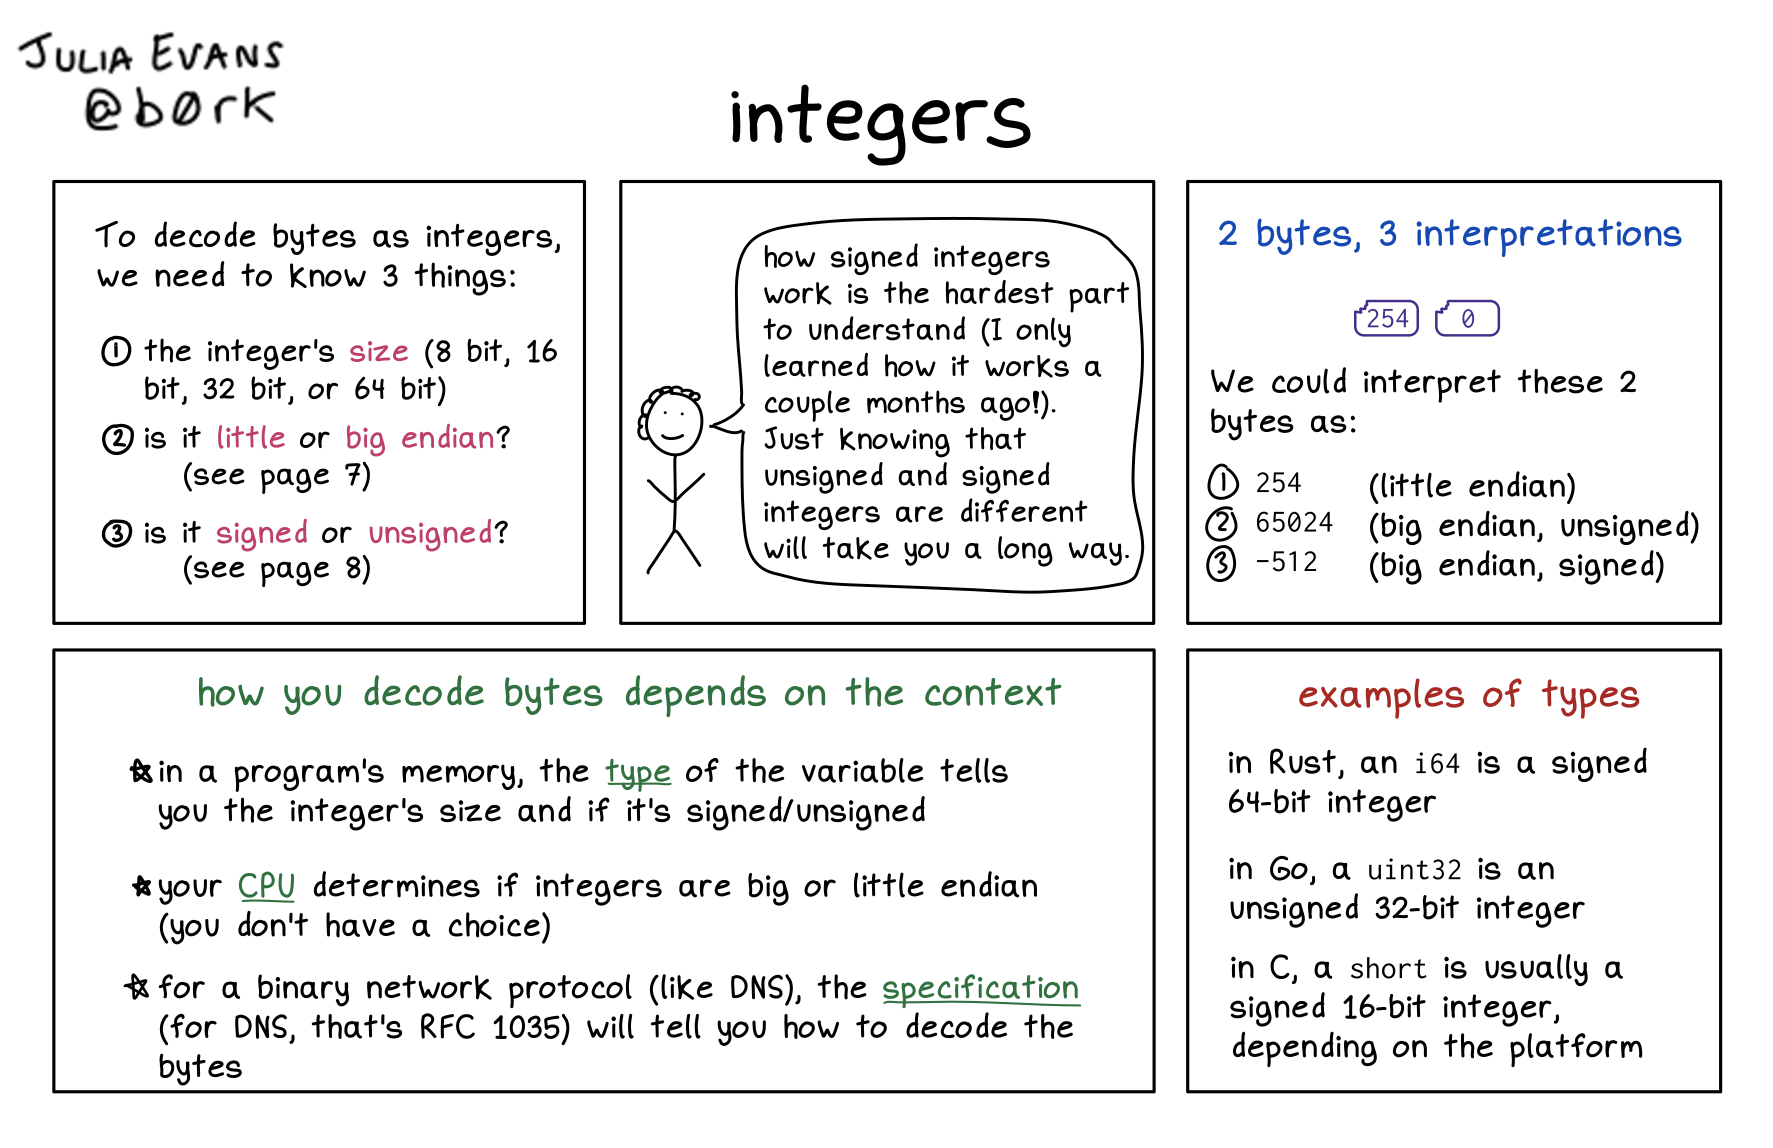
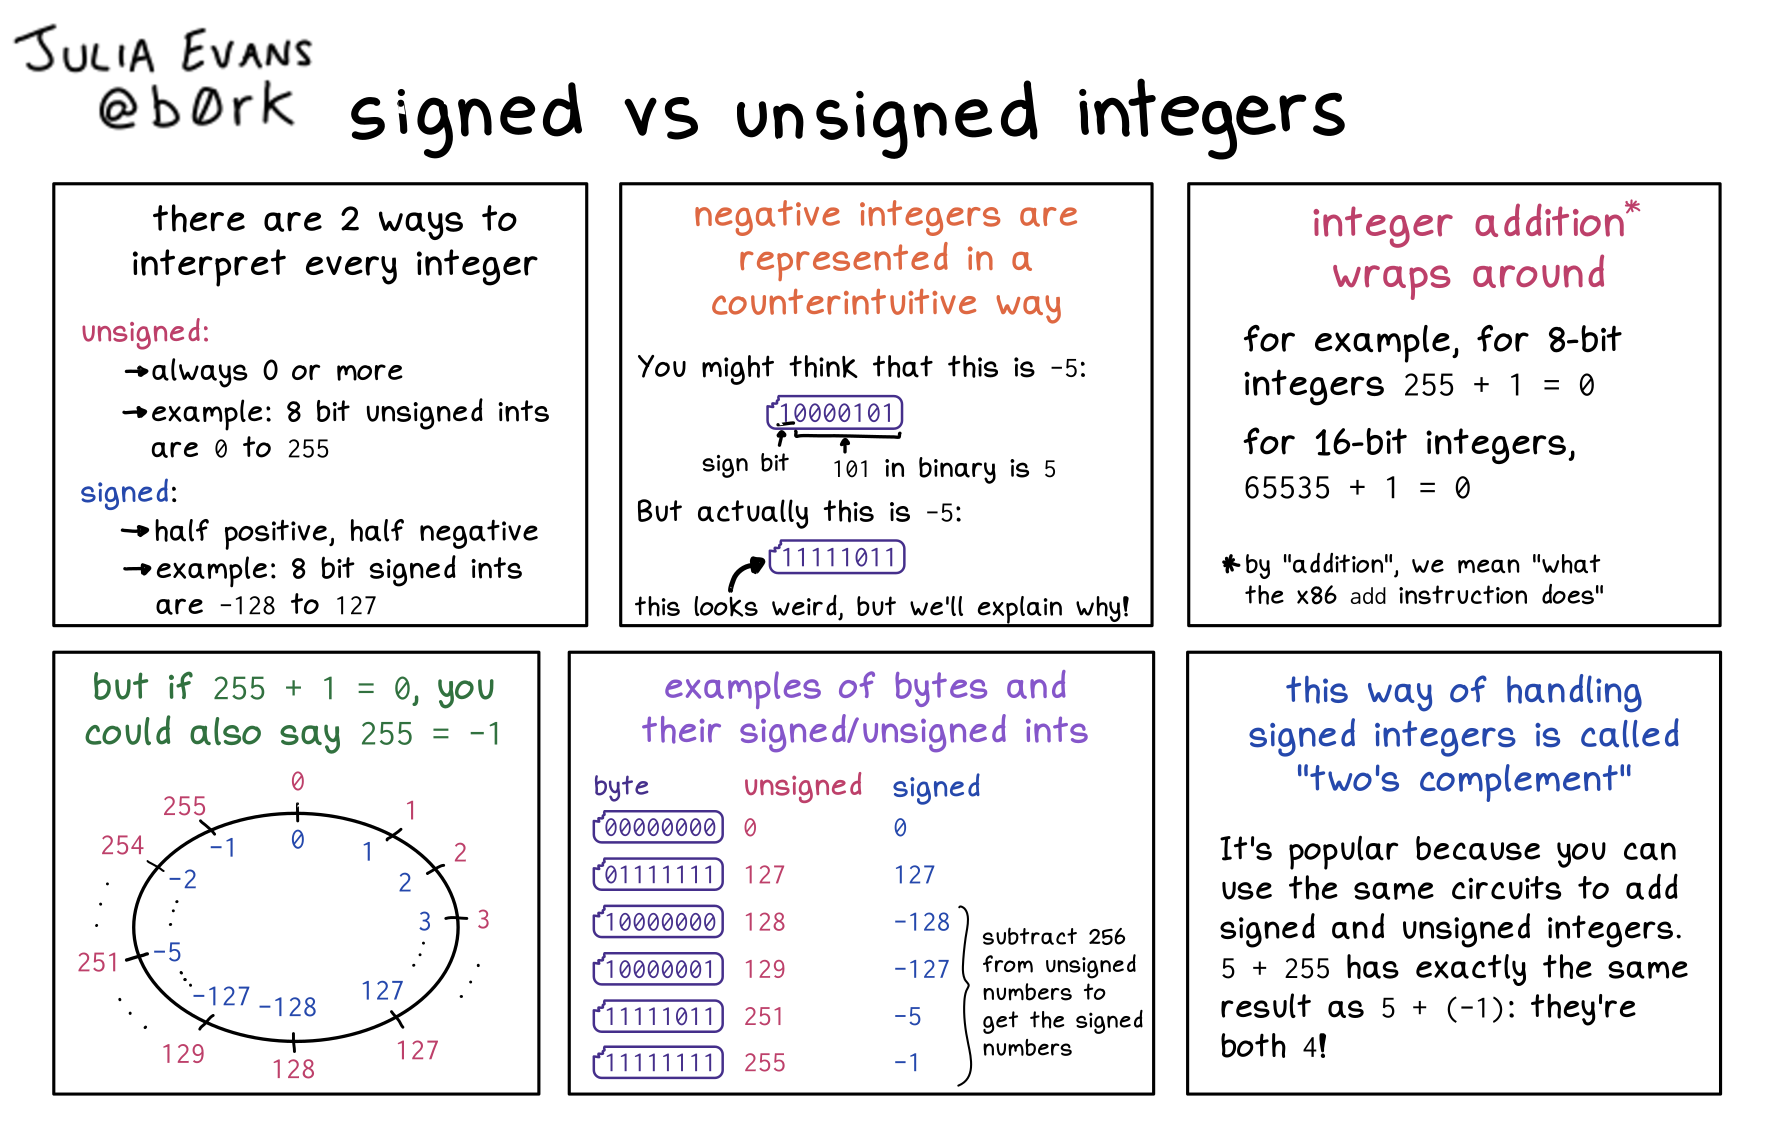
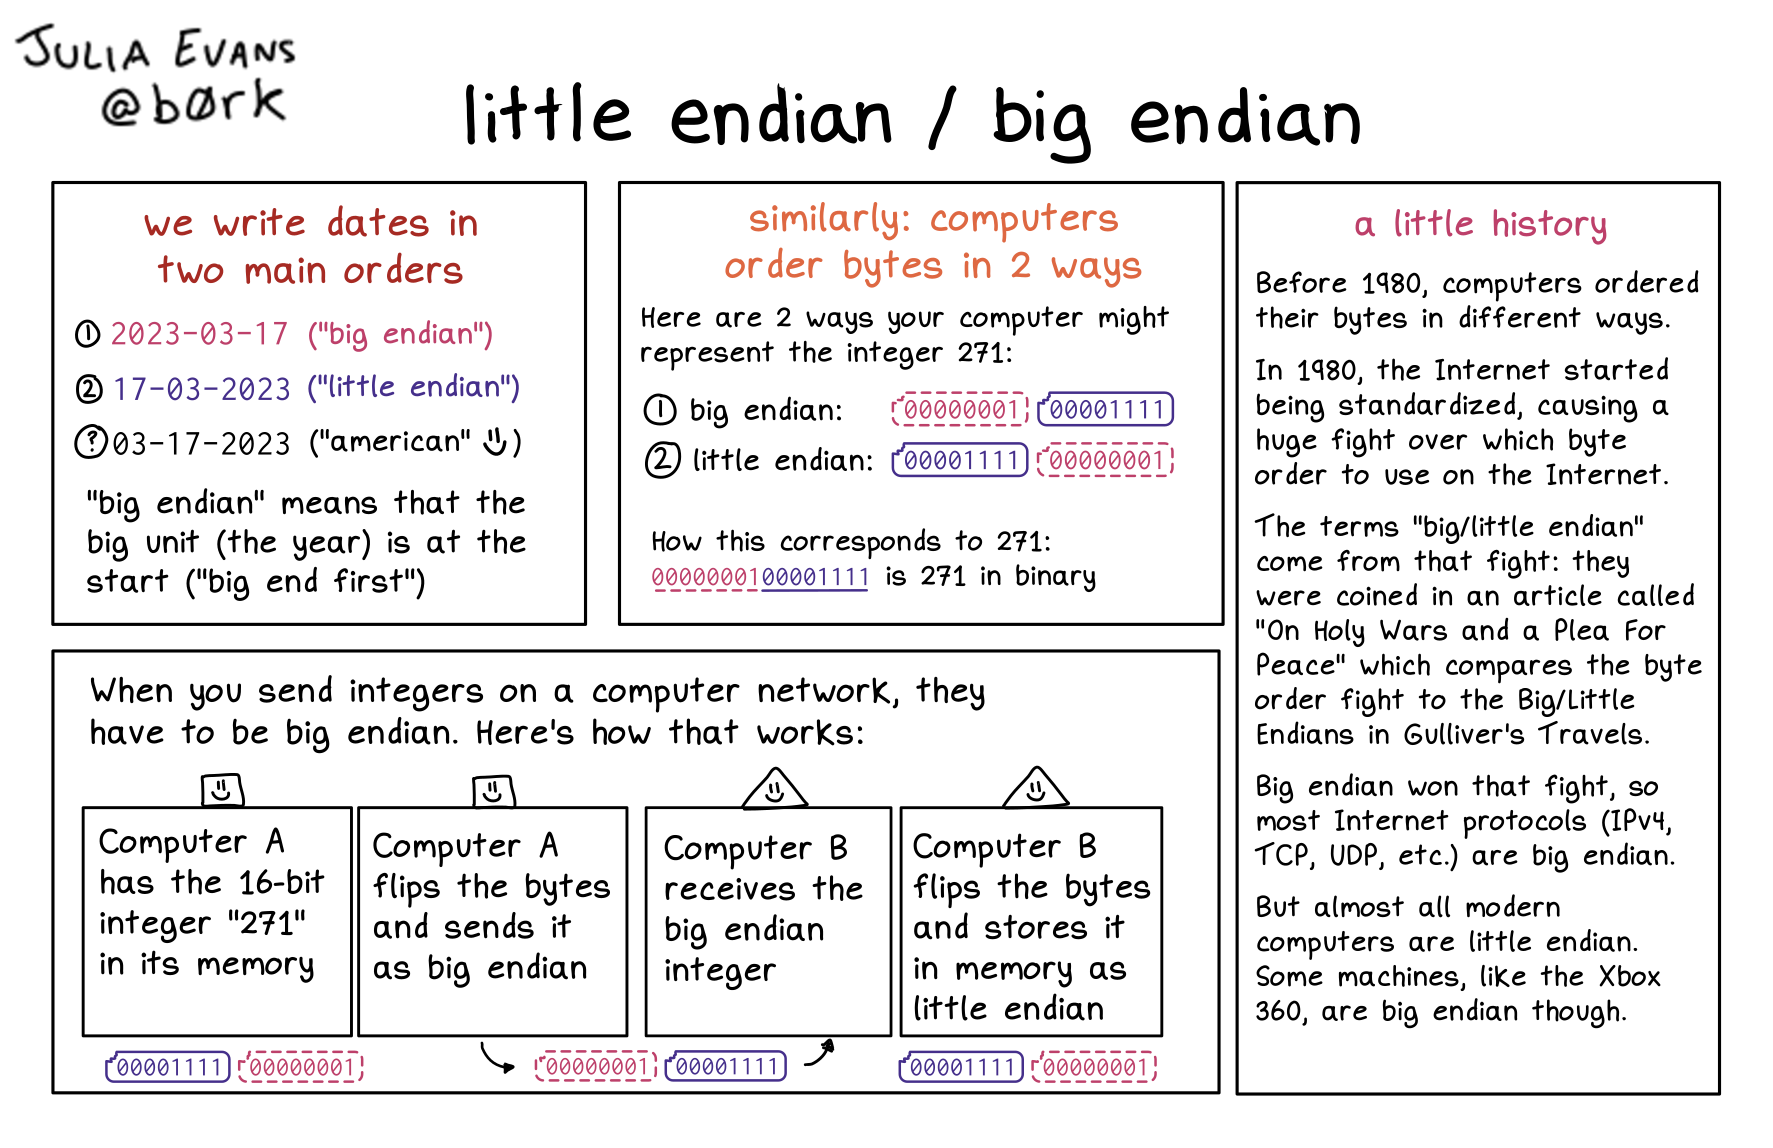
- Data Representation: Signed vs Unsigned, Little vs Big Endian
Some examples from Julia Evans:
Note: It is OK if multiple people pick the same topic, but try to put your own spin on the material.
Zine: Verification
To receive credit for the Zine, you must:
-
Create an original zine (reposting is not allowed).
-
Post the original zine to Exam 03 - Zines document.
-
Include a link or screenshot of the zine in your Pull Request.
Submission
To submit your assignment, please commit your work to the homework07 folder
of your homework07 branch in your assignments GitHub repository.
Your homework07 folder should only contain the following files:
Makefileanswers.jsonlist.clist.hlist.unit.cnode.cnode.unit.cseqit.ctailit.c
Note: You do not need to commit the test scripts because the Makefile
automatically downloads them.
#-----------------------------------------------------------------------
# Make sure you have already completed Activity 0: Preparation
#-----------------------------------------------------------------------
...
$ git add Makefile                            # Mark changes for commit
$ git commit -m "Homework 07: Makefile"       # Record changes
...
$ git add node.c                              # Mark changes for commit
$ git commit -m "Homework 07: node.c"         # Record changes
...
$ git add list.c                              # Mark changes for commit
$ git commit -m "Homework 07: list.c"         # Record changes
...
$ git add seqit.c                             # Mark changes for commit
$ git commit -m "Homework 07: seqit.c"        # Record changes
...
$ git add tailit.c                            # Mark changes for commit
$ git commit -m "Homework 07: tailit"         # Record changes
...
$ git add answers.json                        # Mark changes for commit
$ git commit -m "Homework 07: Quiz"           # Record changes
...
$ git push -u origin homework07               # Push branch to GitHub
Acknowledgments
If you collaborated with any other students, or received help from TAs or AI
tools on this assignment, please record this support in the README.md in
the homework07 folder and include it with your Pull Request.
Pull Request
Remember to create a Pull Request and assign the appropriate TA from the Reading 09 TA List.
DO NOT MERGE your own Pull Request. The TAs use open Pull Requests to keep track of which assignments to grade. Closing them yourself will cause a delay in grading and confuse the TAs.