Homework 08: Findit
The goal of this homework assignment is to allow you to continue practicing
dynamic memory management in C by building another linked list library
and navigating the file system using low-level functions and system
calls. The first two activities involve implementing a singly linked list
with a tail pointer and then a few filter functions that check
various attributes about files, while the last activity requires you to use
these structures and functions to build a file system search utility similar
to find named findit.
For this assignment, record your source code and any responses to the
following activities in the homework08 folder of your assignments
GitHub repository and push your work by noon Saturday, April 12.
Frequently Asked Questions
Activity 0: Preparation
Before starting this homework assignment, you should first perform a git
pull to retrieve any changes in your remote GitHub repository:
$ cd path/to/repository                   # Go to assignments repository

$ git switch master                       # Make sure we are in master branch

$ git pull --rebase                       # Get any remote changes not present locally
Next, create a new branch for this assignment:
$ git checkout -b homework08 # Create homework08 branch and check it out
Task 1: Skeleton Code
To help you get started, the instructor has provided you with the following skeleton code:
# Go to homework08 folder
$ cd homework08

# Download Makefile
$ curl -LO https://www3.nd.edu/~pbui/teaching/cse.20289.sp25/static/txt/homework08/Makefile

# Download C skeleton code
$ curl -LO https://www3.nd.edu/~pbui/teaching/cse.20289.sp25/static/txt/homework08/filter.c
$ curl -LO https://www3.nd.edu/~pbui/teaching/cse.20289.sp25/static/txt/homework08/filter.unit.c
$ curl -LO https://www3.nd.edu/~pbui/teaching/cse.20289.sp25/static/txt/homework08/findit.c
$ curl -LO https://www3.nd.edu/~pbui/teaching/cse.20289.sp25/static/txt/homework08/findit.h
$ curl -LO https://www3.nd.edu/~pbui/teaching/cse.20289.sp25/static/txt/homework08/list.c
$ curl -LO https://www3.nd.edu/~pbui/teaching/cse.20289.sp25/static/txt/homework08/list.unit.c
Once downloaded, you should see the following files in your homework08 directory:
homework08
    \_ Makefile       # This is the Makefile for building all the assignment artifacts
    \_ filter.c       # This is the filter functions C source file
    \_ filter.unit.c  # This is the filter functions C unit test source file
    \_ findit.c       # This is the findit utility C source file
    \_ findit.h       # This is the findit utility C header file
    \_ list.c         # This is the linked list C source file
    \_ list.unit.c    # This is the linked list C unit test source file
Task 2: Initial Import
Now that the files are downloaded into the homework08 folder, you can
commit them to your git repository:
$ git add Makefile                            # Mark changes for commit
$ git add *.c *.h
$ git commit -m "Homework 08: Initial Import" # Record changes
Task 3: Unit Tests
After downloading these files, you can run make test to run the tests.
# Run all tests (will trigger automatic download)
$ make test
You will notice that the Makefile downloads these additional test data and scripts:
homework08
    \_ filter.unit.sh   # This is the filter functions unit test shell script
    \_ find.test.sh     # This is the findit utility test shell script
    \_ list.unit.sh     # This is the linked list unit test shell script
You will be using these unit tests to verify the correctness and behavior of your code.
Automatic Downloads
The test scripts are automatically downloaded by the Makefile, so any
modifications you do to them will be lost when you run make again. Likewise,
because they are automatically downloaded, you do not need to add or commit
them to your git repository.
Task 4: Makefile
The Makefile contains all the rules or recipes for building the
project artifacts (e.g. findit):
CC=       gcc
CFLAGS=   -Wall -g -std=gnu99
LD=       gcc
LDFLAGS=  -L.
TARGETS=  findit

all:    $(TARGETS)

#-------------------------------------------------------------------------------
# TODO: Add rules for object files
#-------------------------------------------------------------------------------

list.o:

filter.o:

findit.o:

#-------------------------------------------------------------------------------
# TODO: Add rules for executables
#-------------------------------------------------------------------------------

findit:

#-------------------------------------------------------------------------------
# DO NOT MODIFY BELOW
#-------------------------------------------------------------------------------

...
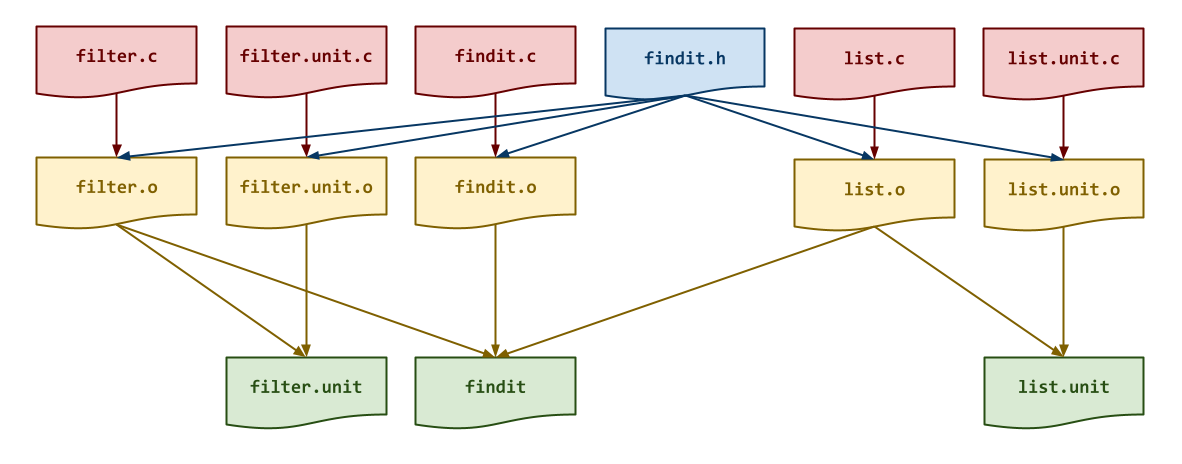
For this task, you will need to add rules for building the intermediate
object files (ie. list.o, filter.o, findit.o) and the findit
executable with the appropriate dependencies as shown the DAG below:
Makefile Variables
You must use the CC, CFLAGS, LD, LDFLAGS, AR, and ARFLAGS
variables when appropriate in your rules. You should also consider
using automatic variables such as $@ and $< as well.
Once you have a working Makefile, you should be able to run the following commands:
# Build all TARGETS
$ make
gcc -Wall -g -std=gnu99 -c -o findit.o findit.c
gcc -Wall -g -std=gnu99 -c -o list.o list.c
gcc -Wall -g -std=gnu99 -c -o filter.o filter.c
gcc -L. -o findit findit.o list.o filter.o

# Run all tests
$ make test
Testing list ...
 node_create                                                  ... Success
 node_delete                                                  ... Success
 list_append                                                  ... Success
 list_filter                                                  ... Success
 list_output                                                  ... Success

   Score 2.50 / 2.50
  Status Success

Testing filter ...
 filter_by_type                                               ... Success
 filter_by_name                                               ... Success
 filter_by_mode                                               ... Success

   Score 1.50 / 1.50
  Status Success

Testing findit ...
 findit                                                       ... Success
 findit /etc                                                  ... Success
 findit /etc -type f                                          ... Success
 findit /etc -type d                                          ... Success
 findit /etc -name '*.conf'                                   ... Success
 findit /etc -readable                                        ... Success
 findit /etc -writable                                        ... Success
 findit /etc -executable                                      ... Success
 findit /etc -type d -name '*.d'                              ... Success
 findit /etc -type d -name '*.d' -executable                  ... Success
 findit . -name '*.c'                                         ... Success
 findit . -writable                                           ... Success
 findit . -type f -name '*.unit' -executable                  ... Success

   Score 4.00 / 4.00
  Status Success

# Remove generated artifacts
$ make clean
Note: The tests will fail if you haven't implemented all the necessary functions appropriately.
Warnings
You must include the -Wall flag in your CFLAGS when you compile. This
also means that your code must compile without any warnings, otherwise
points will be deducted.
Task 5: findit.h
The findit.h file is the header file for the findit utility, which
means it contains the type definitions and function prototypes:
/* findit.h: Search for files in a directory hierarchy */

#pragma once

#include <stdbool.h>
#include <stdio.h>

/* Options Structure */

typedef struct {
    int   type;         // File type (-type)
    char *name;         // File name pattern (-name)
    int   mode;         // Access modes (-executable, -readable, -writable)
} Options;

/* Filter Functions */

typedef bool (*Filter)(const char *path, Options *options);

bool  filter_by_type(const char *path, Options *options);
bool  filter_by_name(const char *path, Options *options);
bool  filter_by_mode(const char *path, Options *options);

/* Data Union */

typedef union {
    char *  string;     // String data
    Filter  function;   // Filter function
} Data;

/* Node Structure */

typedef struct Node Node;
struct Node {
    Data    data;       // Data value
    Node   *next;       // Pointer to next Node
};

Node *  node_create(Data data, Node *next);
void    node_delete(Node *n, bool release, bool recursive);

/* List Structure */

typedef struct {
    Node   *head;       // Pointer to first Node
    Node   *tail;       // Pointer to last Node
} List;

void    list_append(List *l, Data data);
void    list_filter(List *l, Filter filter, Options *options, bool release);
void    list_output(List *l, FILE *stream);
Other C source files will #include this file in order to use the
functions we will be implementing in this assignment.
Options Structure
The Options structure is used by the Filter functions to check the
attribute of various files and directories encountered in the findit
program. It has the following fields:
-
type: This is used to store the file type (ie. S_IFREG, S_IFDIR) to match against. -
name: This is used to store the glob pattern to match against the basename of apathstring. -
mode: This is used to store the access mode to match against.
Data Union
The Data union is used by the List structure to store either a string
or a Filter function pointer:
// Declare a Data union with a string
Data dp = (Data)"file path";

// Access string
puts(dp.string)

// Declare a Data union with a Filter function pointer
Data df = (Data)filter_by_type;

// Access Filter function
df.function(path, options);
The details of the Node structure, List structure, and Filter functions
and what you need to implement are provided in the following sections.
Note: For this task, you do not need to modify this file. Instead, you should review it and ensure you understand the provided code.
Activity 1: Linked List (2.5 Points)
The findit utility works by first walking a directory recursively and
adding any entries it encounters to a singly linked list of file paths.
For the first activity, you are to implement a singly linked list with both
a head and tail pointer as show below:
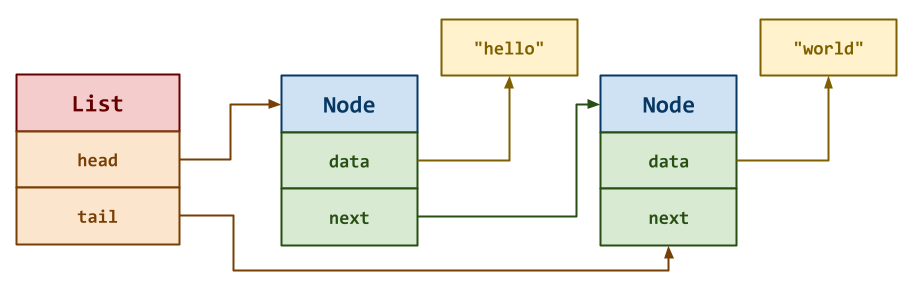
The List structure consists of two pointers to Node structures:
head: This points to the firstNodein the singly linked list.tail: This points to the lastNodein the singly linked list.
If the List is empty, then both head and tail should be NULL.
Each Node structure contains a Data union to store either a string or a
Filter function pointer, and a pointer to the next Node in the singly
linked list.
Task 1: list.c
The list.c file contains the C implementation for the linked list
structure. For this task, you will need to implement the following
functions:
-
Node * node_create(Data data, Node *next)This function allocates a new
Nodestructure on the heap, initializes itsdataandnextattributes, and returns a pointer to this newNodestructure. -
void node_delete(Node *n, bool release, bool recursive)This function deallocates the given
Nodestructure. Ifrecursiveistrue, then the function will callnode_deleteon thenextitem in the singly linked list. Likewise, ifreleaseistruethen thedatastring will also be deallocated (before deallocating theNodeitself).Hint: Consider using free. -
void list_append(List *l, Data data)This function adds a new
Nodestructure with the givendatato thetailof the givenListstructure.Hint: Consider using
node_createand make sure you update theheadandtailof theListappropriately. -
void list_filter(List *l, Filter filter, Options *options, bool release)This function filters the given
Listby applying theFilterfunction to eachNode'sDatastring and the givenOptionsstructure. If theFilterfunction returnstrue, then theNodeis kept. Otherwise, it is removed from theList. Ifreleaseistrue, then theDatastring should also be deallocated when removing aNode.Hint: Consider using
node_deletewhen removing aNode. Draw a picture and consider how many pointers you need to effectively traverse theListand to remove aNodein the middle of theList. Moreover, make sure you update theheadandtailof theListappropriately. -
void list_output(List *l, FILE *stream)This function prints the
Datastring of eachNodein the givenListto the specifiedstream.Hint: Consider using fprintf.
Task 2: Testing
As you implement the functions in list.c, you should use the list.unit
executable with the list.unit.sh script to test each of your functions:
# Build test artifacts and run test scripts
$ make test-list
Testing list ...
 node_create                                                  ... Success
 node_delete                                                  ... Success
 list_append                                                  ... Success
 list_filter                                                  ... Success
 list_output                                                  ... Success

   Score 2.50 / 2.50
  Status Success
You can also run the testing script manually:
# Run Shell unit test script manually
$ ./list.unit.sh
...
To debug your linked list functions, you can use [gdb] on the
list.unit executable:
# Start gdb on list.unit
$ gdb ./list.unit
(gdb) run 0     # Run list.unit with the "0" command line argument (ie. node_create)
...
You can also use valgrind to check for memory errors:
# Check for memory errors on list_lower test case
$ valgrind --leak-check=full ./list.unit 0
Iterative Development
You should practice iterative development. That is, rather than writing a bunch of code and then debugging it all at once, you should concentrate on one function at a time and then test that one thing at a time. The provided unit tests allow you to check on the correctness of the individual functions without implementing everything at once. Take advantage of this and build one thing at a time.
Activity 2: Filters (1.5 Points)
As with the conventional find command, the findit utility will allow for
filtering the list of file paths by their individual attributes. For
instance, to only display the regular files in a directory, you can do the
following with find:
# Only display regular files in the current directory
$ find . -type f
Internally, findit will support this feature by calling a Filter function
on each entry in its singly linked list of file paths to check whether or
not to keep it. In this specific example, findit would call
filter_by_type with an Options structure that has its type attribute
set to S_IFREG on each Data string in its List.
To support filtering the list of file paths in findit, you are to
implement three Filter functions that return true if the file path
should be kept in the list.
Task 1: filter.c
The filter.c file contains the C implementation for the Filter
functions. For this task, you will need to implement the following
functions:
-
bool filter_by_type(const char *path, Options *options)This function returns
trueif the file at the specifiedpathhas the corresponding type specified in theOptionsstructure. -
bool filter_by_name(const char *path, Options *options)This function returns
trueif the basename of the specifiedpathhas matches the glob pattern specified in theOptionsstructure. -
bool filter_by_mode(const char *path, Options *optionsThis function returns
trueif the file at the specifiedpathhas the access mode specified in theOptionsstructure.Hint: Consider using access.
Task 2: Testing
As you implement the functions in filter.c, you should use the
filter.unit executable with the filter.unit.sh script to test each of
your functions:
# Build test artifacts and run test scripts
$ make test-filter
Testing filter ...
 filter_by_type                                               ... Success
 filter_by_name                                               ... Success
 filter_by_mode                                               ... Success

   Score 1.50 / 1.50
  Status Success
You can also run the testing script manually:
# Run Shell unit test script manually
$ ./filter.unit.sh
...
To debug your Filter functions, you can use [gdb] on the filter.unit
executable:
# Start gdb on list.unit
$ gdb ./filter.unit
(gdb) run 0     # Run list.unit with the "0" command line argument (ie. filter_by_type)
...
You can also use valgrind to check for memory errors:
# Check for memory errors on list_lower test case
$ valgrind --leak-check=full ./filter.unit 0
Activity 3: Findit (4 Points)
Once you have implemented the singly linked list and the Filter
functions, you can complete the findit utility:
# Display usage message
$ ./findit
Usage: findit PATH [OPTIONS]

Options:

   -type [f|d]    File is of type f for regular file or d for directory
   -name pattern  Name of file matches shell pattern
   -executable    File is executable or directory is searchable by user
   -readable      File is readable by user
   -writable      File is writable by user

# Display only files
$ ./findit .
./list.c
./list.unit
./Makefile.template
./filter.c.template
...

# Display only .c files
$ ./findit . -name '*.c'
./list.c
./filter.unit.c
./findit.c
./filter.c
./list.unit.c

# Display only executable files
$ ./findit . -type f -executable
./list.unit
./findit
./list.unit.sh
./findit.test.sh
./filter.unit.sh
./filter.unit
As with the find program, findit takes the PATH of the directory to
recursively search as its first argument and then any options the user
wishes to specify to filter the found entries. For findit, you only need
to support the options shown above, which should correspond to a Filter
function you implemented in Activity 2.
Task 1: findit.c
The findit.c file contains the C implementation for the findit program.
For this task, you will need to implement the following functions:
-
void find_files(const char *root, List *files)This function recursively walks the given
rootdirectory and adds any entries it finds to the givenListoffiles.Hint: Consider using opendir, readdir, and closedir as you did for
walkin Reading 11. When recursing on a directory, make sure to use the full path.When adding the full path to the
Listoffiles, consider using strdup.Moreover, consider when to add the
rootitself tofiles. -
void filter_files(List *files, List *filters, Options *options)This function applies each
Filterfunction infilterswith the givenOptionsto theListoffiles.Hint: Consider using
list_filter. -
int main(int argc, char *argv[])This function parses the command line options, finds the files recursively, applies any filters, and then prints out the found files.
Hint: Consider creating a
Listoffiles, aListoffilters, and anOptionsstructure. As you parse the command line options, set the appropriate attributes in theOptionsstructure and add the correspondingFilterfunction to yourListoffilters.After parsing the command line options, you should then use
find_files,filter_files, and thenlist_output.Be sure to deallocate any resources you allocated on the heap.
Task 2: Testing
To test your findit utility, you can use the provided findit.test.sh script:
# Build test artifacts and run test scripts
$ make test-findit
Testing findit ...
 findit                                                       ... Success
 findit /etc                                                  ... Success
 findit /etc -type f                                          ... Success
 findit /etc -type d                                          ... Success
 findit /etc -name '*.conf'                                   ... Success
 findit /etc -readable                                        ... Success
 findit /etc -writable                                        ... Success
 findit /etc -executable                                      ... Success
 findit /etc -type d -name '*.d'                              ... Success
 findit /etc -type d -name '*.d' -executable                  ... Success
 findit . -name '*.c'                                         ... Success
 findit . -writable                                           ... Success
 findit . -type f -name '*.unit' -executable                  ... Success

   Score 4.00 / 4.00
  Status Success
# Run test script manually $ ./findit.test.sh
Activity 4: Quiz (2 Points)
Once you have completed all the activities above, you are to complete the following reflection quiz:
As with Reading 01, you will need to store your answers in a
homework08/answers.json file. You can use the form above to generate the
contents of this file, or you can write the JSON by hand.
To test your quiz, you can use the check.py script:
$ ../.scripts/check.py
Checking homework08 quiz ...
    Q01 1.20
    Q02 0.20
    Q03 0.20
    Q04 0.40
  Score 2.00 / 2.00
 Status Success
Code Review (Optional, 1 Point)
For one point of extra credit, you may perform a code review with either an AI agent (of your choice) or with a TA by Wednesday, April 16:
-
AI Code Review: Once the whole assignment is completed, pick one or two of the most challenging functions and ask the AI agent to review your original code by suggesting improvements, optimizations, or alternative implementations.
Test and verify these suggestions and then decide whether or not you wish to keep them. Discuss in the
README.mdwhat you think of the AI code review and explain your decision.AI Code Review: Verification
To receive credit for the AI Code Review, you must:
-
Link a transcript or include sufficient screenshots of the code review in the Pull Request of your conversation with the AI agent.
-
This conversation must show your original code and the suggested improvements by the AI agent.
-
Discuss the code review and explain your decision in the
README.md. -
Update your Pull Request based on the feedback.
-
-
TA Code Review: Once the whole assignment is completed, meet with one of the teaching assistants from the course in-person and have them review your whole assignment.
To document this process, make the teaching assistant who is reviewing your code a reviewer on your Pull Request and have them record their suggestions as they discuss them with you in-person.
After the code review, you can decide whether or not you wish to incorporate this feedback into your implementation and update your Pull Request.
Note: The TA performing the code review does not need to be the same TA responsible for grading your assignment.
TA Code Review: Verification
To receive credit for the TA Code Review, you must:
-
Meet with a teaching assistant in-person.
-
Make this teaching assistant a reviewer in your Pull Request.
-
Have the teaching assistant record their suggestions on the Pull Request.
-
Update your Pull Request based on the feedback.
-
Guru Point: Easter Egg (Optional, 1 Point)
It is always fun to find Easter Eggs in programs and services. For instance, here is the first video game easter egg (as discussed in History of Computing):
For extra credit, you are to add an easter egg to your findit program
that does any of the following by Wednesday, April 16:
-
Display or scroll your favorite song, quote, or poem.
-
Run a mini-game (ie. rogue, nethack, or any of the BSD games).
-
Display some sort of animation (ala cmatrix or chad_stride).
For example, you can find the instructor's implementation of findit here:
# Easter Egg Hint: Indiana Jones and the Last Crusade
$ ~pbui/pub/bin/findit
Pass findit the right argument and it will display something...
precious.
Easter Egg: Verification
To receive credit for the Easter Egg, you must:
-
Place your
finditexecutable in thepublicfolder of your$HOMEdirectory on the student machines.If you do not have a
publicfolder already, then you will need to create it:# Create public folder in your `$HOME` directory $ mkdir ~/public # Set permissions on public folder $ chmod 755 ~/public # Copy findit to public folder $ cp findit ~/public # Set permissions on findit $ chmod 755 ~/public/findit -
Post the location of your
finditin the class Slack channel and invite the class to discover the easter egg. -
Update your
README.mdto include instructions on how to activate the easter egg. -
Post a screenshot of your easter egg in your Pull Request.
Submission
To submit your assignment, please commit your work to the homework08 folder
of your homework08 branch in your assignments GitHub repository.
Your homework08 folder should only contain the following files:
Makefileanswers.jsonfilter.cfilter.unit.cfindit.cfindit.hlist.clist.unit.c
Note: You do not need to commit the test scripts because the Makefile
automatically downloads them.
#-----------------------------------------------------------------------
# Make sure you have already completed Activity 0: Preparation
#-----------------------------------------------------------------------
...
$ git add Makefile                        # Mark changes for commit
$ git add list.c                          # Mark changes for commit
$ git commit -m "homework08: list.c"      # Record changes
...
$ git add Makefile                        # Mark changes for commit
$ git add filter.c                        # Mark changes for commit
$ git commit -m "homework08: filter.c"    # Record changes
...
$ git add Makefile                        # Mark changes for commit
$ git add findit.c                        # Mark changes for commit
$ git commit -m "homework08: findit.c"    # Record changes
...
$ git add answers.json                    # Mark changes for commit
$ git commit -m "homework08: quiz"        # Record changes
...
$ git push -u origin homework08           # Push branch to GitHub
Acknowledgments
If you collaborated with any other students, or received help from TAs or AI
tools on this assignment, please record this support in the README.md in
the homework08 folder and include it with your Pull Request.
Pull Request
Remember to create a Pull Request and assign the appropriate TA from the Reading 11 TA List.
DO NOT MERGE your own Pull Request. The TAs use open Pull Requests to keep track of which assignments to grade. Closing them yourself will cause a delay in grading and confuse the TAs.