Homework 09: timeit, curlit
The goal of this homework assignment is to allow you to practice using system calls involving processes, signals, and sockets in C by implementing two utilities:
-
timeit: The first utility allows users to compute the elapsed time of an application while also enforcing a timeout (or cut off time), similar to timeout. -
curlit: The second utility implements a simple HTTP client similar to curl.
Set us up the bomb (No!)
Be careful with the fork system call:
If you still manage to create a fork bomb, do not simply go to another machine and run the same program. Notify the csehelp@nd.edu and explain what happened.
For this assignment, record your source code and any responses to the
following activities in the homework09 folder of your assignments
GitHub repository and push your work by noon Saturday, April 26.
Frequently Asked Questions
Activity 0: Preparation
Before starting this homework assignment, you should first perform a git
pull to retrieve any changes in your remote GitHub repository:
$ cd path/to/repository                   # Go to assignments repository

$ git switch master                       # Make sure we are in master branch

$ git pull --rebase                       # Get any remote changes not present locally
Next, create a new branch for this assignment:
$ git checkout -b homework09 # Create homework09 branch and check it out
Task 1: Skeleton Code
To help you get started, the instructor has provided you with the following skeleton code:
# Go to homework09 folder
$ cd homework09

# Download Makefile
$ curl -LO https://www3.nd.edu/~pbui/teaching/cse.20289.sp25/static/txt/homework09/Makefile

# Download C skeleton code
$ curl -LO https://www3.nd.edu/~pbui/teaching/cse.20289.sp25/static/txt/homework09/curlit.c
$ curl -LO https://www3.nd.edu/~pbui/teaching/cse.20289.sp25/static/txt/homework09/socket.c
$ curl -LO https://www3.nd.edu/~pbui/teaching/cse.20289.sp25/static/txt/homework09/socket.h
$ curl -LO https://www3.nd.edu/~pbui/teaching/cse.20289.sp25/static/txt/homework09/socket.unit.c
$ curl -LO https://www3.nd.edu/~pbui/teaching/cse.20289.sp25/static/txt/homework09/timeit.c
Once downloaded, you should see the following files in your homework09
directory:
homework09
    \_ Makefile           # This is the Makefile for building all the project artifacts
    \_ curlit.c           # This is the curlit utility C source file
    \_ socket.c           # This is the timeit library C source file
    \_ socket.h           # This is the socket library C header file
    \_ socket.unit.c      # This is the socket library C unit test source file
    \_ timeit.c           # This is the timeit utility C source file
Task 2: Initial Import
Now that the files are downloaded into the homework09 folder, you can
commit them to your git repository:
$ git add Makefile                            # Mark changes for commit
$ git add *.c *.h
$ git commit -m "Homework 09: Initial Import" # Record changes
Task 3: Unit and Functional Tests
After downloading these files, you can run make test to run the tests.
# Run all tests (will trigger automatic download)
$ make test
You will notice that the Makefile downloads these additional test data and scripts:
homework09
    \_ curlit.test.sh   # This is the curlit utility test shell script
    \_ socket.unit.sh   # This is the socket library unit test shell script
    \_ timeit.test.sh   # This is the timeit utility test shell script
You will be using these unit tests and functional tests to verify the correctness and behavior of your code.
Automatic Downloads
The test scripts are automatically downloaded by the Makefile, so any
modifications you do to them will be lost when you run make again. Likewise,
because they are automatically downloaded, you do not need to add or commit
them to your git repository.
Task 4: Makefile
The Makefile contains all the rules or recipes for building the
project artifacts (e.g. timeit, curlit):
CC=       gcc
CFLAGS=   -Wall -g -std=gnu99
LD=       gcc
LDFLAGS=  -L.
TARGETS=  timeit curlit

all:      $(TARGETS)

#------------------------------------------------------------------------------
# TODO: Rules for object files and executables
#------------------------------------------------------------------------------

timeit.o:

socket.o:

curlit.o:

timeit:

curlit:

#------------------------------------------------------------------------------
# DO NOT MODIFY BELOW
#------------------------------------------------------------------------------

...
For this task, you will need to add rules for building the intermediate
object files, and the timeit and curlit executables with the appropriate
dependencies as shown in the DAG below:

Makefile Variables
You must use the CC, CFLAGS variables when appropriate in your
rules. You should also consider using automatic variables such as
$@ and $< as well.
Once you have a working Makefile, you should be able to run the following commands:
# Build all TARGETS
$ make
gcc -Wall -g -std=gnu99 -c -o timeit.o timeit.c
gcc -L. -o timeit timeit.o
gcc -Wall -g -std=gnu99 -c -o curlit.o curlit.c
gcc -Wall -g -std=gnu99 -c -o socket.o socket.c
gcc -L. -o curlit curlit.o socket.o

# Run all tests
$ make test
Testing timeit...
...

Testing socket...
...

Testing curlit...
...

# Remove generated artifacts
$ make clean
Note: The tests will fail if you haven't implemented all the necessary functions appropriately.
Warnings
You must include the -Wall flag in your CFLAGS when you compile. This
also means that your code must compile without any warnings, otherwise
points will be deducted.
Activity 2: timeit (2.5 Points)
For the first activity, write a program, timeit, that executes the given
command until a timeout is reached or the program terminates as show below:
If the verbose mode is enabled, your timeit should display the following
sort of debugging messages:
$ ./timeit -v
timeit.c:68:parse_options: Timeout = 10
timeit.c:69:parse_options: Verbose = 1
Usage: timeit [options] command...
Options:
    -t SECONDS  Timeout duration before killing command (default is 10)
    -v          Display verbose debugging output

$ ./timeit -t 5 -v sleep 1
timeit.c:68:parse_options: Timeout = 5
timeit.c:69:parse_options: Verbose = 1
timeit.c:85:parse_options: Command = sleep 1
timeit.c:116:main: Registering handlers...
timeit.c:119:main: Grabbing start time...
timeit.c:137:main: Sleeping for 5 seconds...
timeit.c:139:main: Waiting for child 160815...
timeit.c:131:main: Executing child...
timeit.c:145:main: Child exit status: 0
timeit.c:148:main: Grabbing end time...
Time Elapsed: 1.0

$ ./timeit -t 1 -v sleep 2
timeit.c:68:parse_options: Timeout = 1
timeit.c:69:parse_options: Verbose = 1
timeit.c:85:parse_options: Command = sleep 2
timeit.c:116:main: Registering handlers...
timeit.c:119:main: Grabbing start time...
timeit.c:137:main: Sleeping for 1 seconds...
timeit.c:139:main: Waiting for child 160841...
timeit.c:131:main: Executing child...
timeit.c:101:handle_signal: Killing child 160841...
timeit.c:145:main: Child exit status: 9
timeit.c:148:main: Grabbing end time...
Time Elapsed: 1.0
Note: If the time limit is exceeded, the parent should kill the child and wait for it. Moreover, the parent should always return the child's exit status as its own exit status.
Task 1: timeit.c
To implement the timeit utility, you are to complete the provided
timeit.c source file which contains the following macros and
functions:
Macros
#define debug(M, ...) \
    if (Verbose) { \
        fprintf(stderr, "%s:%d:%s: " M, __FILE__, __LINE__, __func__, ##__VA_ARGS__); \
}
This
debugmacro displays the specified formatted message only if theVerboseglobal variable istrue. The message includes the name of the file, the line number, and the function at which the macro is called.
Functions
/**
 * Display usage message and exit.
 * @param   status      Exit status.
 **/
void    usage(int status);
This provided
usagefunction displays the help message and terminates the process with the specifiedstatuscode.
/**
 * Parse command line options.
 * @param   argc        Number of command line arguments.
 * @param   argv        Array of command line argument strings.
 * @return  Array of strings representing command to execute.
 **/
char ** parse_options(int argc, char **argv);
This
parse_optionsfunction processes the command line arguments by setting theTimeoutandVerboseglobal variables and by constructing an array of strings to represent the specifiedcommand.
/**
 * Handle signal.
 * @param   signum      Signal number.
 **/
void    handle_signal(int signum);
This provided
handle_signalfunction kills the child process whenever aSIGALRMis invoked.
Main Execution
The main logic for timeit will be in the main function. While there are
multiple approaches on how to accomplish the task of running a program with a
time limit, the recommended method is shown below:
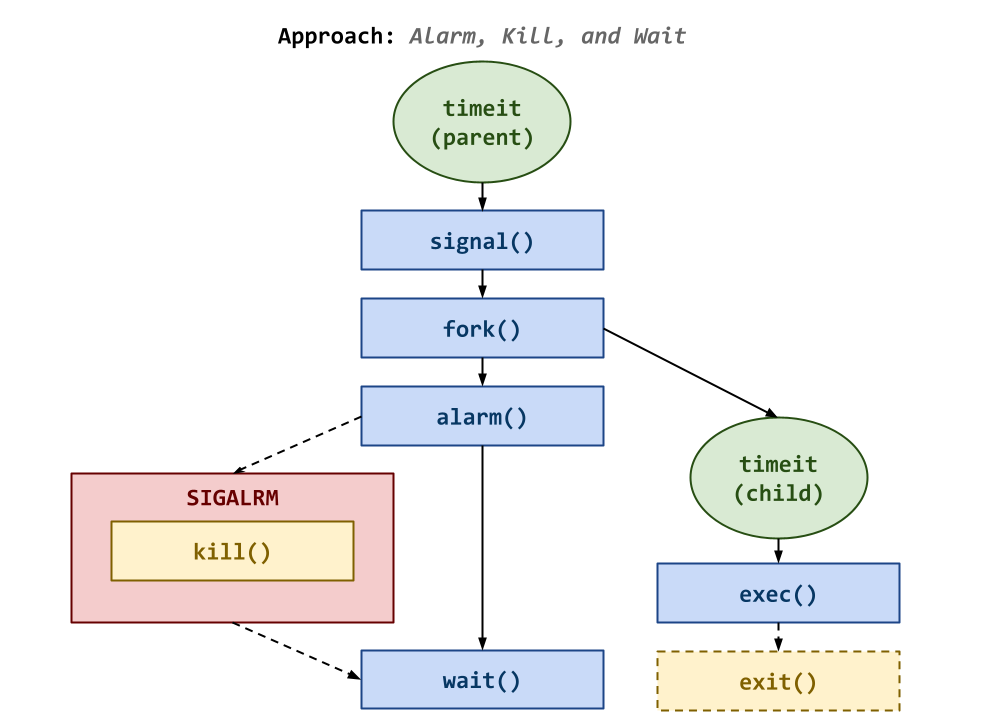
In this approach, the main function first registers the signal_handle
function for SIGALRM using signal. Then the parent process performs a
fork and the child process executes the specified command using one of
the exec variants.
After the fork, the parent process sets an alarm based on the specified
Timeout. It then simply calls wait. If the alarm triggers, then the
handler should kill the child process. Otherwise, if the child terminates
before the Timeout then the parent cancels the alarm and completes its
wait to retrieve the child's exit status.
To measure the elapsed time, you must use the clock_gettime function with
the CLOCK_MONOTONIC clock identifier.
Task 2: Testing
Once you have implemented timeit, you can test it by running the
test-timeit target:
$ make test-timeit
Testing timeit...
 system calls                                                 ... Success
 usage (-h)                                                   ... Success
 usage (no arguments)                                         ... Success
 usage (-v, no command)                                       ... Success
 usage (-t 5 -v, no command)                                  ... Success
 sleep                                                        ... Success
 sleep 1                                                      ... Success
 -v sleep 1                                                   ... Success
 -t 5 -v sleep 1                                              ... Success
 sleep 5                                                      ... Success
 -v sleep 5                                                   ... Success
 -t 1 sleep 5                                                 ... Success
 -t 1 -v sleep 5                                              ... Success
 -v find /etc -type f                                         ... Success
 -t 5 -v /tmp/timeit.1000/TROLL                               ... Success

   Score 2.50 / 2.50
  Status Success
Activity 3: socket (1 Point)
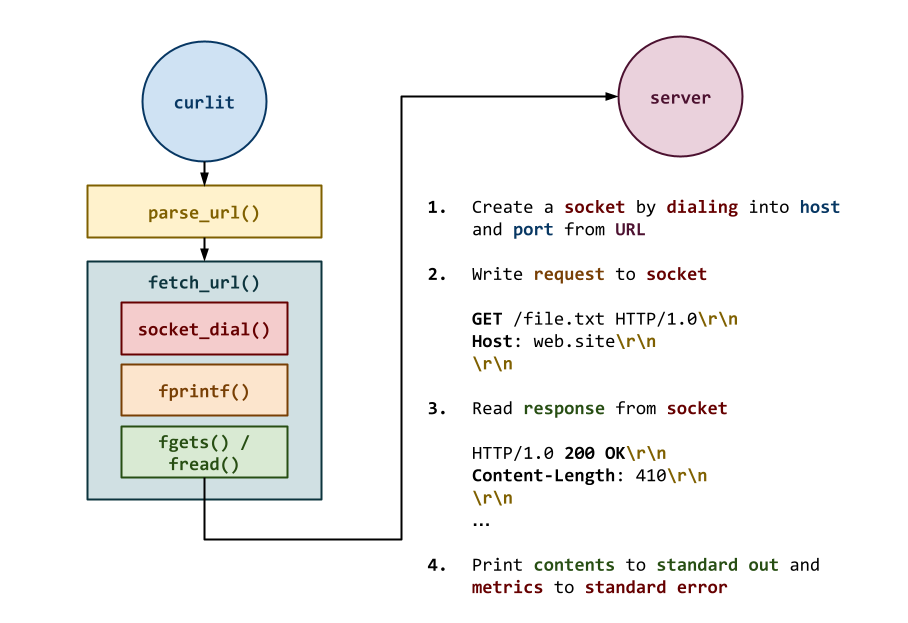
The curlit utility will require using sockets in C to communicate with
a remote host. To simplify the process of establishing a connection, you
are to make consolidate all the code for connecting to a remote host into
a single socket_dial function.
Task 1: socket.c
To implement the socket library, you are to complete the provided
socket.c source file which contains the following function:
/**
 * Create socket connection to specified host and port.
 * @param   host        Host string to connect to.
 * @param   port        Port string to connect to.
 * @return  Socket file stream of connection if successful, otherwise NULL.
 **/
FILE *socket_dial(const char *host, const char *port)
This function uses socket to connect to the given
hostandportusing TCP and returns a read/writableFILEstream corresponding to the socket connection.
Hints:
-
You must check if any of the system calls fail.
-
You should use getaddrinfo, socket, connect, freeaddrinfo, and fdopen.
Task 2: Testing
As you implement the functions in socket.c, you should use the
socket.unit executable with the socket.unit.sh script to test each of
your functions:
# Build test artifacts and run test scripts
$ make test-socket
Testing socket ...
 socket_dial_success                                          ... Success
 socket_dial_failure                                          ... Success
 socket_dial_mode                                             ... Success

   Score 1.00 / 1.00
  Status Success
You can also run the testing script manually:
# Run shell unit test script manually
$ ./socket.unit.sh
...
To debug your socket functions, you can use gdb on the socket.unit executable:
# Start gdb on socket.unit
$ gdb ./socket.unit
(gdb) run 0     # Run socket.unit with the "0" command line argument (ie. socket_dial_success)
...
You can also use valgrind to check for memory errors:
# Check for memory errors on first test case
# $ valgrind --leak-check=full ./socket.unit 0
Activity 4: curlit (4.5 Points)
Once you have the socket_dial function implemented, you can complete the
curlit utility, which performs a HTTP request at the specified URL.
Here are some examples of curlit in action:
# Display usage message
$ ./curlit -h
Usage: curlit [-h ] URL

# Make HTTP request to http://example.com
$ ./curlit http://example.com
<!doctype html>
<html>
<head>
    <title>Example Domain</title>

    <meta charset="utf-8" />
    <meta http-equiv="Content-type" content="text/html; charset=utf-8" />
    <meta name="viewport" content="width=device-width, initial-scale=1" />
    ...
</head>

<body>
<div>
    <h1>Example Domain</h1>
    <p>This domain is for use in illustrative examples in documents. You may use this
    domain in literature without prior coordination or asking for permission.</p>
    <p><a href="https://www.iana.org/domains/example">More information...</a></p>
</div>
</body>
</html>
Time Elapsed: 0.03 s
Bandwidth:    0.05 MB/s

# Return success if status was 200 OK
$ echo $?
0

# Make HTTP request to google.com
$ ./curlit google.com
<HTML><HEAD><meta http-equiv="content-type" content="text/html;charset=utf-8">
<TITLE>301 Moved</TITLE></HEAD><BODY>
<H1>301 Moved</H1>
The document has moved
<A HREF="http://www.google.com/">here</A>.
</BODY></HTML>
Time Elapsed: 0.07 s
Bandwidth:    0.00 MB/s

# Return failure if status was not 200 OK
$ echo $?
1
Missing URL Components
Note: Not all URLs will specify every component explicitly. Some may be missing the protocol or the port or even the path (the host must always be given).
For instance, here are some valid URLs you will need to support:
example.comhttp://example.comhttp://example.com:8888http://example.com/dataexample.com:9999/data
If the port is not specified, then you are to assume the default HTTP
port: 80. If a path is not specified, then you can assume an empty
path: "".
Task 1: curlit.c
To implement the curlit utility, you are to complete the provided
curlit.c source file which contains the following functions:
/**
 * Display usage message and exit.
 * @param   status      Exit status
 **/
void    usage(int status);
This provided
usagefunction displays the help message and terminates the process with the specifiedstatuscode.
/**
 * Parse URL string into URL structure.
 * @param   s       URL string
 * @param   url     Pointer to URL structure
 **/
void    parse_url(const char *s, URL *url);
This function parses the
sURL string to extract thehost,port, andpathcomponents and copies them into the corresponding attributes of theURLstructure.
Hints:
-
Copy the URL
sstring to a local buffer that you can manipulate. -
Use strstr and strchr to search the local buffer for the appropriate delimiters (e.g.
HOST_DELIMITER,PATH_DELIMITER, andPORT_DELIMITER) and split the string into different components. -
Use strcpy to copy the found components to the
URLstructure.
/**
 * Fetch contents of URL and print to standard out.
 *
 * Print elapsed time and bandwidth to standard error.
 * @param   s       URL string
 * @param   url     Pointer to URL structure
 * @return  true if client is able to read all of the content (or if the
 * content length is unset), otherwise false
 **/
bool    fetch_url(URL *url);
This function performs a HTTP request with the given
URLby usingsocket_dialto form a TCP connection. It writes the response body or contents to standard out, and the elapsed time and bandwidth metrics to standard error. It returnsfalseif any error was experienced during the HTTP transaction or if the server response was not200 OK.
Hints:
-
You must check if any of the system calls fail.
-
You will want to follow the HTTP transaction steps described above and outlined below:
- Connect to remote host and port.
- Send HTTP request to remote server.
- Read response status and verify success.
- Read response headers (until there is an empty line).
- Read response body and copy to
stream. - Close connection.
Return number of bytes written to
stream.
-
Remember that HTTP uses DOS line endings and terminates each line with
\r\n. -
Use strstr to check the response status.
-
Use sscanf to parse the response headers for the value of
Content-Length. -
Use fgets to read the response status and headers.
-
Use fread and fwrite to read the response body since it may contain binary data.
-
If the server does not return a HTTP status of
200 OKor it provides aContent-Lengthand the number of bytes written tostreamdoes not match, then the function should returnfalseto indicate an error. Otherwise, if the HTTP status is200 OKand there is noContent-Lengthor the number of bytes written matches, then it should returntrue. -
Only a HTTP status of
200 OKis considered successful.
Task 2: Testing
Once you have implemented curlit, you can test it by running the
test-curlit target:
$ make test-curlit
Testing curlit utility...
 curlit                                                       ... Success
 curlit -h                                                    ... Success
 curlit -?                                                    ... Success
 curlit http://fake.host                                      ... Success
 curlit http://example.com                                    ... Success
 curlit http://nd.edu                                         ... Success
 curlit h4x0r.space                                           ... Success
 curlit h4x0r.space:9898/mind.txt                             ... Success
 curlit h4x0r.space:9898/txt/walden.txt                       ... Success
 curlit h4x0r.space:9898/txt/gatsby.txt                       ... Success
 curlit http://h4x0r.space:9898/txt/warandpeace.txt           ... Success
 curlit http://h4x0r.space:9898/img/appa.png                  ... Success

   Score 4.50 / 4.50
  Status Success
Activity 5: Quiz (2 Points)
Once you have completed all the activities above, you are to complete the following reflection quiz:
As with Reading 01, you will need to store your answers in a
homework09/answers.json file. You can use the form above to generate the
contents of this file, or you can write the JSON by hand.
To test your quiz, you can use the check.py script:
$ ../.scripts/check.py
Checking homework09 quiz ...
     Q01 0.10
     Q02 0.10
     Q03 0.10
     Q04 0.10
     Q05 0.80
     Q06 0.40
     Q07 0.40
   Score 2.00 / 2.00
  Status Success
Code Review (Optional, 1 Point)
For one point of extra credit, you may perform a code review with either an AI agent (of your choice) or with a TA by Wednesday, April 30:
-
AI Code Review: Once the whole assignment is completed, pick one or two of the most challenging functions and ask the AI agent to review your original code by suggesting improvements, optimizations, or alternative implementations.
Test and verify these suggestions and then decide whether or not you wish to keep them. Discuss in the
README.mdwhat you think of the AI code review and explain your decision.AI Code Review: Verification
To receive credit for the AI Code Review, you must:
-
Link a transcript or include sufficient screenshots of the code review in the Pull Request of your conversation with the AI agent.
-
This conversation must show your original code and the suggested improvements by the AI agent.
-
Discuss the code review and explain your decision in the
README.md. -
Update your Pull Request based on the feedback.
-
-
TA Code Review: Once the whole assignment is completed, meet with one of the teaching assistants from the course in-person and have them review your whole assignment.
To document this process, make the teaching assistant who is reviewing your code a reviewer on your Pull Request and have them record their suggestions as they discuss them with you in-person.
After the code review, you can decide whether or not you wish to incorporate this feedback into your implementation and update your Pull Request.
Note: The TA performing the code review does not need to be the same TA responsible for grading your assignment.
TA Code Review: Verification
To receive credit for the TA Code Review, you must:
-
Meet with a teaching assistant in-person.
-
Make this teaching assistant a reviewer in your Pull Request.
-
Have the teaching assistant record their suggestions on the Pull Request.
-
Update your Pull Request based on the feedback.
-
Guru Point: IRC Bot, Personal Website (Optional, 2 Points)
For this week, there are two Guru Point opportunities.
IRC Bot
For extra credit, you are to use Python and sockets to implement your own
version of bobbit, an IRC chat bot. Your bot should connect to the
chat.ndlug.org server and join the #bots channel. It should be able to
respond to at least one type of command or message. The particular operation
is up to you.
To help you get started, here are some resources:
NDLUG IRC
To connect to the NDLUG server yourself, you can use the following anonymous web client:
Alternatively, if you wish to have access to more chat features such as history, you can register via regserv.ndlug.org, which will setup a Lounge and IRC account for you.
The Lounge is a web-based IRC client that you can use from any web
browser, but you are free to connect to the IRC server from any IRC
client such as Weechat, Hexchat, or Textual using chat.ndlug.org as
the hostname and 6697 as the port.
A basic IRC client session looks like this:
USER ircle-pbui 0 * :pbui's bot
NICK ircle-pbui
JOIN #bots
PRIVMSG #bots :I've fallen and I can't get up!
-
The
USERcommand sets the users real name and registers the user. -
The
NICKcommand sets the users nickname. -
The
JOINcommand allows the user to join in a channel (in this case#bots). -
The
PRIVMSGcommand allows the user to send a message (in this case to the channel#bots).
Here is a basic skeleton, ircle.py, that you can start with:
import os
import socket
import ssl

# Constants

HOST = 'chat.ndlug.org'
PORT = 6697
NICK = f'ircle-{os.environ["USER"]}'

# Functions

def ircle():
    # Connect to IRC server
    ssl_context = ssl.create_default_context()
    tcp_socket  = socket.create_connection((HOST, PORT))
    ssl_socket  = ssl_context.wrap_socket(tcp_socket, server_hostname=HOST)
    ssl_stream  = ssl_socket.makefile('rw')

    # Identify ourselves
    ssl_stream.write(f'USER {NICK} 0 * :{NICK}\r\n')
    ssl_stream.write(f'NICK {NICK}\r\n')
    ssl_stream.flush()

    # Join #bots channel
    ssl_stream.write(f'JOIN #bots\r\n')
    ssl_stream.flush()

    # Write message to channel
    ssl_stream.write(f"PRIVMSG #bots :I've fallen and I can't get up!\r\n")
    ssl_stream.flush()

    # Read and display
    while True:
        message = ssl_stream.readline().strip()
        print(message)

# Main Execution

def main():
    ircle()

if __name__ == '__main__':
    main()
Alternatively, if you are interested in using the new asyncio features of Python 3 to perform event-driven and concurrent programming, you can use the following skeleton ircle-async.py:
import asyncio
import os
import sys

# Constants

HOST = 'chat.ndlug.org'
PORT = 6697
NICK = f'ircle-{os.environ["USER"]}'

# Functions

async def ircle():
    # Connect to IRC server
    reader, writer = await asyncio.open_connection(HOST, PORT, ssl=True)

    # Identify ourselves
    writer.write(f'USER {NICK} 0 * :{NICK}\r\n'.encode())
    writer.write(f'NICK {NICK}\r\n'.encode())
    await writer.drain()

    # Join #bots channel
    writer.write(f'JOIN #bots\r\n'.encode())
    await writer.drain()

    # Write message to channel
    writer.write(f"PRIVMSG #bots :I've fallen and I can't get up!\r\n".encode())
    await writer.drain()

    # Read and display
    while True:
        message = (await reader.readline()).decode().strip()
        print(message)

# Main execution

def main():
    asyncio.run(ircle())

if __name__ == '__main__':
    main()
IRC Bot: Verification
To receive credit for the IRC Bot, you must:
-
You must have your IRC bot join the
#botschannel on chat.ndlug.org server. -
Demonstrate your bot's functionality by logging into the server with your own account and showing the instructor (
pnutzh4x0r). -
You have until Wednesday, April 30.
Personal Website
For extra credit, you are to make your own personal website such as:
The idea behind this website is to publish a portfolio or profile that you can share with others (including potential employers). As such, you should avoid platforms such as SquareSpace, WiX, or Wordpress, and instead opt to building the website yourself.
To do so, you can use a platform such as GitHub Pages or use resources from the GitHub Student Developer Pack (which includes cloud and domain name credits).
Personal Website: Verification
To receive credit for the Personal Website, you must:
-
Post a link to your personal website in the class Slack channel.
-
Update your
README.mdto include a link to your personal website. -
You have until Wednesday, April 30.
Submission
To submit your assignment, please commit your work to the homework09 folder
of your homework09 branch in your assignments GitHub repository.
Your homework09 folder should only contain the following files:
Makefileanswers.jsoncurlit.csocket.csocket.hsocket.unit.ctimeit.c
Note: You do not need to commit the test scripts because the Makefile
automatically downloads them.
#-----------------------------------------------------------------------
# Make sure you have already completed Activity 0: Preparation
#-----------------------------------------------------------------------
...
$ git add Makefile                        # Mark changes for commit
$ git commit -m "Homework 09: Makefile"   # Record changes
...
$ git add timeit.c                        # Mark changes for commit
$ git commit -m "Homework 09: timeit"     # Record changes
...
$ git add socket.c                        # Mark changes for commit
$ git commit -m "Homework 09: socket"     # Record changes
...
$ git add curlit.c                        # Mark changes for commit
$ git commit -m "Homework 09: curlit"     # Record changes
...
$ git add answers.json                    # Mark changes for commit
$ git commit -m "Homework 09: quiz"       # Record changes
...
$ git push -u origin homework09           # Push branch to GitHub
Acknowledgments
If you collaborated with any other students, or received help from TAs or AI
tools on this assignment, please record this support in the README.md in
the homework09 folder and include it with your Pull Request.
Pull Request
Remember to create a Pull Request and assign the appropriate TA from the Reading 13 TA List.
DO NOT MERGE your own Pull Request. The TAs use open Pull Requests to keep track of which assignments to grade. Closing them yourself will cause a delay in grading and confuse the TAs.