Homework 03: Arrays, Stacks, RPN
The goal of this homework assignment is to allow you to explore building both a dynamic array and a stack, and then using these data structures to implement a RPN calculator. The first two activities involve implementing first a dynamic array and then using this data structure to implement a stack. Once you have a working data structure library, you will then use it implement a simple calculator that can evaluate RPN expressions. After these coding activities, there is a quiz where you will have an opportunity to reflect on the code you have written for this homework assignment.
For this assignment, you are to do your work in the homework03 folder of
your assignments GitHub repository and push your work by noon
Wednesday, September 13.
Activity 0: Preparation
Before starting this homework assignment, you should first perform a git
pull to retrieve any changes in your remote GitHub repository:
$ cd path/to/repository                   # Go to assignments repository

$ git switch master                       # Make sure we are in master branch

$ git pull --rebase                       # Get any remote changes not present locally
Next, create a new branch for this assignment:
$ git checkout -b homework03 # Create homework03 branch and check it out
Task 1: Skeleton Code
To help you get started, the instructor has provided you with the following skeleton code:
# Go to assignments repository
$ cd path/to/assignments/repository

# -----------------------------------------------------
# MAKE SURE YOU ARE NOT INSIDE THE homework03 DIRECTORY
# -----------------------------------------------------
# MAKE SURE YOU ARE AT THE TOP-LEVEL DIRECTORY
# -----------------------------------------------------

# Download skeleton code tarball
$ curl -LO https://www3.nd.edu/~pbui/teaching/cse.20312.fa23/static/tar/homework03.tar.gz

# Extract skeleton code tarball
$ tar xzvf homework03.tar.gz
Once downloaded and extracted, you should see the following files in your
homework03 directory:
homework03
    \_ Makefile             # This is the Makefile for building all the project artifacts
    \_ bin                  # This contains the project binary executables and test scripts
        \_ test_array.sh    # This is the shell script for testing the array library
        \_ test_stack.sh    # This is the shell script for testing the stack utility
        \_ test_rpn.sh      # This is the shell script for testing the rpn program
    \_ include              # This contains the project header files
        \_ ds               # This contains the project data structure header files
            \_ array.h      # This is the C header file for the array library
            \_ stack.h      # This is the C header file for the stack library
    \_ lib                  # This contains the project library files
    \_ src                  # This contains the project source code
        \_ array.c          # This is the C source code for the array library
        \_ rpn.c            # This is the C source code for the rpn program
        \_ stack.c          # This is the C source code for the stack library
    \_ tests                # This contains the project unit tests
        \_ unit_array.c     # This is the unit test for the array library
        \_ unit_stack.c     # This is the unit test for the stack library
Task 2: Initial Import
Now that the files are extracted into the homework03 folder, you can commit
them to your git repository:
# Go into homework03 folder
$ cd homework03

# Add and commit initial skeleton files
$ git add Makefile                            # Mark changes for commit
$ git add bin/*.sh                            # Mark changes for commit
$ git add include/ds/*.h                      # Mark changes for commit
$ git add lib/.gitkeep                        # Mark changes for commit
$ git add src/*.c                             # Mark changes for commit
$ git add tests/*.c                           # Mark changes for commit
$ git commit -m "Homework 03: Initial Import" # Record changes
The details on what you need to implement are described in the following sections.
Task 3: Makefile
Before you begin coding, you should first make sure you complete the
Makefile that will be used to build all the software artifacts in this
assignment.
The Makefile contains all the rules or recipes for building the project
artifacts (e.g. rpn, libds.a, unit_array, unit_stack, etc.):
CC=             gcc
CFLAGS=         -Wall -std=gnu99 -g -Iinclude
AR=             ar
ARFLAGS=        rcs
LD=             gcc
LDFLAGS=        -Llib

all:            bin/rpn

test:
        @$(MAKE) -sk test-all

test-all:       test-array test-stack test-rpn

# TODO: Pattern rule for object files

# TODO: Rule for lib/libds.a

# TODO: Rule for bin/rpn

bin/unit_array: tests/unit_array.o lib/libds.a
        $(LD) $(LDFLAGS) -o $@ $^

bin/unit_stack: tests/unit_stack.o lib/libds.a
        $(LD) $(LDFLAGS) -o $@ $^

test-array:     bin/unit_array
        bin/test_array.sh

test-stack:     bin/unit_stack
        bin/test_stack.sh

test-rpn:       bin/rpn
        bin/test_rpn.sh

clean:
        rm -f bin/unit_* bin/rpn lib/*.a src/*.o tests/*.o
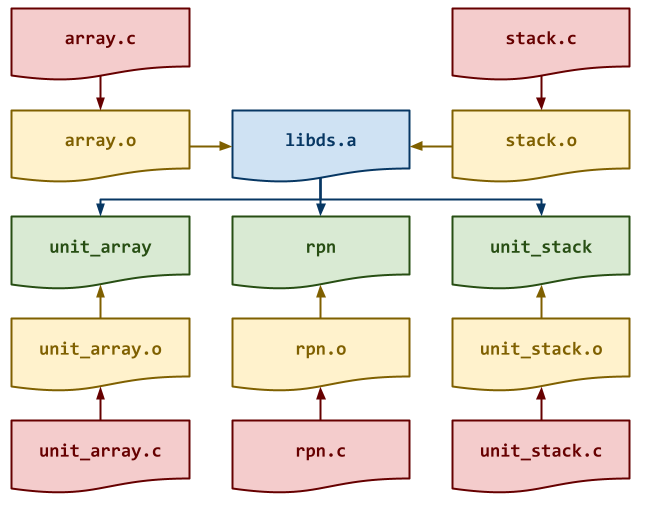
For this task, you will need to add rules for building the static library
lib/libds.a and the program bin/rpn. Be sure to have a recipe for any
intermediate object files that libraries require as shown in the DAG
below:

Archives
lib/libds.a is an archive or static library. You can think of these
as a combination of multiple object files. To compile an archive, you
can use the ar command as follows:
$ ar rcs lib/libds.a src/array.o src/stack.o
Since the Makefile has AR and ARFLAGS variables, we can have the
following rule:
lib/libds.a:  src/array.o src/stack.o
        $(AR) $(ARFLAGS) lib/libds.a src/array.o src/stack.o
Makefile Variables
You must use the CC, CFLAGS, LD, LDFLAGS, AR, and ARFLAGS
variables when appropriate in your rules. You should also consider using
automatic variables such as $@ and $< as well.
Once you have a working Makefile, you should be able to run the following
commands:
# Build all TARGETS
$ make
gcc -Wall -std=gnu99 -g -Iinclude -c -o src/rpn.o src/rpn.c
gcc -Wall -std=gnu99 -g -Iinclude -c -o src/array.o src/array.c
gcc -Wall -std=gnu99 -g -Iinclude -c -o src/stack.o src/stack.c
ar rcs lib/libds.a src/array.o src/stack.o
gcc -Llib -o bin/rpn src/rpn.o lib/libds.a

# Run all tests
$ make test
Testing array...
...

# Remove generated artifacts
$ make clean
rm -f bin/unit_* bin/rpn lib/*.a src/*.o tests/*.o
Note: The tests will fail if you haven't implemented array or stack
libraries or the rpn utility.
Warnings
You must include the -Wall flag in your CFLAGS when you compile. This
also means that your code must compile without any warnings, otherwise
points will be deducted.
After completing the Makefile and verifying that you can produce all the
specified artifacts, you may begin implementing the data structures and
applications for this assignment.
Activity 1: Dynamic Array (4 Points)
In high-level languages such as Python, we have built-in implementations of dynamic arrays which support a variety of methods:
# Define a dynamic array
>>> array = [4, 6, 6, 3, 7]

# Add a new value to the end of the array
>>> array.append(9)
>>> array
[4, 6, 6, 3, 7, 9]

# Remove the value at index 0
>>> array.pop(0)
>>> array
[6, 6, 3, 7, 9]

# Access the last element
>>> array[-1]
9
Unfortunately, C only has fixed arrays that do not support append or
pop or negative indexing (ie. array[-index] is translated to
array[len(array) - index]).

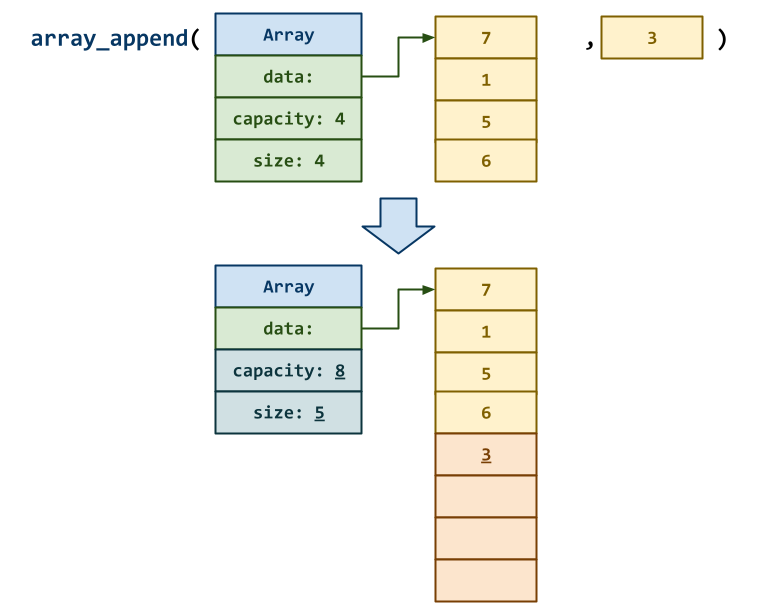
As discussed in class, we can use fixed arrays in C to implement dynamic
arrays by introducing an Array struct with the following attributes:
-
data: This is the internal fixed-sized array that we will need to periodically resize or grow. -
capacity: This is the total number of possible elements in the internal fixed-size array. -
size: This is the number of valid elements stored in the internal fixed-size array.
With this Array struct in mind, for the first activity, you are to create
a dynamic array library, lib/libds.a, which contains functions such as
array_append and array_pop that implements some of the functionality
present in Python but missing in C.
Task 1: include/ds/array.h
The include/ds/array.h file is the header file for the dynamic array library,
which contains the following structs and function prototypes:
/* array.h: Dynamic Array */

#pragma once

#include <stdbool.h>
#include <stdint.h>
#include <stdlib.h>

/* Structures */

typedef struct {
    int64_t *data;        // Internal array
    size_t   capacity;    // Total number of elements
    size_t   size;        // Number of valid elements
} Array;

/* Constants */

extern const size_t ARRAY_DEFAULT_CAPACITY;

/* Functions */

Array   *array_create(size_t capacity);
void     array_delete(Array *array);

int64_t  array_at(Array *array, ssize_t index);

void     array_resize(Array *array, size_t capacity);

void     array_append(Array *array, int64_t value);
int64_t  array_pop(Array *array, ssize_t index);
Other programs will #include this file in order to use the functions we
will be implementing in this library.
Note: For this task, you do not need to modify this file. Instead, you should review it and ensure you understand the provided code.
Task 2: src/array.c
The src/array.c file contains the C implementation for the dynamic array library.

For this task, you will need to implement the following functions:
-
Array* array_create(size_t capacity)This function allocates a new
Arraystruct and initializes its attributes:data,capacity, andsizeas described above. If thecapacityof the internaldataarray is0, then theARRAY_DEFAULT_CAPACITYshould be used as thecapacity. -
void array_delete(Array *array)This function deallocates the given
Arraystruct along with its internaldataarray. -
int64_t array_at(Array *array, ssize_t index)This function returns the value in the
arrayat the specifiedindex(e.g.array[index]in Python).Note: If
indexis negative, then offset it relative to size ofarray.Hint: Use assert to verifyindexis valid. -
void array_resize(Array *array, size_t capacity)This function resizes the given
arrayto the specifiedcapacity.Note: the
arraycould grow or shrink.Hint: Use realloc to resize thearray. -
void array_append(Array *array, int64_t value)This function adds
valueto the end of thearray(e.g.array.append(value)in Python).Hint: Usearray_resizewhen necessary (e.g. double itscapacity) as shown in the diagram above. -
int64_t array_pop(Array *array, ssize_t index)This function removes the
valuein thearrayat the specifiedindex(e.g.array.pop(index)in Python).Hint: Use memmove to shift elements in the internalarray.
Task 3: Testing
As you implement the functions in src/array.c, you should use
bin/test_array.sh to test each function:
# Build unit-test
$ make bin/unit_array
gcc -Wall -std=gnu99 -g -Iinclude -c -o tests/unit_array.o tests/unit_array.c
gcc -Wall -std=gnu99 -g -Iinclude -c -o src/array.o src/array.c
gcc -Wall -std=gnu99 -g -Iinclude -c -o src/stack.o src/stack.c
ar rcs lib/libds.a src/array.o src/stack.o
gcc -Llib -o bin/unit_array tests/unit_array.o lib/libds.a

# Run test script manually
$ ./bin/test_array.sh
Testing array...
 array_create                             ... Success
 array_delete                             ... Success
 array_at                                 ... Success
 array_resize                             ... Success
 array_append                             ... Success
 array_pop                                ... Success

   Score 4.00 / 4.00
  Status Success
Alternatively, you can both build the artifacts and run the test script by doing the following:
# Build and run test scripts
$ make test-array
...
If one of the functions fails, and you need to debug the unit tests, you
can run the bin/unit_array command directly:
# Display usage message
$ ./bin/unit_array
Usage: ./bin/unit_array NUMBER

Where NUMBER is right of the following:
    0  Test array_create
    1  Test array_delete
    2  Test array_at
    3  Test array_resize
    4  Test array_append
    5  Test array_pop

# Run test for array_create
$ ./bin/unit_array 0

# Run test for array_create using GDB
$ gdb ./bin/unit_array
...
(gdb) run 0

# Run test for array_create using Valgrind
$ valgrind --leak-check=full ./bin/unit_array 0
Of course, you are free to create your own test programs to debug and test your dynamic array library.
Iterative Development
You should practice iterative development. That is, rather than writing a bunch of code and then debugging it all at once, you should concentrate on one function at a time and then test that one thing at a time. The provided unit tests allow you to check on the correctness of the individual functions without implementing everything at once. Take advantage of this and build one thing at a time.
Activity 2: Stack Library (2 Points)
Once you have completed the dynamic array library, you are to implement a
stack for the second activity using the Array struct.

Task 1: include/ds/stack.h
The include/ds/stack.h file is the header file for the stack library,
which contains the following structs and function prototypes:
/* stack.h: Stack */

#pragma once

#include "array.h"

/* Structures */

typedef Array Stack;

/* Functions */

Stack   *stack_create();
void     stack_delete(Stack *stack);

bool     stack_empty(Stack *stack);
int64_t  stack_top(Stack *stack);

void     stack_push(Stack *stack, int64_t value);
int64_t  stack_pop(Stack *stack);
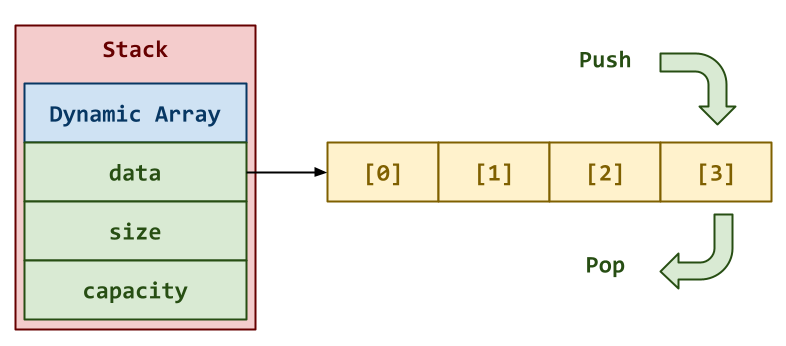
As can been seen, the Stack is just a type definition or alias for
our existing Array struct. This means any of the operations we
previously defined in our dynamic array library should work on your new
stack library.
Note: For this task, you do not need to modify this file. Instead, you should review it and ensure you understand the provided code.
Task 2: src/stack.c
The src/stack.c file contains the C implementation for the stack
library. For this task, you will need to implement the following functions:
-
Stack* stack_create()This function allocates a new
Stackstruct. -
void stack_delete(Stack *s)This function deallocates the given
Stackstruct. -
bool stack_empty(Stack *s)This function returns
trueif theStackstruct has no values, otherwisefalse. -
int64_t stack_top(Stack *s)This function returns the value at the top of the
Stackstruct. -
void stack_push(Stack *s, int64_t value)This function adds a new
valueto the top of theStackstruct. -
int64_t stack_pop(Stack *s)This function removes the value at the top of the
Stackstruct and returns it.
Hint: All of these functions should be one line.
Task 3: Testing
As you implement the functions in src/stack.c, you should use
bin/test_stack.sh to test each function:
# Build unit-test
$ make bin/unit_stack
gcc -Wall -std=gnu99 -g -Iinclude -c -o tests/unit_stack.o tests/unit_stack.c
gcc -Wall -std=gnu99 -g -Iinclude -c -o src/array.o src/array.c
gcc -Wall -std=gnu99 -g -Iinclude -c -o src/stack.o src/stack.c
ar rcs lib/libds.a src/array.o src/stack.o
gcc -Llib -o bin/unit_stack tests/unit_stack.o lib/libds.a

# Run test script manually
$ ./bin/test_stack.sh
Testing stack...
 stack_create                             ... Success
 stack_delete                             ... Success
 stack_empty                              ... Success
 stack_top                                ... Success
 stack_push                               ... Success
 stack_pop                                ... Success

   Score 2.00 / 2.00
  Status Success
Alternatively, you can both build the artifacts and run the test script by doing the following:
# Build and run test scripts
$ make test-stack
...
If one of the functions fails, and you need to debug the unit tests, you
can run the bin/unit_stack command directly:
# Display usage message
$ ./bin/unit_stack
Usage: ./bin/unit_stack NUMBER

Where NUMBER is right of the following:
    0  Test stack_create
    1  Test stack_delete
    2  Test stack_empty
    3  Test stack_top
    4  Test stack_push
    5  Test stack_pop

# Run test for stack_create
$ ./bin/unit_stack 0

# Run test for stack_create using GDB
$ gdb ./bin/unit_stack
...
(gdb) run 0

# Run test for stack_create using Valgrind
$ valgrind --leak-check=full ./bin/unit_stack 0
Of course, you are free to create your own test programs to debug and test your stack library.

Activity 3: RPN Calculator (4 Points)
Back in the day, when phones were landlines, computers were the size of minivans, and the instructor was just a twinkle in his parents' eye, the pride and joy of every engineering geek was their HP scientific calculator. Even the mighty Woz1 cherished his legendary HP-35.
Of course, since the old timers back then were super awesome (unlike today's
zoomers), they didn't use the standard lame infix notation to perform their
calculations; instead, they used the uber 1337 reverse polish notation.
That is, rather than entering in <operand> <operation> <operand>, you would
enter in <operand> <operand> <operation> to perform a calculation on the
RPN calculator. Using RPN eliminates the need for paretheses and orders
of operation since it is never ambiguous what operands are used with which
operation; the operation is always applied to the previous arguments.
This means that if you wanted to perform 3 + 4, you would have to enter in:
3 4 +
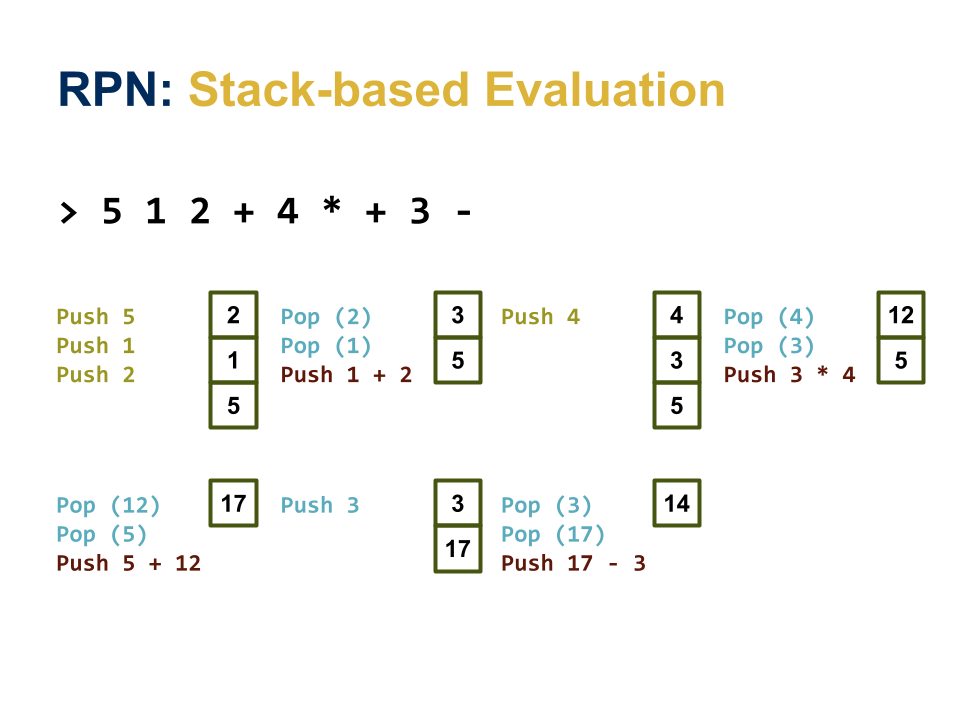
To implement such a RPN calculator, you can use a stack to evaluate the
expression using the process shown below for: 5 1 2 + 4 * + 3 -:

To prove that you too are uber awesome and to relive some of the glory days,
you are to create a RPN calulator that can perform the following arithmetic
operations: +, -, *, /.
Task 1: src/rpn.c
Once you have a working array and stack library, you are to complete the
src/rpn.c program:
$ ./bin/rpn
4
4
5 8 * 1 +
41
In the example above, the user first entered in 4 and this evaluates to 4
and is displayed back to the user. Next, the user enters the RPN
expression 5 8 * 1 + which evaluates to 41.
You are to implement the bin/rpn program to support reading standard
input line by line and evaluating each line as a RPN expression and
printing out the result.
Invalid Input
For our class, you do not need to worry about (ie. handle) invalid input. You can assume the user will only enter in valid RPN expressions.
The src/rpn.c file contains the C implementation of the rpn program
described above. You will need to implement the following functions:
-
int64_t evaluate_expression(char *expression)This function uses a stack to evaluate the given RPN expression and returns the result of the evaluation.
-
int main(int argc, char *argv[])This function reads one line at a time from
stdin, evaluates each line as a RPN expression, and then outputs the result.Hint: Use fgets to read from standard input.
Memory Management
In addition to meeting the functional requirements of the assignment (as described above), your program must not exhibit any memory leaks or invalid memory accesses as would be detected by Valgrind.
Be sure to free any memory that has been allocated on the heap and to initialize any allocate memory appropriately.
Task 2: Testing
As you implement src/rpn.c, you can test it by running the test-rpn
target:
# Build artifact and run test
$ make test-rpn
Testing rpn ...
 expressions 1 (output)                   ... Success
 expressions 1 (valgrind)                 ... Success
 expressions 2 (output)                   ... Success
 expressions 2 (valgrind)                 ... Success
 expressions 3 (output)                   ... Success
 expressions 3 (valgrind)                 ... Success
 expressions 4 (output)                   ... Success
 expressions 4 (valgrind)                 ... Success

  Score 4.00 / 4.00
 Status Success
Activity 4: Quiz (2 Points)
Once you have completed all the activities above, you are to complete the following reflection quiz:
As with Reading 01, you will need to store your answers in a
homework03/answers.json file. You can use the form above to generate the
contents of this file, or you can write the JSON by hand.
To check your quiz directly, you can use the check.py script:
$ ../.scripts/check.py
Checking homework03 quiz ...
      Q1 0.40
      Q2 0.40
      Q3 0.20
      Q4 0.20
      Q5 0.80
   Score 2.00 / 2.00
  Status Success
Leet Point (1 Extra Credit Point)
For extra credit, you are to solve the following LeetCode problem in C.
To receive credit, you must pass on LeetCode and achieve an Accepted submission.
Verification
To get credit for this Leet Point, show your solution and the LeetCode acceptance page to a TA to verify (or attached a screenshot with both to your Pull Request). You have up until two days after this assignment is due to verify your Leet Point.
Self-Service Extension
Remember that you can always forgo this Leet Point for two extra days to do the homework. That is, if you need an extension, you can simply skip the Leet Point and you will automatically have until Friday to complete the assignment for full credit.
Just leave a note on your Pull Request of your intentions.
Submission
To submit your assignment, please commit your work to the homework03 folder
of your homework03 branch in your assignments GitHub repository:
#-----------------------------------------------------------------------
# Make sure you have already completed Activity 0: Preparation
#-----------------------------------------------------------------------
...
$ git add Makefile                            # Mark changes for commit
$ git commit -m "Homework 03: Activity 0"     # Record changes
...
$ git add src/array.c                         # Mark changes for commit
$ git commit -m "Homework 03: Activity 1"     # Record changes
...
$ git add src/stack.c                         # Mark changes for commit
$ git commit -m "Homework 03: Activity 2"     # Record changes
...
$ git add src/rpn.c                           # Mark changes for commit
$ git commit -m "Homework 03: Activity 3"     # Record changes
...
$ git add answers.json                        # Mark changes for commit
$ git commit -m "Homework 03: Activity 4"     # Record changes
...

$ git push -u origin homework03               # Push branch to GitHub
Pull Request
Remember to create a Pull Request and assign the appropriate TA from the Reading 03 TA List.
DO NOT MERGE your own Pull Request. The TAs use open Pull Requests to keep track of which assignments to grade. Closing them yourself will cause a delay in grading and confuse the TAs.
-
Woz spilled my french fries. I will never forget. ↩