Homework 07: Hash Table, Word Frequencies
The goal of this homework assignment is to allow you to explore building a
hash table that uses linear probing to handle collisions. Once you
have this hash table library, you will use it to build freq, which is a
program that counts the frequencies of all the words from a file given via
stdin.
In high-level languages such as Python, we have a built-in implementation of a hash table in the form of a dict:
# Define an empty dictionary
>>> table = {}

# Insert a key, value pair
>>> table['fate'] = 'inexorable'

# Lookup value associated with key
>>> table['fate']
'inexorable'
Unfortunately, the C standard library does not provide any map or hash table data structure. To remedy this, you will implement a hash table that uses linear probing to handle collisions.
For this assignment, you are to do your work in the homework07 folder of
your assignments GitHub repository and push your work by noon
Wednesday, October 11.
Activity 0: Preparation
Before starting this homework assignment, you should first perform a git
pull to retrieve any changes in your remote GitHub repository:
$ cd path/to/repository                   # Go to assignments repository

$ git switch master                       # Make sure we are in master branch

$ git pull --rebase                       # Get any remote changes not present locally
Next, create a new branch for this assignment:
$ git checkout -b homework07 # Create homework07 branch and check it out
Task 1: Skeleton Code
To help you get started, the instructor has provided you with the following skeleton code:
# Go to assignments repository
$ cd path/to/assignments/repository

# -----------------------------------------------------
# MAKE SURE YOU ARE NOT INSIDE THE homework07 DIRECTORY
# -----------------------------------------------------
# MAKE SURE YOU ARE AT THE TOP-LEVEL DIRECTORY
# -----------------------------------------------------

# Download skeleton code tarball
$ curl -LO https://www3.nd.edu/~pbui/teaching/cse.20312.fa23/static/tar/homework07.tar.gz

# Extract skeleton code tarball
$ tar xzvf homework07.tar.gz
Once downloaded and extracted, you should see the following files in your
homework07 directory:
homework07
    \_ Makefile            # This is the Makefile for building all the project artifacts
    \_ bin                 # This contains the project binary executables and test scripts
        \_ benchmark.py    # This is the Python script for benchmarking the freq program
        \_ test_freq.sh    # This is the shell script for testing the freq utility
        \_ test_hash.sh    # This is the shell script for testing the hash functions
        \_ test_pair.sh    # This is the shell script for testing the Pair structure
        \_ test_string.sh  # This is the shell script for testing the string functions
        \_ test_table.sh   # This is the shell script for testing the Table structure
    \_ include             # This contains the project header files
        \_ ds              # This contains the project data structure header files
            \_ hash.h      # This is the C header file for the hash functions
            \_ pair.h      # This is the C header file for the Pair structure
            \_ string.h    # This is the C header file for the string functions
            \_ table.h     # This is the C header file for the Table structure
    \_ lib                 # This contains the project library files
    \_ src                 # This contains the project source code
        \_ freq.c          # This is the C source code for the freq utility
        \_ hash.c          # This is the C source code for the hash functions
        \_ pair.c          # This is the C source code for the Pair structure
        \_ string.c        # This is the C source code for the string functions
        \_ table.c         # This is the C source code for the Table structure
    \_ tests               # This contains the project unit tests
        \_ unit_hash.c     # This is the unit test for the hash functions
        \_ unit_pair.c     # This is the unit test for the Pair structure
        \_ unit_string.c   # This is the unit test for the string functions
        \_ unit_table.c    # This is the unit test for the Table structure
Task 2: Initial Import
Now that the files are extracted into the homework07 folder, you can
commit them to your git repository:
# Go into homework07 folder
$ cd homework07

# Add and commit initial skeleton files
$ git add Makefile                            # Mark changes for commit
$ git add bin/*.sh bin/*.py                   # Mark changes for commit
$ git add include/ds/*.h                      # Mark changes for commit
$ git add lib/.gitkeep                        # Mark changes for commit
$ git add src/*.c                             # Mark changes for commit
$ git add tests/*.c                           # Mark changes for commit
$ git commit -m "Homework 07: Initial Import" # Record changes
The details on what you need to implement are described in the following sections.
Task 3: Makefile
The Makefile contains all the rules or recipes for building the project
artifacts (e.g. freq, libds.a, unit_hash, unit_pair, unit_string,
unit_table, etc.):
CC=       gcc
CFLAGS=   -Wall -std=gnu99 -g -Iinclude
AR=       ar
ARFLAGS=  rcs
LD=       gcc
LDFLAGS=  -Llib

all:              bin/freq

test:
      @$(MAKE) -sk test-all

test-all:         test-hash test-pair test-table test-string test-freq

# TODO: Pattern rule for object files

# TODO: Rule for lib/libds.a

# TODO: Rule for bin/freq

bin/unit_hash:    tests/unit_hash.o lib/libds.a
      $(LD) $(LDFLAGS) -o $@ $^

bin/unit_pair:    tests/unit_pair.o lib/libds.a
      $(LD) $(LDFLAGS) -o $@ $^

bin/unit_table:   tests/unit_table.o lib/libds.a
      $(LD) $(LDFLAGS) -o $@ $^

bin/unit_string:  tests/unit_string.o lib/libds.a
      $(LD) $(LDFLAGS) -o $@ $^

test-hash:        bin/unit_hash
      bin/test_hash.sh

test-pair:        bin/unit_pair
      bin/test_pair.sh

test-table:       bin/unit_table
      bin/test_table.sh

test-string:      bin/unit_string
      bin/test_string.sh

test-freq:        bin/freq
      bin/test_freq.sh

clean:
      rm -f bin/freq bin/unit_* lib/*.a src/*.o tests/*.o
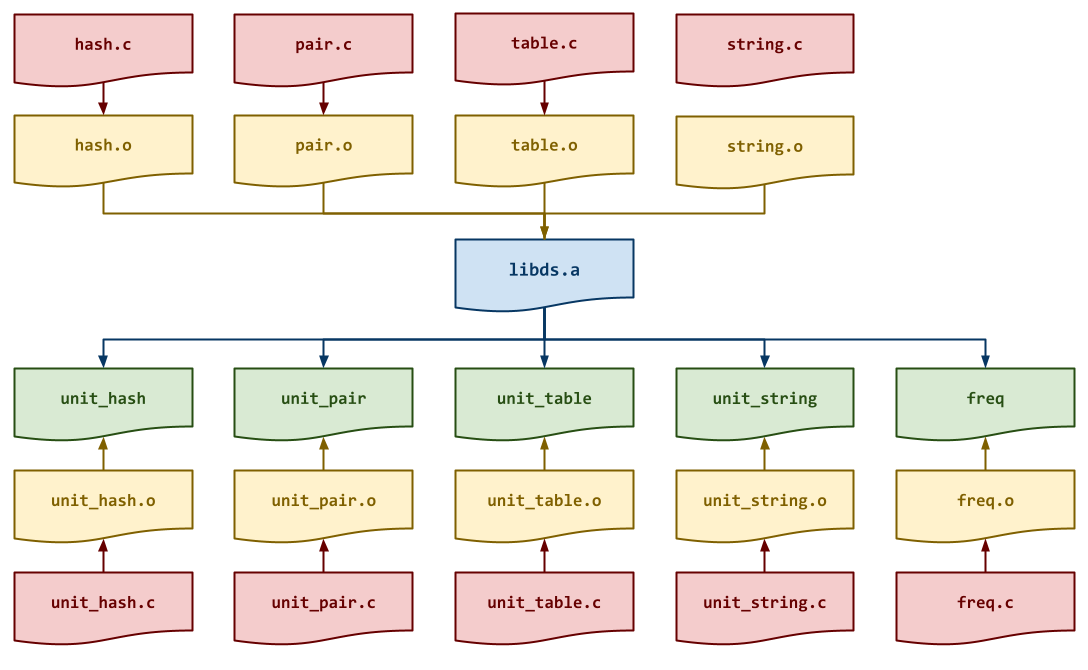
For this task, you will need to add rules for building the static library
lib/libds.a and the program bin/freq. Be sure to have a recipe
for any intermediate object files that libraries require as shown in the
DAG below:
Makefile Variables
You must use the CC, CFLAGS, LD, LDFLAGS, AR, and ARFLAGS
variables when appropriate in your rules. You should also consider using
automatic variables such as $@ and $< as well.
Once you have a working Makefile, you should be able to run the following
commands:
# Build all TARGETS
$ make
gcc -Wall -std=gnu99 -g -Iinclude -c -o src/freq.o src/freq.c
gcc -Wall -std=gnu99 -g -Iinclude -c -o src/hash.o src/hash.c
gcc -Wall -std=gnu99 -g -Iinclude -c -o src/pair.o src/pair.c
gcc -Wall -std=gnu99 -g -Iinclude -c -o src/table.o src/table.c
gcc -Wall -std=gnu99 -g -Iinclude -c -o src/string.o src/string.c
ar rcs lib/libds.a src/hash.o src/pair.o src/table.o src/string.o
gcc -Llib -o bin/freq src/freq.o lib/libds.a

# Run all tests
$ make test
Testing hash...
...

# Remove generated artifacts
$ make clean
rm -f bin/freq bin/unit_* lib/*.a src/*.o tests/*.o
Note: The tests will fail if you haven't implemented the hash or
string functions, or the Pair or Table structures, or the freq
program.
Warnings
You must include the -Wall flag in your CFLAGS when you compile. This
also means that your code must compile without any warnings, otherwise
points will be deducted.
After completing the Makefile and verifying that you can produce all the
specified artifacts, you may begin implementing the data structures and
applications for this assignment.
Activity 1: Hash Functions (1 Point)
For the first activity, you are to implement two famous hash functions DJB2 and FNV-1a.

Task 1: include/ds/hash.h
The include/ds/node.h file is the header file for the hash functions,
which contains the following prototypes:
/* hash.h: Hash Functions */

#pragma once

#include <stdint.h>
#include <stdlib.h>

/* Type Definitions */

typedef uint64_t (*HashFunction)(const void *data, size_t n);

/* Functions */

uint64_t    djb_hash(const void *data, size_t n);
uint64_t    fnv_hash(const void *data, size_t n);
Other programs will #include this file in order to use the functions we
will be implementing in this library.
Note: HashFunction is a type definition for functions such as
djb_hash and fnv_hash.
Note: For this task, you do not need to modify this file. Instead, you should review it and ensure you understand the provided code.
Task 2: src/hash.c
The src/hash.c file contains the C implementation for the hash
functions. For this task, you will need to implement the following
functions:
-
uint64_t djb_hash(const void *data, size_t n)This function computes the DJB2 hash of all
nbytes indata. -
uint64_t fnv_hash(const void *data, size_t n)This function computes the FNV-1a hash of all
nbytes indata.
Hint: You will want to initialize each hash to the appropriate BASIS
constant and then cast the data into bytes. Once you have done so, you
can loop through the bytes and perform the mathematical operations
specified by each algorithm.
uint64_t hash = _BASIS_;
uint8_t *byte = (uint8_t *)data;

for (size_t i = 0; i < n; i++) {
    hash = ... byte[i] ...;
}
Task 3: Testing
As you implement the functions in src/hash.c, you should use
bin/test_hash.sh to test each function:
# Build unit-test
$ make bin/unit_hash
gcc -Wall -std=gnu99 -g -Iinclude -c -o tests/unit_hash.o tests/unit_hash.c
gcc -Llib -o bin/unit_hash tests/unit_hash.o lib/libds.a

# Run test script manually
$ ./bin/test_hash.sh
Testing hash...
 djb_hash                                 ... Success
 fnv_hash                                 ... Success

   Score 1.00 / 1.00
  Status Success
Alternatively, you can both build the artifacts and run the test script by doing the following:
# Build and run test scripts
$ make test-hash
...
If one of the functions fails, and you need to debug the unit tests, you
can run the bin/unit_hash command directly:
# Display usage message
$ ./bin/unit_hash
Usage: ./bin/unit_hash NUMBER

Where NUMBER is right of the following:
      0  Test djb_hash
      1  Test fnv_hash

# Run test for djb_hash
$ ./bin/unit_hash 0

# Run test for djb_hash using GDB
$ gdb ./bin/unit_hash
...
(gdb) run 0

# Run test for djb_hash using Valgrind
$ valgrind --leak-check=full ./bin/unit_hash 0
Of course, you are free to create your own test programs to debug and test your hash functions.
Iterative Development
You should practice iterative development. That is, rather than writing a bunch of code and then debugging it all at once, you should concentrate on one function at a time and then test that one thing at a time. The provided unit tests allow you to check on the correctness of the individual functions without implementing everything at once. Take advantage of this and build one thing at a time.
Activity 2: Pair Structure (1 Point)
For the second activity, you are to complete the Pair structure that
holds a string key and an associated integer value. The Table
structure you will complete next will utilize this Pair struct to
store its internal information.
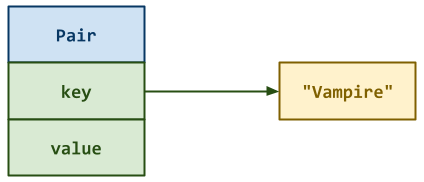
As can seen, each Pair structure has the following attributes:
key: This is a string which will be used to locate thePair.value: This is an integer which is associated with thekey.
Task 1: include/ds/pair.h
The include/ds/pair.h file is the header file for the Pair
structure, which contains the following structs and function
prototypes:
/* pair.h: Key/Value Pair Structure */

#pragma once

#include <stdint.h>
#include <stdio.h>

/* Structures */

typedef struct {
    char   *key;
    int64_t value;
} Pair;

/* Functions */

Pair *      pair_create(const char *key, int64_t value);
void        pair_delete(Pair *p);
void        pair_format(Pair *p, FILE *stream);
Note: For this task, you do not need to modify this file. Instead, you should review it and ensure you understand the provided code.
Task 2: src/pair.c
The src/pair.c file contains the C implementation for the Pair
structure. For this task, you will need to implement the following functions:
-
Pair * pair_create(const char *key, int64_t value)This function allocates a new
Pairstruct and initializes its internal attributes:keyandvalue. -
void pair_delete(Pair *p)This function deallocates the given
Pairstruct along with its internalkeystring. -
void pair_format(Pair *p, FILE *stream)This function prints the
valueand thekeyof the givenPairstruct to the specifiedstreamin the following format:{value}\t{key}\n.
Task 3: Testing
As you implement the functions in src/pair.c, you should use
bin/test_pair.sh to test each function:
# Build unit-test
$ make bin/unit_pair
gcc -Wall -std=gnu99 -g -Iinclude -c -o tests/unit_pair.o tests/unit_pair.c
gcc -Llib -o bin/unit_pair tests/unit_pair.o lib/libds.a

# Run test script manually
$ ./bin/test_pair.sh
Testing pair...
 pair_create                              ... Success
 pair_delete                              ... Success
 pair_format                              ... Success

   Score 1.00 / 1.00
  Status Success
Alternatively, you can both build the artifacts and run the test script by doing the following:
# Build and run test scripts
$ make test-pair
...
If one of the functions fails, and you need to debug the unit tests, you
can run the bin/unit_pair command directly:
# Display usage message
$ ./bin/unit_pair
Usage: ./bin/unit_pair NUMBER

Where NUMBER is right of the following:
    0  Test pair_create
    1  Test pair_delete
    2  Test pair_format

# Run test for pair_create
$ ./bin/unit_pair 0

# Run test for pair_create using GDB
$ gdb ./bin/unit_pair
...
(gdb) run 0

# Run test for pair_create using Valgrind
$ valgrind --leak-check=full ./bin/unit_pair 0
Of course, you are free to create your own test programs to debug and test
your Pair structure.
Activity 3: Table Structure (5 Points)
For this activity, you are to implement the Table structure, which is a
hash table that uses linear probing to handle collisions.
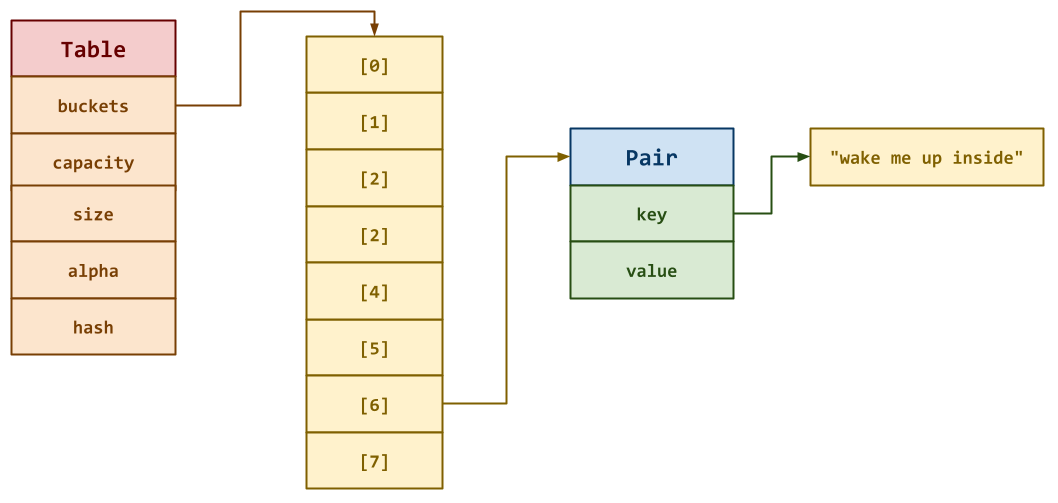
As can be seen, the Table struct has the following internal
attributes.
-
capacity: This is the maximum number of values in thebucketsarray. -
size: This is the number of actual items in thebucketsarray. -
alpha: This is the maximum load factor for thebucketsarray. -
hash: This is a pointer to the hash function to use in locating the appropriate bucket for a givenkey.
Task 1: include/ds/table.h
The include/ds/table.h file is the header file for the Table
structure, which contains the following structs and function
prototypes:
/* table.h: Table Structure */

#pragma once

#include "ds/hash.h"
#include "ds/pair.h"

#include <stdio.h>
#include <stdint.h>
#include <stdlib.h>

/* Constants */

#define DEFAULT_CAPACITY    (1<<3)

/* Structures */

typedef struct {
    Pair          **buckets;
    size_t          capacity;
    size_t          size;
    double          alpha;
    HashFunction    hash;
} Table;

/* Functions */

Table *     table_create(size_t capacity, double alpha, HashFunction hash);
void        table_delete(Table *t);

ssize_t     table_locate(Table *t, const char *key);

void        table_insert(Table *t, const char *key, int64_t value);
int64_t     table_lookup(Table *t, const char *key);
void        table_format(Table *t, FILE *stream);
void        table_resize(Table *t, size_t capacity);
Note: For this task, you do not need to modify this file. Instead, you should review it and ensure you understand the provided code.
Task 2: src/table.c
The src/table.c file contains the C implementation for the Table
structure. For this task, you will need to implement the following
functions:
-
Table * table_create(size_t capacity, double alpha, HashFunction hash)This function allocates a
Tablestruct and initializes its internal attributes:buckets,capacity,size,alpha, andhash. Ifcapacityis0, then useDEFAULT_CAPACITYinstead. -
void table_delete(Table *t)This function deallocates the given
Tablestruct along with thePairsin its internalbucketsarray. -
ssize_t table_locate(Table *t, const char *key)This function uses the
keyalong with the internalhashfunction to locate the index within the internalbucketsarray of theTablestruct:-
If there is a
Pairthat matches thiskeyin thebucketsarray, then the index of thisPairis returned. -
If there is not a matching
Pair, then the index of first free or unused location in thebucketsarray is returned. -
If there is no match and there are no unused locations in the
bucketsarray, then-1is returned.
Hint: Use linear probing to scan the
bucketsarray. Be sure tohashthekeyto find the initialbucketsindex and then proceed to scan thebucketsuntil a matchingPairis found or thebucketsslot is free (ie.NULL). -
-
void table_insert(Table *t, const char *key, int64_t value)This function adds a
Pairstruct with the givenkeyandvalueto the internalbucketsarray of theTablestruct. If aPairwith a matchingkeyalready exists, then thevalueof thePairis updated. -
int64_t table_lookup(Table *t, const char *key)This function searches the
Tablestruct for aPairstruct with the matchingkeyand returns the associatedvalueof thePair. If no suchPairis found, then return-1. -
void table_format(Table *t, FILE *stream)This function prints every valid
Pairstruct in theTable's internalbucketsarray to the specifiedstream.Hint: Use
pair_formaton each validPairin thebucketsarray. -
void table_resize(Table *t, size_t capacity)This function resizes the internal
bucketsarray of theTablestruct to the specifiedcapacity.
Task 3: Testing
As you implement the functions in src/table.c, you should use
bin/test_table.sh to test each function:
# Build unit-test
$ make bin/unit_table
gcc -Wall -std=gnu99 -g -Iinclude -c -o tests/unit_table.o tests/unit_table.c
gcc -Llib -o bin/unit_table tests/unit_table.o lib/libds.a

# Run test script manually
$ ./bin/test_table.sh
Testing table...
 table_create                             ... Success
 table_delete                             ... Success
 table_locate                             ... Success
 table_insert                             ... Success
 table_lookup                             ... Success
 table_format                             ... Success
 table_resize                             ... Success
 table_insert_resize                      ... Success

  Score 5.00 / 5.00
 Status Success
Alternatively, you can both build the artifacts and run the test script by doing the following:
# Build and run test scripts
$ make test-table
...
If one of the functions fails, and you need to debug the unit tests, you
can run the bin/unit_table command directly:
# Display usage message
$ ./bin/unit_table
Usage: ./bin/unit_table NUMBER

Where NUMBER is right of the following:

    0  Test table_create
    1  Test table_delete
    2  Test table_locate
    3  Test table_insert
    4  Test table_lookup
    5  Test table_format
    6  Test table_resize
    7  Test table_insert_resize

# Run test for table_create
$ ./bin/unit_table 0

# Run test for table_create using GDB
$ gdb ./bin/unit_table
...
(gdb) run 0

# Run test for table_create using Valgrind
$ valgrind --leak-check=full ./bin/unit_table 0
Of course, you are free to create your own test programs to debug and test
your Table structure.
Activity 4: String Functions (1 Point)
For this activity, you are to implement two string utility functions as described below.
Task 1: src/string.c
The src/string.c file contains the C implementation for two string
utility functions. For this task, you will need to implement the following
functions:
-
char * str_lower(char *s)This function converts each letter in the string
sto lowercase and returns a pointer to the first character in the string.Hint: Consider using tolower.
-
char * str_trim(char *s)This function removes any non-alphanumeric characters from the beginning and end of the string
sand returns a pointer to the first alphanumeric character in the string.
Task 2: Testing
As you implement the functions in src/string.c, you should use
bin/test_string.sh to test each function:
# Build unit-test
$ make bin/unit_string
gcc -Wall -std=gnu99 -g -Iinclude -c -o tests/unit_string.o tests/unit_string.c
gcc -Llib -o bin/unit_string tests/unit_string.o lib/libds.a

# Run test script manually
$ ./bin/test_string.sh
Testing string...
 str_lower                                ... Success
 str_trim                                 ... Success
 str_both                                 ... Success

  Score 1.00 / 1.00
 Status Success
Alternatively, you can both build the artifacts and run the test script by doing the following:
# Build and run test scripts
$ make test-string
...
If one of the functions fails, and you need to debug the unit tests, you
can run the bin/unit_string command directly:
# Display usage message
$ ./bin/unit_string
Usage: ./bin/unit_string NUMBER

Where NUMBER is right of the following:

    0  Test str_lower
    1  Test str_trim
    2  Test str_both

# Run test for str_lower
$ ./bin/unit_string 0

# Run test for str_lower using GDB
$ gdb ./bin/unit_string
...
(gdb) run 0

# Run test for str_lower using Valgrind
$ valgrind --leak-check=full ./bin/unit_string 0
Of course, you are free to create your own test programs to debug and test your string utility functions.
Activity 5: Freq (2 Points)
For the last activity, you are to use your Table structure to implement
bin/freq, which computes the word frequencies of all the text from stdin.
# Use an alpha of 0.5, and FNV as the hash to compute word frequencies
$ ./bin/freq <<<"I shake it off, I shake it off"
2       it
2       off
2       i
2       shake

# Use an alpha of 0.75, and DJB as the hash to compute word frequencies
$ ./bin/freq -a 0.75 -d <<<"I shake it off, I shake it off"
2       off
2       shake
2       it
2       i

# Use an alpha of 0.90, and FNF as hash to compute word frequencies
$ ./bin/freq -a 0.9 -f < include/ds/string.h
1       str_trim(char
1       once
1       pragma
10
1       set
1       sw=4
1       ft=c
1       sts=4
2       functions
1       str_lower(char
1       vim
1       string
1       expandtab
1       ts=8
2       char
1       string.h
The bin/freq program should support the following command line options:
-a ALPHA: Set thealphafor theTable-d: Use DJB2 as the hash function.-f: Use [FNV1-a] as the hash function.
By default, bin/freq sets alpha to 0.5 and uses [FNV1-a] as the hash
function.
Memory Management
In addition to meeting the functional requirements of the assignment (as described above), your program must not exhibit any memory leaks or invalid memory accesses as would be detected by Valgrind.
Be sure to free any memory that has been allocated on the heap and to initialize any allocate memory appropriately.
Task 1: src/freq.c
The src/freq.c file contains the C implementation of the bin/freq
program described above. You will need to implement the following functions:
-
int main(int argc, char *argv[])This function should do the following:
- Parse the command line options.
- Read each line from
stdin. - Lowercase and trim each word in each line and insert count of word into
Table. - Print the
Tabletostdout.
Hint: Take advantage of the HashFunction type definition to treat
functions as pointers that can be assigned to variables:
// Assign functions as variables
double       alpha = 0.5;
HashFunction hash  = fnv_hash;

...

// Use function variables
Table *t = table_create(0, alpha, hash);
Task 2: Testing
As you implement src/freq.c, you can test it by running the
test-freq target:
# Build artifact and run test
$ make test-freq
bin/test_freq.sh
  The Swan, 0.50, FNV (output)             ... Success
  The Swan, 0.50, FNV (valgrind)           ... Success
  The Swan, 0.75, FNV (output)             ... Success
  The Swan, 0.75, FNV (valgrind)           ... Success
  The Swan, 0.50, DJB (output)             ... Success
  The Swan, 0.50, DJB (valgrind)           ... Success
  The Swan, 0.75, DJB (output)             ... Success
  The Swan, 0.75, DJB (valgrind)           ... Success
  Vampire, 0.50, FNV (output)              ... Success
  Vampire, 0.50, FNV (valgrind)            ... Success
  Vampire, 0.75, FNV (output)              ... Success
  Vampire, 0.75, FNV (valgrind)            ... Success
  Vampire, 0.50, DJB (output)              ... Success
  Vampire, 0.50, DJB (valgrind)            ... Success
  Vampire, 0.75, DJB (output)              ... Success
  Vampire, 0.75, DJB (valgrind)            ... Success

   Score 2.00 / 2.00
  Status Success
Activity 6: Quiz (2 Points)
Once you have completed all the activities above, you are to complete the following reflection quiz:
As with Reading 01, you will need to store your answers in a
homework07/answers.json file. You can use the form above to generate the
contents of this file, or you can write the JSON by hand.
To check your quiz directly, you can use the check.py script:
$ ../.scripts/check.py
Checking homework07 quiz ...
      Q1 0.20
      Q2 0.60
      Q3 0.40
      Q4 0.20
      Q5 0.40
      Q6 0.20
   Score 2.00 / 2.00
  Status Success
Leet Point (1 Extra Credit Point)
For extra credit, you are to solve the following LeetCode problem in C.
To receive credit, you must pass on LeetCode and achieve an Accepted submission.
Verification
To get credit for this Leet Point, show your solution and the LeetCode acceptance page to a TA to verify (or attached a screenshot with both to your Pull Request). You have up until two days after this assignment is due to verify your Leet Point.
Self-Service Extension
Remember that you can always forgo this Leet Point for two extra days to do the homework. That is, if you need an extension, you can simply skip the Leet Point and you will automatically have until Friday to complete the assignment for full credit.
Just leave a note on your Pull Request of your intentions.
Submission
To submit your assignment, please commit your work to the homework07 folder
of your homework07 branch in your assignments GitHub repository:
#-----------------------------------------------------------------------
# Make sure you have already completed Activity 0: Preparation
#-----------------------------------------------------------------------
...
$ git add Makefile                            # Mark changes for commit
$ git commit -m "Homework 07: Activity 0"     # Record changes
...
$ git add src/hash.c                          # Mark changes for commit
$ git commit -m "Homework 07: Activity 1"     # Record changes
...
$ git add src/pair.c                          # Mark changes for commit
$ git commit -m "Homework 07: Activity 2"     # Record changes
...
$ git add src/table.c                         # Mark changes for commit
$ git commit -m "Homework 07: Activity 3"     # Record changes
...
$ git add src/string.c                        # Mark changes for commit
$ git commit -m "Homework 07: Activity 4"     # Record changes
...
$ git add src/freq.c                          # Mark changes for commit
$ git commit -m "Homework 07: Activity 5"     # Record changes
...
$ git add answers.json                        # Mark changes for commit
$ git commit -m "Homework 07: Activity 6"     # Record changes
...

$ git push -u origin homework07               # Push branch to GitHub
Pull Request
Remember to create a Pull Request and assign the appropriate TA from the Reading 07 TA List.
DO NOT MERGE your own Pull Request. The TAs use open Pull Requests to keep track of which assignments to grade. Closing them yourself will cause a delay in grading and confuse the TAs.