Homework 10: Binary Heaps, Huffman Coding
The goal of this homework assignment is to allow you to explore building priority queues in Python using binary heaps and then employ these data structures in implementing a script that computes the Huffman coding for a stream of text. This encoding is a mapping from each character in the input stream to a unique bit sequence or prefix code, which unlike say ASCII is variable-length rather than fixed size. The purpose of the Huffman coding is to utilize a greedy algorithm to produce an encoding that uses less space (ie. fewer bits) than the fixed-size ASCII encoding as show below:
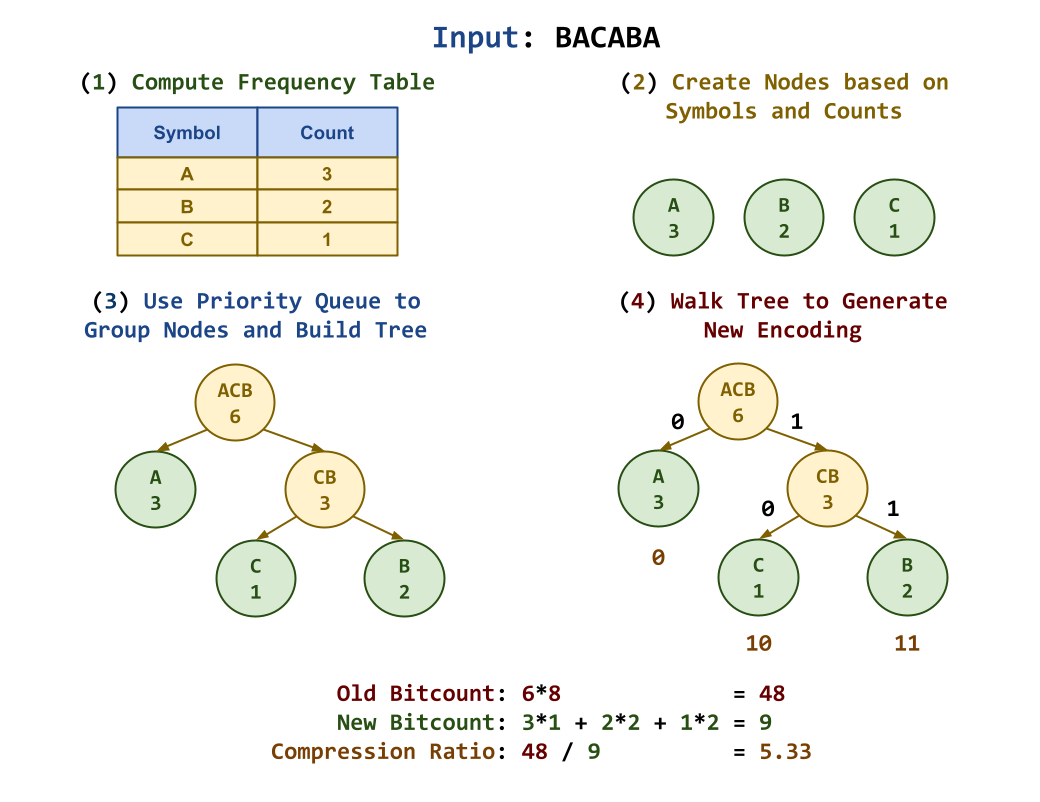
In the example above, our input sequence is: BACABA, which in ASCII would
consist of a total of 48 bits (e.g. 6 bytes):
010000100100000101000011010000010100001001000001 # ASCII Representation
To generate a more compressed version of this text, we would need to construct a Huffman coding by performing the following process:
-
Compute Frequencies: First, read in the input stream and count the occurrences of each symbol (ie. character) to create a frequency table.
-
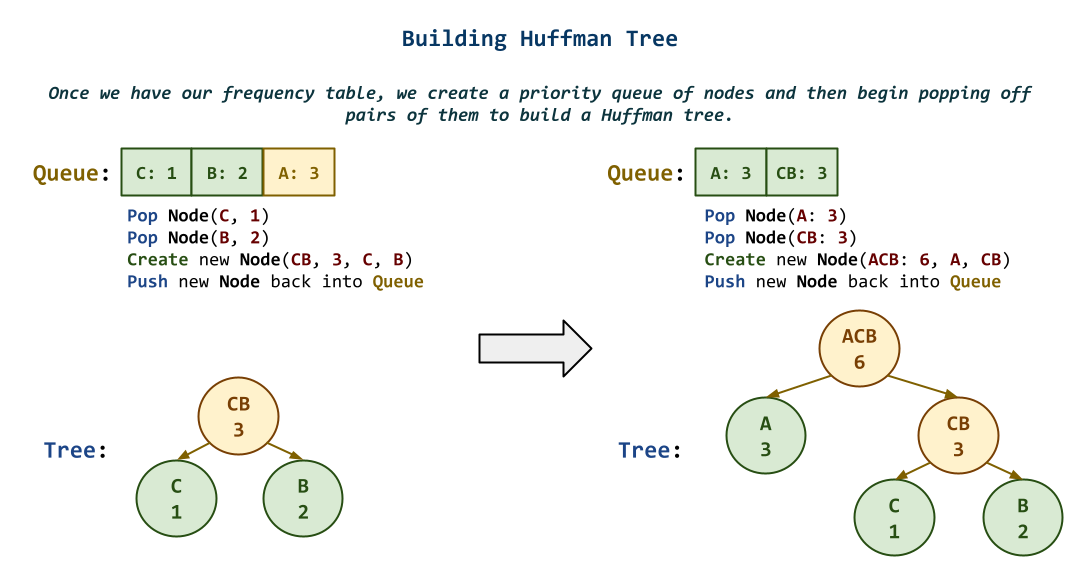
Populate Priority Queue: Next, represent each symbol and count pair as a node and push them into a priority queue.
-
Build Tree: Afterwards, construct the Huffman tree by doing the following:
while len(queue) > 1:
    # Pop nodes with smallest counts from priority queue
    left  = queue.pop()
    right = queue.pop()

    # Construct new composite node
    node  = Node(left.symbol + right.symbol, left.value  + right.value, left, right)

    # Push new composite node into priority queue
    queue.push(node)

root = queue.pop()
Basically, as long there is more than one node in the priority queue, we will pop off the two smallest items, create a new node with the combined count of these two nodes, and insert this new node back into the priority queue. We repeat this process until there is only one node left in the priority queue, which we then set as the root of our Huffman tree.
By constantly grouping nodes with the smallest counts, we use a greedy problem solving approach in order to maximize the path from the root to the nodes with the lowest occurrences (and thus minimize the path from the root to the nodes with the highest occurrences).
-
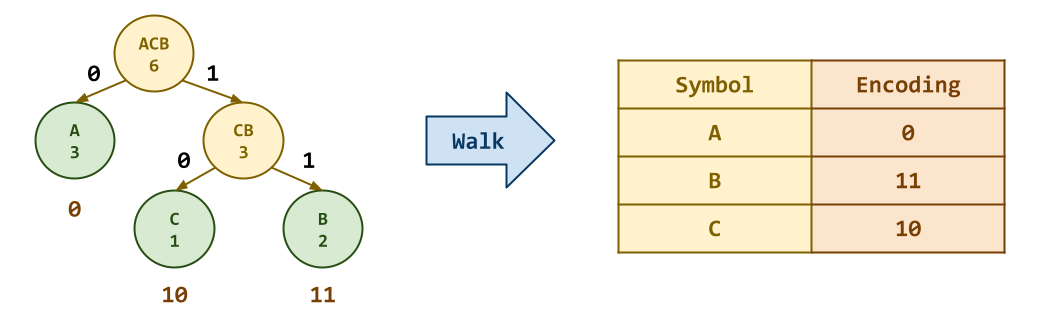
Walk Tree: Finally, to produce the Huffman coding, walk (ie. recursively traverse) the Huffman tree we constructed in the previous step and record the path we took to the leaf nodes (ie. the original nodes from step
2). To ensure a consistent prefix code, we can use the convention where the left child gets a0and the right child gets a1when we take the path from parent to child. In the example, above, using this traversal mechanism yields the following encoding:Symbol Count Encoding A 3 0 B 2 11 C 1 10
Using this new Huffman coding, our original text, BACABA, can be encoded as
follows:
110100110 # Huffman Encoding
This means the Huffman coding was about to compress down to about 20% of
the original ASCII representation. This is the reason why many real-world
data compression schemes such as PKZIP, JPEG, and MP3 use elements of
the Huffman coding technique to achieve smaller file sizes for different
types of data.
To keep things manageable (and to respect your time), we will only worry about the construction of the Huffman coding in this assignment and leave out the actual compression and decompressing process (though you are free to implement that on your own!).
For this assignment, you are to do your work in the homework10 folder of
your assignments GitHub repository and push your work by noon,
Wednesday, November 15.
Activity 0: Preparation
Before starting this homework assignment, you should first perform a git
pull to retrieve any changes in your remote GitHub repository:
$ cd path/to/repository                   # Go to assignments repository

$ git switch master                       # Make sure we are in master branch

$ git pull --rebase                       # Get any remote changes not present locally
Next, create a new branch for this assignment:
$ git checkout -b homework10 # Create homework10 branch and check it out
Task 1: Skeleton Code
To help you get started, the instructor has provided you with the following skeleton code:
# Go to assignments repository
$ cd path/to/assignments/repository

# -----------------------------------------------------
# MAKE SURE YOU ARE NOT INSIDE THE homework10 DIRECTORY
# -----------------------------------------------------
# MAKE SURE YOU ARE AT THE TOP-LEVEL DIRECTORY
# -----------------------------------------------------

# Download skeleton code tarball
$ curl -LO https://www3.nd.edu/~pbui/teaching/cse.20312.fa23/static/tar/homework10.tar.gz

# Extract skeleton code tarball
$ tar xzvf homework10.tar.gz
Once downloaded and extracted, you should see the following files in your
homework10 directory:
homework10
    \_ Makefile           # This is the Makefile for building all the assignment artifacts
    \_ huffman.py         # This is the Python script for the Huffman coding script
    \_ node.py            # This is the Python module for the Node class and functions
    \_ priority_queue.py  # This is the Python module for the Priority Queue class and functions
Task 2: Initial Import
Now that the files are extracted into the homework10 folder, you can
commit them to your git repository:
# Go into homework10 folder
$ cd homework10

# Add and commit initial skeleton files
$ git add Makefile                            # Mark changes for commit
$ git add *.py
$ git commit -m "Homework 10: Initial Import" # Record changes
Task 3: Unit Tests
After downloading and extracting these files, you can run the make command
to run the tests.
# Run all tests (will trigger automatic download)
$ make
You will notice that the Makefile downloads three additional test scripts:
homework10
  \_ huffman_test.py        # This is the Python unit test for the Huffman script
  \_ node_test.py           # This is the Python unit test for the Node module
  \_ priority_queue_test.py # This is the Python unit test for the Priority Queue module
In addition to the embedded doctests in the skeleton code, you will be using these unit tests to verify the correctness and behavior of your code.
Automatic Downloads
The test scripts are automatically downloaded by the Makefile, so any
modifications you do to them will be lost when you run make again.
Likewise, because they are automatically downloaded, you do not need to add
or commit them to your git repository.
The details on what you need to implement for this assignment are described in the following sections.
Activity 1: Node (2 Points)
For the first activity, you are to extend and augment our usual Node dataclass:
@dataclass
class Node:
    symbol: str
    value:  int = 0
    left:   Optional['Node'] = None
    right:  Optional['Node'] = None
In particular, you will need to implement the __gt__ magic method to
allow comparing two Node objects and you will need to implement the walk
function that traverses a Huffman tree to construct the Huffman coding
as described previously.
Task 1: node.py
The node.py Python script contains the Node class you are to augment
and the walk function you are to complete for this activity:
-
Node.__gt__(self, other: 'Node') -> boolThis method determines whether the current
Nodeis greater than theotherspecifiedNode(returnsTrueif it is greater,Falseotherwise). To do so, the method will first consider thevalueattributes as the higher priority and then consider the length of thesymbolattributes as the lower priority. -
walk(node: Optional[Node], codeword: str='') -> dictThis function recursively traverses the binary tree starting at
nodeand returns a dict containing a mapping of symbols to Huffman codes as shown in the diagram above.Hints
-
When initializing a variable, you can annotate its type:
variable: dict[str, str] = {}This will inform static type checkers such as mypy of your intentions.
-
Use divide-and-conquer to traverse the binary tree and carefully consider your base cases (particularly when you know you have a complete
codeword). -
Remember that the left child should add a
0to itscodewordand the right child should add a1to itscodeword. -
Consider using the
|operator to combine multiple dicts.
-
DocTests
You may notice that in addition to the usual comments and TODOs, the docstrings of each method also contains a few doctests.
You are not to modify these doctests and must keep them in-place. They are used to verify the correctness of your code.
Your code goes below the docstrings, where the TODO and pass commands are (you may remove the pass once you complete the method).
Task 2: Testing
As you implement node.py, you can use the provided doctests to verify the
correctness of your code:
# Run doctests
$ python3 -m doctest node.py -v
...
2 items passed all tests:
   2 tests in node.Node.__gt__
   2 tests in node.walk
4 tests in 7 items.
4 passed and 0 failed.
Test passed.
You can also use make to run both the doctests and the unit tests:
# Run unit tests (and doctests)
$ make test-node
Testing node ...
test_00_doctest (__main__.NodeTests) ... ok
test_01_mypy (__main__.NodeTests) ... ok
test_02_comparison (__main__.NodeTests) ... ok
test_03_walk (__main__.NodeTests) ... ok

   Score 2.00 / 2.00
  Status Success

----------------------------------------------------------------------
Ran 4 tests in 0.048s

OK
To just run the unit tests, you can do the following:
# Run unit tests
$ ./node_test.py -v
...
To run a specific unit test, you can specify the method name:
# Run only mypy unit test
$ ./node_test.py -v NodeTests.test_01_mypy
...
Iterative Development
You should practice iterative development. That is, rather than writing a bunch of code and then debugging it all at once, you should concentrate on one function at a time and then test that one thing at a time. The provided unit tests allow you to check on the correctness of the individual functions without implementing everything at once. Take advantage of this and build one thing at a time.
Activity 2: Priority Queue (4 Points)
As described above, to build the Huffman tree, you will need to use a
greedy approach that involves extracting the two Nodes with the lowest
values in order to build a composite Node. To enable this greedy
algorithm, you will be implementing a priority queue using a binary heap
for this activity.
Although Python provides the heapq module, for this assignment, you are to implement your own binary heap, whose internal data representation is a list. You are not to use any functions from the heapq library.
Note: In this implementation, you will be implementing a minimum binary heap.
Task 1: priority_queue.py
The priority_queue.py Python script contains the PriorityQueue class
and utility functions you are to complete for this activity:
-
left_index(index: int) -> int:This function returns the index of the left child of the node specified by
index. -
right_index(index: int) -> int:This function returns the index of the right child of the node specified by
index. -
parent_index(index: int) -> int:This function returns the index of the parent of the node specified by
index. -
PriorityQueue.__len__(self) -> int:This method returns the number of values in the
PriorityQueue. -
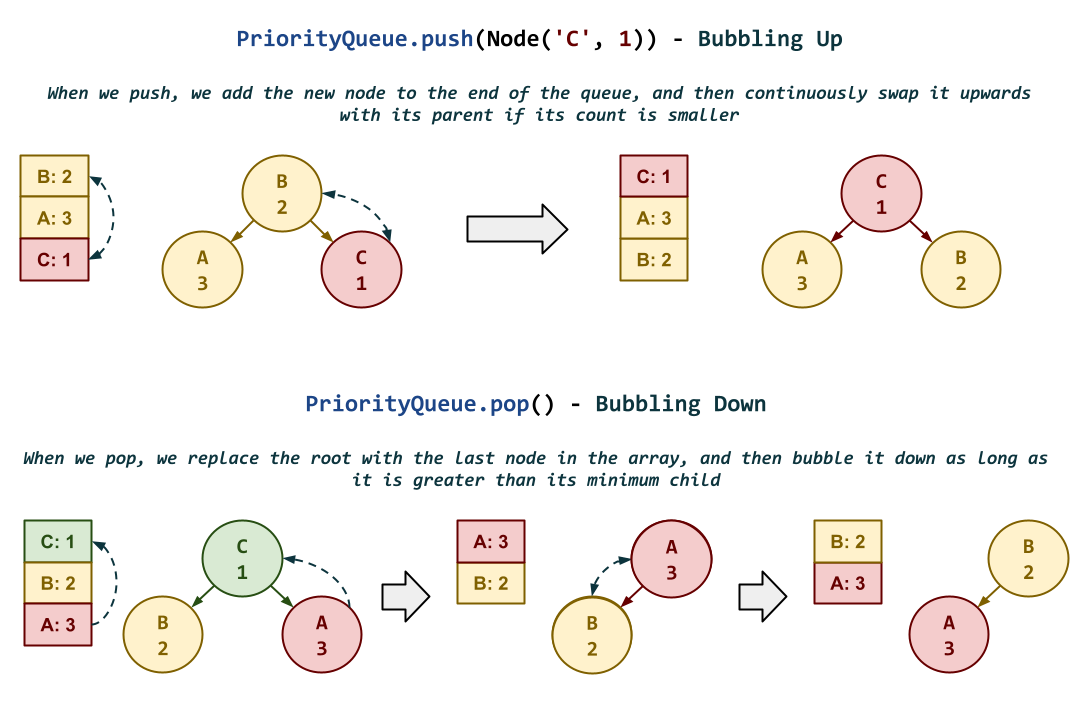
PriorityQueue._bubble_up(self, index: int) -> None:This method performs the bubble up operation on the internal binary heap, beginning at the specified
index:To maintain the binary heap invariant (ie. each node is never less than its children), continuously swap the current node with its parent if the current node is less than its parent*.
Hints
-
Consider doing this iteratively and think carefully about the ending condition.
-
Remember that in Python, you can swap using destructured assignment:
a, b = b, a -
The order of the comparisons matter. To have outputs consistent with the unit tests, you will want to do something like the following:
if self.data[index] < self.data[parent]:
    # Perform swap
-
-
PriorityQueue.push(self, value) -> None:This method adds the
valueto the internal binary heap.Hint: Consider usingPriorityQueue._bubble_upto maintain the binary heap invariant. -
PriorityQueue._find_smallest_child(self, index: int) -> int:This method compares the children of the node specified by
indexand returns the index of the child with the smallest value.Hint: Be mindful of the bounds of the binary heap. Again, order is important, so when you compare the left and *right children, you want to do:
self.data[left] < self.data[right]. -
PriorityQueue._bubble_down(self, index: int) -> None:This method performs the bubble down operation on the internal binary heap, beginning at the specified
index:To maintain the binary heap invariant (ie. each node is never less than its children), continuously swap the current node with its parent if the current node is less than its parent*.
Hints
-
Consider doing this iteratively and think carefully about the ending condition.
-
Remember that in Python, you can swap using destructured assignment:
a, b = b, a -
The order of the comparisons matter. To have outputs consistent with the unit tests, you will want to do something like the following:
if self.data[index] > self.data[smallest]:
    # Perform swap
-
-
PriorityQueue.pop(self):This method removes smallest
valuefrom the internal binary heap and returns it.Hint: After moving the last value in the binary heap to the root, consider using
PriorityQueue._bubble_downto maintain the binary heap invariant.
Task 2: Testing
As you implement priority_queue.py, you can use the provided doctests to verify
the correctness of your code:
# Run doctests
$ python3 -m doctest priority_queue.py -v
...
9 items passed all tests:
   2 tests in priority_queue.PriorityQueue.__len__
   3 tests in priority_queue.PriorityQueue._bubble_down
   3 tests in priority_queue.PriorityQueue._bubble_up
   2 tests in priority_queue.PriorityQueue._find_smallest_child
   3 tests in priority_queue.PriorityQueue.pop
   3 tests in priority_queue.PriorityQueue.push
   1 tests in priority_queue.left_index
   1 tests in priority_queue.parent_index
   1 tests in priority_queue.right_index
19 tests in 14 items.
19 passed and 0 failed.
Test passed.
You can also use make to run both the doctests and the unit tests:
# Run unit tests (and doctests)
$ make test-priority-queue
Testing priority queue ...
test_00_doctest (__main__.PriorityQueueTests) ... ok
test_01_mypy (__main__.PriorityQueueTests) ... ok
test_02_left_index (__main__.PriorityQueueTests) ... ok
test_03_right_index (__main__.PriorityQueueTests) ... ok
test_04_parent_index (__main__.PriorityQueueTests) ... ok
test_05_bubble_up (__main__.PriorityQueueTests) ... ok
test_06_push (__main__.PriorityQueueTests) ... ok
test_07_find_smallest_child (__main__.PriorityQueueTests) ... ok
test_08_bubble_down (__main__.PriorityQueueTests) ... ok
test_09_pop (__main__.PriorityQueueTests) ... ok
test_10_len (__main__.PriorityQueueTests) ... ok

   Score 4.00 / 4.00
  Status Success

----------------------------------------------------------------------
Ran 11 tests in 0.049s

OK
To just run the unit tests, you can do the following:
# Run unit tests
$ ./priority_queue_test.py -v
...
To run a specific unit test, you can specify the method name:
# Run only mypy unit test
$ ./priority_queue_test.py -v PriorityQueueTests.test_01_mypy
...
Activity 3: Huffman Coding (4 Points)
Once you have completed the Node and PriorityQueue classes, and have
verified the walk function, you can now complete the Huffman coding
script.
As described above, to build a Huffman tree, you will need to the following:
-
First, compute the frequencies of each symbol in the input stream.
-
Second, construct a priority queue of
Nodes based on the frequency table computed in the previous step. -
Third, use a greedy approach to build the Huffman tree by removing the two
Nodes with the smallest value from the priority queue and then adding back to the priority queue a composite node. -
Finally, walk the Huffman tree to determine the encoding for each symbol.
Task 1: huffman.py
For this task, you are to complete the huffman.py Python script by
implementing the following functions:
-
count_frequencies(symbols: str) -> dict[str, int]This function returns a dict with the number of occurrences of each symbol in the
symbolsstring.Hint: Consider using dict.get or collections.defaultdict.
-
compute_compression_ratio(symbols: str, codes: dict[str, str]) -> floatThis function returns the compression ratio if the input
symbolsstring were encoded using the Huffman coding corresponding to thecodesdict.Ratio = Number of Bits with Original Encoding / Number of Bits with Huffman Coding
Hint: To determine the number of
bitsare required with the original encoding, you can ask Python to tell you the number ofbytesfor each symbol:symbol_bytes = len(bytes(symbol.encode()))Remember that each
byteis8 bits. -
main(stream=sys.stdin) -> None:This function creates the Huffman coding of all the symbols in the input
streamusing the process described above.Hints
-
To read all of a
streaminto a single string, you can use the read method. -
Consider using dict.items to loop over the frequency counts and push
Nodeobjects into yourPriorityQueue. -
After building the Huffman tree using the
whileloop described above, you will need towalkthe root to construct the Huffman codes. -
Print out each symbol and its corresponding Huffman code after sorting it by the length of the Huffman code and then the Huffman code itself.
Remember that sorted takes a
keyargument that can be used to specified the priorities of an object for comparison. -
You can format floating point numbers with the following:
f'{number:.2f}' # Use two decimal places -
Since some of the symbols may be escape characters, you can use the following to print out each symbol:
f'{repr(symbol)[1:-1]}' # Use representation of symbol, strip quotes
-
Task 2: Testing
As you implement huffman.py, you can use the provided doctests to verify the
correctness of your code:
# Run doctests
$ python3 -m doctest huffman.py -v
3 items passed all tests:
   2 tests in huffman.compute_compression_ratio
   1 tests in huffman.count_frequencies
   2 tests in huffman.main
5 tests in 4 items.
5 passed and 0 failed.
You can also use make to run both the doctests and the unit tests:
# Run unit tests (and doctests)
$ make test-huffman
test_00_doctest (__main__.HuffmanTests) ... ok
test_01_mypy (__main__.HuffmanTests) ... ok
test_02_count_frequencies (__main__.HuffmanTests) ... ok
test_03_compute_compression_ratio (__main__.HuffmanTests) ... ok
test_04_main (__main__.HuffmanTests) ... ok

   Score 4.00 / 4.00
  Status Success

----------------------------------------------------------------------
Ran 5 tests in 0.113s

OK
To just run the unit tests, you can do the following:
# Run unit tests
$ ./huffman_test.py -v
...
To run a specific unit test, you can specify the method name:
# Run only mypy unit test
$ ./huffman_test.py -v HuffmanTests.test_01_mypy
...
Activity 4: Quiz (2 Points)
Once you have completed all the activities above, you are to complete the following reflection quiz:
As with Reading 01, you will need to store your answers in a
homework10/answers.json file. You can use the form above to generate the
contents of this file, or you can write the JSON by hand.
To check your quiz directly, you can use the check.py script:
$ ../.scripts/check.py
Checking homework10 quiz ...
      Q1 0.20
      Q2 0.20
      Q3 1.00
      Q4 0.60
   Score 2.00 / 2.00
  Status Success
Leet Point (1 Extra Credit Point)
For extra credit, you are to solve the following LeetCode problem in Python.
To receive credit, you must pass on LeetCode and achieve an Accepted submission.
Verification
To get credit for this Leet Point, show your solution and the LeetCode acceptance page to a TA to verify (or attached a screenshot with both to your Pull Request). You have up until two days after this assignment is due to verify your Leet Point.
Self-Service Extension
Remember that you can always forgo this Leet Point for two extra days to do the homework. That is, if you need an extension, you can simply skip the Leet Point and you will automatically have until Friday to complete the assignment for full credit.
Just leave a note on your Pull Request of your intentions.
Submission
To submit your assignment, please commit your work to the homework10 folder
of your homework10 branch in your assignments GitHub repository:
#-----------------------------------------------------------------------
# Make sure you have already completed Activity 0: Preparation
#-----------------------------------------------------------------------
...
$ git add node.py                             # Mark changes for commit
$ git commit -m "Homework 10: Activity 1"     # Record changes
...
$ git add priority_queue.py                   # Mark changes for commit
$ git commit -m "Homework 10: Activity 2"     # Record changes
...
$ git add huffman.py                          # Mark changes for commit
$ git commit -m "Homework 10: Activity 3"     # Record changes
...
$ git add answers.json                        # Mark changes for commit
$ git commit -m "Homework 10: Activity 4"     # Record changes
...

$ git push -u origin homework10               # Push branch to GitHub
Pull Request
Remember to create a Pull Request and assign the appropriate TA from the Reading 11 TA List.
DO NOT MERGE your own Pull Request. The TAs use open Pull Requests to keep track of which assignments to grade. Closing them yourself will cause a delay in grading and confuse the TAs.