Lab 5: Bezier Curves
Due: Thursday, September 23rd, 2010 (before lab session ends)
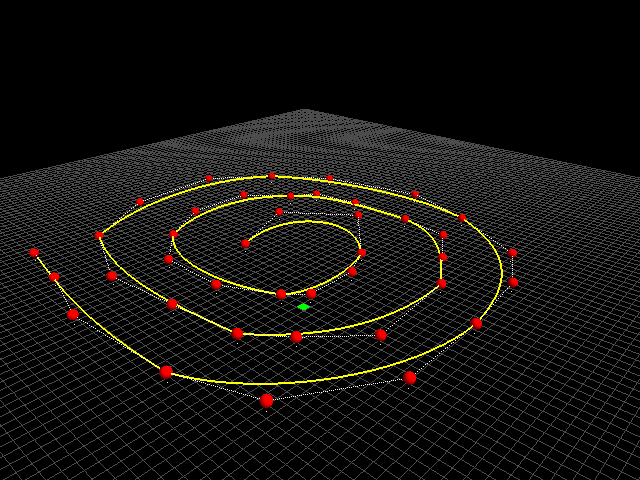
Create a program, bezier, that allows the user to construct 3D bezier curves using the keyboard and mouse. The idea is to allow the user to click on a grid to place points. Once there are at least 4 points a bezier curve can be draw by using these points as the controls. To edit the location of the points, the user should be able to use the mouse to select the control points and move them around. The full list of controls is described below. The program should allow users to create something like this:
To help you get started, we have provided skeleton source code for this lab and have marked where you need to implement particular segments of the application:
The source code marks the parts of the program you need to implement with comments beginning with TODO <TOPIC> and a description of what needs to be done at each particular location. The comments don't specify everything in detail, but should put you in the right direction.
Controls
The hooks for the following controls are already in place and it is up to you to support the underlying mechanisms that carry out these operations:
Mouse
- Place points using a left mouse click.
- Delete points using a middle mouse click.
- Move camera arund using right mouse drag.
- If point is selected, mouse wheel adjusts height.
- In orthographic mode, left drag on point moves control.
- In orthographic mode, right click refocuses camera.
- In orthographic mode, mouse wheel zooms in and out.
Keyboard
- Left, right arrows moves control points.
- -/= adjusts height of control points.
- o toggles between perspective and orthographic projection.
- g toggles display of grid.
As can been seen, many of the mouse controls require using OpenGL's selection mechanism to pick objects from the window and perform operations on them. This lab will focus on implementing projection, selection, and bezier curves.
Projection
All of the code segments related to projection are marked with TODO PROJECTION. The first thing we want to do is implement the function setup_projection which is called whenever we want to set our projection matrix. To do this, we simply check the variable CameraOrthographic and then set our projection matrix using glOrtho or gluPerspective.
Once we have setup projection matrix (our lens), it is also necessary to establish our viewing matrix (set the camera). To do this, we need to modify the function draw_scene. When we are in orthographic mode, we should zoom in based on our camera distance and focus in on a particular point on the grid. To do this, we will use the various OpenGL matrix transformation functions. For perspective mode, you can simply use gluLookAt.
Selection
All of the code segments related to projection are marked with TODO SELECTION. To implement selection we first need to make sure we mark objects with names as we draw them. Therefore, we will need to add calls to glPushName and glPopName in our drawing functions draw_grid, draw_selected_box, and draw_points.
Next, we need to implement the start_picking, stop_picking, and process_hit functions. Description on what these functions require are in the source code provided. Be sure to setup the select buffer at the top of the program.
To be able to draw control points around, we will need to use gluUnProject in addition to the OpenGL selection mechanism. The segment of code for this is found in the motion callback function. Again, a description of what needs to be implemented is provided in the source code.
Bezier Curves
All of the code segments related to projection are marked with TODO BEZIER. Once you have a set of control points (at least 4), you can draw bezier curves based on these points. To do this, you will need to implement the cubic bezier computation in the draw_bezier function. An overview of how the algorithm works can be found here: http://www.gamedev.net/reference/articles/article1808.asp
Submission
Demonstrate the bezier executable to the instructor or TA before the lab session is over. Once verified, place the source code and Makefile in your course dropbox:
/afs/nd.edu/coursefa.10/cse/cse40166.01/dropbox/<afsid>/lab5