Program 4: Terrain Vehicle
Due: Thursday, September 23th, 2010 (before lab session starts)
Utilize your base code from the previous homework assignment, tview. For this program, you will modify tview and add a movable and animated vehicle to it. Name the new program tvehicle. For this assignment, choose between triangle and quad rendering.
Vehicle
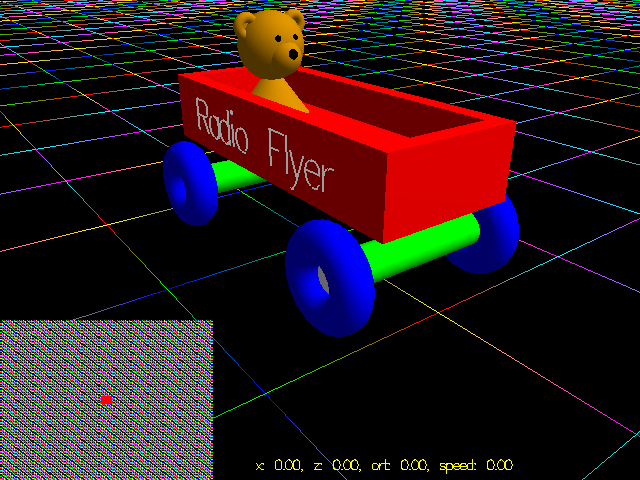
The idea behind this assignment is take create a vehicle as in example 13 and place it on our terrain. The user should be able to use the arrow keys to move the object around the scene. As the vehicle moves around, it should adjust to the height of the terrain it is located at (this doesn't have to be perfect, but it should be relatively close) and it should display some sort of animation.
To construct the vehicle, you should decompose your object into a hierarchy of components and build it up from base structures. DO NOT SIMPLY BUILD YOUR OBJECT IN ONE BIG FUNCTION. Break down your parts into objects and then use model instancing to design your vehicle. You should use some of the 3D geometric objects introduced in class, but feel free to create your own functions out of the basic polygon primitives. Likewise, to optimize rendering, you should use display lists for parts of your vehicle if not for all of it when possible. To perform the animation, you will probably want to use a timer to update certain global variables which will affect the placement or orientation of components of your vehicle.
Note
To start, you may wish to model your vehicle in another simpler program and then import it in your terrain one later. This will allow you to play around with the vehicle and not worry about integrating it into the scene right away. Likewise, you may wish to have a WireFrame mode which will show you the outline of your objects, which can be easier to see and work with in determining how your components are fitting together.
In addition to making your vehicle movable, you should perform basic bounds checking to ensure your vehicle does not fall off the terrain. One way to do this is to treat your object as a sphere and check if the circumference of your object exceeds any of the boundaries. Here are some online resources:
- http://www.edenwaith.com/products/pige/tutorials/collision.php
- http://www.gamedev.net/reference/articles/article1234.asp
Camera Modes
Your program should allow for four different camera modes:
1. First Person: this is as if the camera is inside your vehicle and facing forward.
2. Bird's Eye: the camera is above the vehicle and looking down at it, and continues to follow the vehicle.
3. Third Person: the camera is behind the vehicle at a slight angle and faces the front of the vehicle and stays oriented with it.
4. Orbit: the camera moves in an arcball around the vehicle even as the vehicle moves around the scene.
Demonstration of these camera modes can be found in example 13. The user should be able to switch between these different modes by pressing keys 1 - 4.
Mini-map
Your program should also display a mini-map which shows a reduced or simplified version of the terrain and the location of your vehicle. To construct a mini-map you should do the following:
1. Setup a viewport in the corner of the window. Any corner is fine, but it should not obstruct the main view of the vehicle.
2. Setup your projection and modelview matrices. For a mini-map you can simply use a 2D rendering of your scene for speed. Note, if you do this you may need transform your scene vertices (In 2D mode, you need X and Y coordinates, but in 3D we mainly use X and Z coordinates for location and Y for height).
3. Disable any unnecessary OpenGL features such as lighting or smoothing, which will allow for faster rendering.
4. Redraw your scene, or select parts of it. For instance, you should probably include the terrain, but instead of drawing your whole vehicle model, you may simply which to represent its location using a simple polygon or circle.
Once you have rendered your mini-map, be sure to reset your matrices and re-enable any features you disabled, otherwise your scene rendering may be incorrect.
In addition to a mini-map, your program should also write some of the vehicle's information to the screen. For instance, you may want to indicate the vehicles's location, orientation, and speed, along with the current camera mode. To do this, create a viewport in some section of the screen and use GLUT's text rendering functions to write that information.
Usage
To specify the input DEM file, your program should have at least the following command line interface:
usage: tview [options] <datafile>
Options:
    -h         Show this help message
An example invocation would be:
$ ./tvehicle all_campus.dem
Feel free to add additional flags and options to modify your programs behavior at runtime.
Note
Your program must read in the input file from command line arguments.
Grading Rubric
Grading for this assignment is out of 30 points:
| Points | Requirements |
|---|---|
| 15 | Movable and animated vehicle:
|
| 5 | Camera modes:
|
| 5 | Mini-map and Text information:
|
| 5 | Submission builds and runs properly and includes the appropriate files:
|
Submission
Submit your source code, Makefile, and README to your course dropbox:
/afs/nd.edu/coursefa.10/cse/cse40166.01/dropbox/<afsid>/pgm4