Program 6: Fun with Textures
Due: Thursday, November 11th, 2010 (before class)
This homework consists of two distinct parts; in the first part, you will write a function to draw a cube in OpenGL, but you will have to manually create texture coordinates such that a given texture displays correctly on the cube. In the second part, you will write a simple reader for the PLY file format. We will provide some PLY models and textures, and hopefully you'll get a sense for how much of an effect texturing can have on the appearance of your program.
Each part should compile as a separate executable. Submit a folder to your dropbox, pgm6/, which contains two folders: part1/ and part2/. You should have separate README files for both parts of the program in their respective folders, separate makefiles, and separate code. As usual, you are expected to place your name in your source files and comment your code appropriately.
You may use code from the examples or lab as base -- you will particularly find examples 21 and 22 useful for this assignment.
Input Files
For the first part of the assignment, you will need:
For the second part of the assignment, you will need:
The PLY file was obtained from the Stanford 3D Scanning Repository: http://graphics.stanford.edu/data/3Dscanrep/.
Part 1 - Texturing a Cube
For this assignment, you will draw a simple OpenGL cube with manually generated texture coordinates. For simplicity, let your cube range from (-1,-1,-1) to (1,1,1) and be centered at the origin.
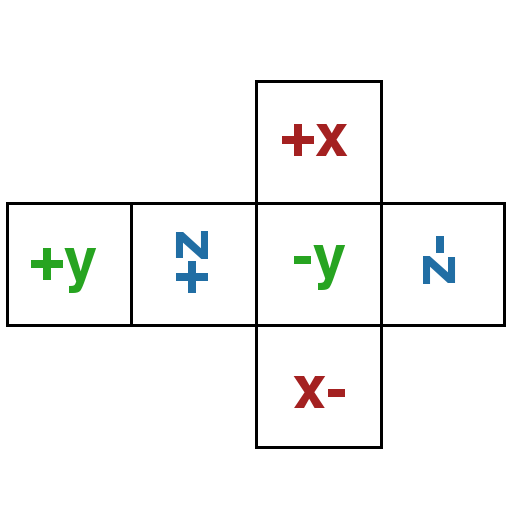
And your job is to determine correct texture coordinates for each vertex of the cube such that your cube looks like this:

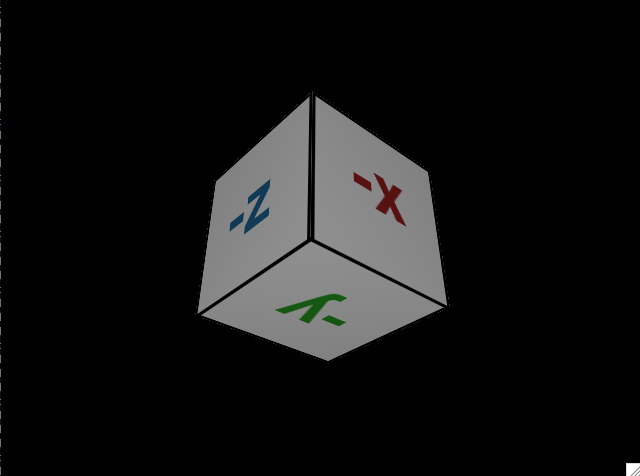
Since this assignment is about correct texture coordinates, it is important that your cube looks like the one above. For your convenience, we've provided the image-space coordinates for the points marked below, where (0,0) is at the top left of the image. Units are in pixels.
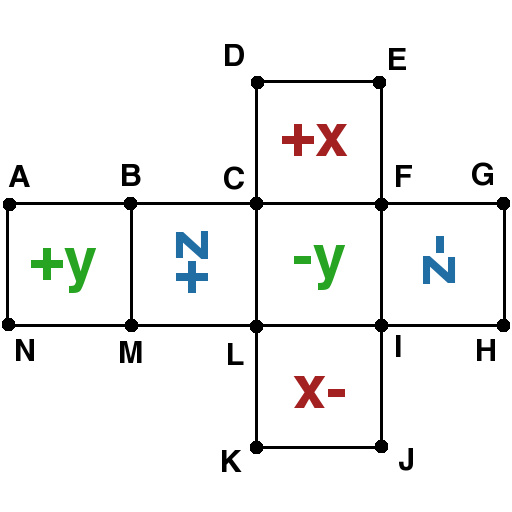
A: (6,202) B: (131,202) C: (255,202) D: (255,80) E: (383,80) F: (383,202) G: (506,202) H: (506,327) I: (383,327) J: (383,449) K: (255,449) L: (255,327) M: (131,327) N: (6,327)
Note
Think about this for a moment. You will want to render your cube as a series of six quads and determine the texture coordinates distinctly for each quad. The same vertex will have different texture coordinates depending on which adjacent face of the cube you are drawing.
The user should be able to view the cube from different angles (i.e., the camera should be controllable as an arcball camera or a free-view camera, although the arcball approach is more appropriate here). The user must also be able to toggle textures on and off with 't.'
Usage
Your program should take the texture for the cube from the command line, e.g.:
./part1 cube_texture.ppm
Tips
Keep in mind that your texture coordinates will range from 0 to 1 each. Knowing the pixel locations of each corner point in the image, you will have to scale those values by the image's width and height appropriately.
Draw a picture beforehand! It will help. If you're unsure of where your points are going in space, draw a set of axes or a grid in OpenGL.
Part 2: Textured PLY Viewer
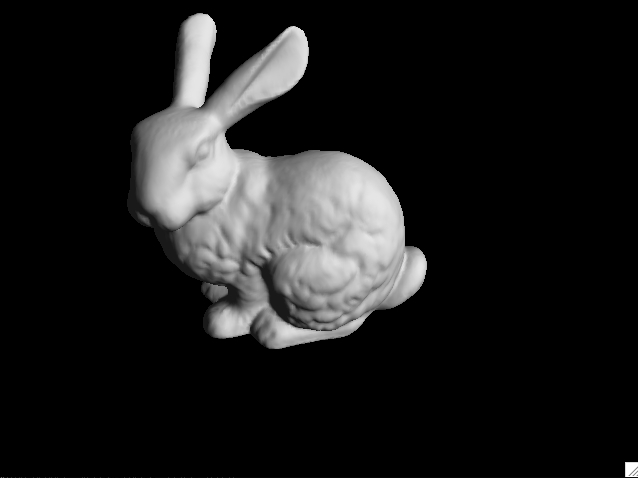
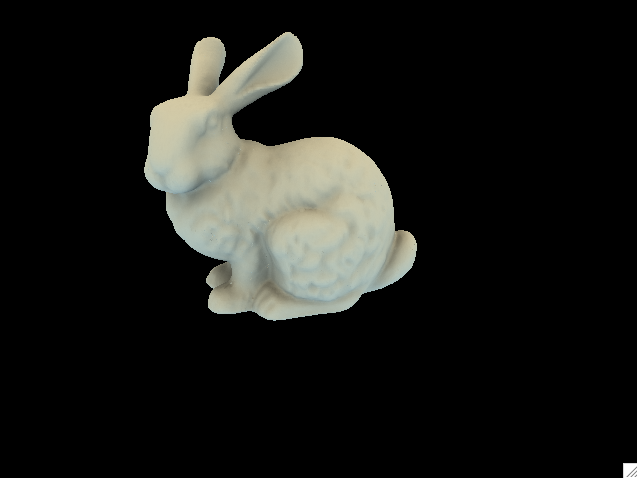
In this part of the assignment, you will load a PLY and a texture, and apply the texture to the PLY. Since the texture we include here incorporates lighting information, you may want to disable lighting when texturing is enabled. Here's a picture of the bunny model with lighting and no texture, and then with texture and no lighting:
As for part 1, the user should be able to view the cube from different angles; the arcball camera is a good choice here as well, and you may want to zoom in on your model. Note that the models may not be centered at the origin. Also, the user must be able to toggle textures on and off with t.
The PLY Format
A specification for the PLY format can be found here: http://local.wasp.uwa.edu.au/~pbourke/dataformats/ply/. The files that you are given will be in a valid PLY format, but you can make some assumptions that will simplify your reader. You can assume that:
- There will be no comments (no lines begin with 'comment').
- The first line of the file will always be ply and the second will always be format ascii 1.0.
- There will be two element definitions; one for vertex and one for face.
- The 'vertex' element definition will always be the same; 8 floating point values, corresponding to x, y, z, normal x, normal y, normal z, and texture coordinates s and t.
- The 'face' element definition will always be the same ('list uchar uint vertex_indices').
- Faces will only be triangles (i.e., face definitions will always be of the form "3 [index1] [index2] [index3]")
Do not hardcode the number of vertices or the number of faces in a model.
Usage
Your program should take as command line input the PLY file to render and the PPM file to use as a texture, e.g.:
./part2 bunny.ply bunny_texture.ppm
Tips
The simplest way to store the data is to have two arrays: one that holds all the vertex data (x,y,z,nx,ny,nz,s,t), and one that holds the triangle definitions (idx1,idx2,idx3). To render your model, just loop through the face definitions, and call glVertex(), glNormal(), and glTexCoord() with data from the vertex with that index.
You will want to store your model's vertices, normals, and texture coordinates in a display list because they may be very detailed.
It is a good idea to worry about loading the PLY file and texturing it appropriately separately -- focus on just loading and displaying the PLY file, and then work on texture application.
Grading Rubric
Grading for this assignment is out of 40 points.
| Points | Requirements |
|---|---|
| 18 | Part 1
|
| 18 | Part 2
|
| 4 | Submission builds and runs properly and includes the appropriate files:
|
Submission
Submit your program 6 in your dropbox in the following location:
/afs/nd.edu/coursefa.10/cse/cse40166.01/dropbox/<afsid>/pgm6
There should be two separate folders in this directory:
/afs/nd.edu/coursefa.10/cse/cse40166.01/dropbox/<afsid>/pgm6/part1
/afs/nd.edu/coursefa.10/cse/cse40166.01/dropbox/<afsid>/pgm6/part2
These should contain the full code / makefile / README for each part of the assignment. Do not include the PLY models with your submission.