Program Midterm: Short Video
Due: Thursday, October 14th, 2010 (before lab session starts)
For the final programming assignment of the midterm, you are to work with 1 or 2 other people to create a short video using the computer graphics techniques you have developed thus far. You must have the following components:
- Animated models:
- These can be vehicles, persons, builders, etc.
- Some models must be composed of multiple polygons or 3D objects.
- Some models must be animated.
- Some models must move around in the scene.
- Some of the movement must be non-linear (i.e. use curve computation).
- Camera views:
- You must include multiple camera angles.
- You must have a portion of the video where the camera moves in the scene.
- Lighting:
- You must use at least two light sources.
- You must set the appropriate material properties.
- Reproducible:
- Your video must be reproducible. We must be able to run the programs that produce the segments included in your video.
- You must include clear instructions on how to put your video together.
- BE CREATIVE!
- The video must contain at least 1 minute of computer generated animation.
- You may include clips from other movies or even your own video if you wish.
- Tell a story. Have fun.
How to make a video
Making a video using OpenGL is rather simple:
- Draw to the frame buffer one frame.
- Capture that frame and save it to an image file.
- Repeat until we have all the frames required for a scene.
- Stitch the image files together sequentially to make a video file.
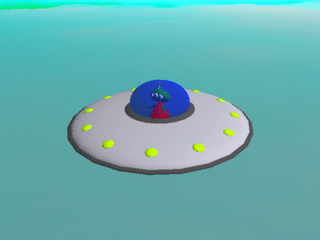
An example of this video generation process is provided in example 18 which basically takes the spaceship in example 5 and captures the actions during the course of the program.
1. Draw one frame
One way to do this is to set a FrameRate and then use a timer to periodically trigger a display using glutPostRedisplay. This should give you captures of your screen at regular intervals.
In the display callback, we should simply draw our scene and thus flush it (glFlush) to make sure it everything reaches the buffer. Once we have done this, we can then capture the buffer to an image file.
2. Capture to image
To capture the buffer and write it to an image file, we must first read the pixels out of the graphics memory and store it in a buffer. To do this, we must first set the buffer we want to read using glReadBuffer and then perform the read using glReadPixels.
If we are using double-buffering, then we want to set our buffer to GL_BACK, otherwise we want to set it to GL_FRONT.
The following code is an example of reading from the pixels from the buffer:
GLubyte *buffer;

buffer = new GLubyte[WindowWidth*WindowHeight*3];

glReadBuffer(GL_BACK);
glReadPixels(0, 0, WindowWidth, WindowHeight, GL_RGB, GL_UNSIGNED_BYTE, buffer);
In this code, we declare a buffer the size of our window times 3. This is because each pixel contains the RGB color information. That means for each pixel, we have a color value composed of a red, green, and blue component each of size GL_UNSIGNED_BYTE (1 byte).
Once we have the buffer of pixel values, we then need to write it to a file for storage. There are a variety of image files such as PNG, BMP, JPG, GIF, etc. but the simplest is probably PPM We provide you a simple PPM writer includes one function: ppm_write that takes a buffer of pixel values and writes it to the file name you provide. An example invocation is:
ppm_write(fname, buffer, WindowWidth, WindowHeight);
The PPM writer source code can be found here:
3. Repeat display and capture
The program should repeat the display and capture process over and over, one image per frame. The higher the FrameRate, the smoother your animation will appear in the video, but also the more processing it will take to generate the video. Moreover, your images should be named sequentially, using a set pattern. This way the video compiler can now deduce the order in which to stitch the frames.
4. Video Compiler
To produce a video file, we simply use a video processing utility such as ffmpeg. To use this we simply tell it the pattern in which we named our image files, the FrameRate, and then the output video name. Here is an example invocation:
ffmpeg -r 30 -i "spaceship.frame.%08d.ppm" spaceship.flv
In this case, our FrameRate is 30, our image file name pattern is "spaceship.frame.%08d.ppm", and the final video file is spaceship.flv. You can use any extension, such as avi or mp4, and even specify the encoding bitrate (higher is better quality) if you wish. flv is commonly used in flash and allows us to embed videos on the web as shown below:
For higher quality consider using the x264 codec. Here is an example invocation:
ffmpeg -r 30 -i "spaceship.frame.%08d.ppm" -vcodec libx264 -vpre slow -crf 22 spaceship.mp4
You would get something like this MP4:
You can also use the mpeg4 codec. Here is an example invocation:
ffmpeg -r 30 -i "abrazas.frame.%08d.ppm" -vcodec mpeg4 -b 1024k abrazas.mp4
You would get something like this video (MPEG4 is not supported by Flash, so you'll have to use your own video player).
You can also make GIFs using convert from ImageMagick:
convert -delay 0.03 -loop 0 *.ppm gif:video.gif
Note
You can find a copy of ffmpeg on AFS at /afs/nd.edu/user37/ccl/software/external/ffmpeg/bin/ffmpeg.
Additional Ideas
The following are some additional ideas that may be useful to the making a good video:
- You may want to put models in different source files and then include them in your main program. This would help in splitting up the work or to keep the code organized and manageable.
- You may write multiple programs to produce particular scenes and stitch them together.
- You may want to add a pause (capture/don't capture) mode to your scene editor that will let you adjust your objects or camera without capturing it.
- You may want to make your scene scriptable or dynamic, so manipulating and modifying the scene is easier and faster.
- You may use video editors such a Final Cut Pro or Sony Vega to edit the rendered scenes.
- You may want to add an audio track to your short video. ffmpeg join an audio and video file.
Grading Rubric
Grading for the midterm project is out of 100 points and will be posted shortly.
Submission
Each group member should submit source code, Makefile, and README to dropbox:
/afs/nd.edu/coursefa.10/cse/cse40166.01/dropbox/<afsid>/pgm_midterm
The README for each group member must mention the other members of the group and describe their own contributions to the project.