Notebook 09: Image Processing
Overview
The goal of this assignment is to allow you to explore processing and manipulating images in the Python programming language.
To record your solutions and answers, create a new Jupyter Notebook
titled Notebook09.ipynb and use this notebook to complete the following
activities and answer the corresponding questions.
Make sure you label your activities appropriately. That is for Activity 1, have a header cell that is titled Activity 1. Likewise, use the Markdown cells to answer the questions (include the questions above the answer).
This Notebook assignment is due midnight Friday, November 11, 2016 and is to be done individually or in pairs.
Partners
Both members of each pair should submit a Notebook. Be sure to identify your partner at the top of the Notebook.Activity 0: Utilities
To help you complete this Notebook, here are some utility functions we discussed in class:
# Display figures and images inline
%matplotlib inline

# Imports
from matplotlib.pyplot import imread, imshow, imsave, figure
import numpy
import requests
import StringIO

# Functions
def display_image(image, enlarge=False):
    ''' Display image (enlarge if specified) '''
    if enlarge:
        figure(figsize=(10, 8))
    imshow(numpy.asarray(image).astype('uint8'))

def read_image(path, format='JPG'):
    ''' Read image from path or URL '''
    if path.startswith('http'):
        data  = StringIO.StringIO(requests.get(path).content)
        image = imread(data, format=format)
    else:
        image = imread(path)
    return image

def save_image(path, image):
    ''' Save image to specified path '''
    imsave(path, numpy.asarray(image).astype('uint8'))

def create_image(width, height, default_color=(0, 0, 0)):
    ''' Create image with specified width, height, and default color '''
    image = []

    for row in range(height):
        image_row = []
        for column in range(width):
            image_row.append(default_color)
        image.append(image_row)

    return image

def copy_image(source):
    ''' Return copy of source image '''
    height = len(source)
    width  = len(source[0])
    target = []

    for row in range(height):
        target_row = []
        for column in range(width):
            target_row.append(source[row][column])
        target.append(target_row)

    return target
Feel free to use these functions in the activities below.
Activity 1: Image Creation
For the first activity, you are to implement two of any of the following four options. Each function involves creating or generating an image.
To help you out, each option is labeled with a difficulty rating and includes some hints.
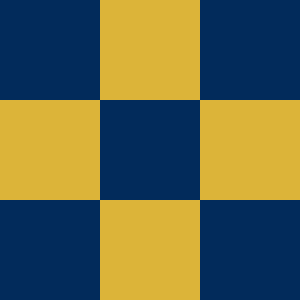
Option A: Checkered
Easy
For this option, you are to produce a checkered image:
def make_checkered_image(width, height, square_size, colors):
Given the
widthandheightof the target image, this function produces a checkered image consisting of squares ofsquare_sizeand with alternatingcolors.
COLORS = [
  (255, 0, 0),
  (0, 255, 0),
]
WIDTH  = 400
HEIGHT = 300

display_image(make_checkered_image(WIDTH, HEIGHT, 100, COLORS), True)
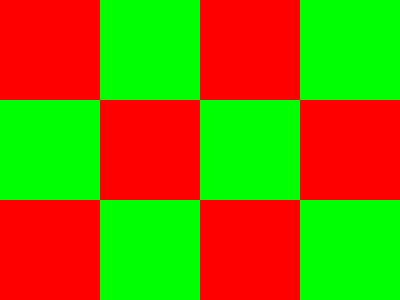
Hints
-
To determine which color each pixel should be, you need to determine which square that pixel belongs to.
-
The modulus operator may be useful.
Option B. Gradient
Easy
For this option, you are to produce a gradient image:
def make_gradient_image(width, height, colors):
Given the
widthandheightof the target image, this function produces a gradient image that goes fromcolors[0]tocolors[1].
COLORS = [
  (255, 0, 0),
  (0, 255, 0),
]
WIDTH  = 400
HEIGHT = 300

display_image(make_gradient_image(WIDTH, HEIGHT, COLORS), True)

Hints
A gradient is basically a weighted average of the two colors. For each pixel, you will want to use the following formula:
new_color = color_0(1 - progress) + color_1(progress)
Where progress is percentage of how far we are from the left-hand side of
the image.
If we are at column 25 and the image has a width of 100, then our
progress is 25/100 = 0.25. Given the formula above, this means that the
first color (e.g. color_0) will be given the most weight (1 - 0.25 =
0.75), while the second color will give the least weight (0.25).
As we move from left to right, the first color becomes less dominant until the right-most pixels are basically the second color.
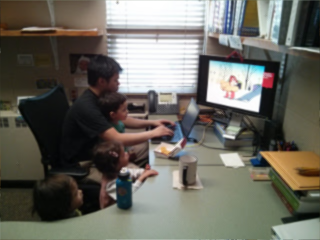
Option C. Tiled
Medium
For this option, you are to produce a tiled image:
def make_tiled_image(source, rows, columns):
Given a
sourceimage, this function creates a tiled image consisting ofrowsbycolumnscopies of thesourceimage.
source = read_image('http://www3.nd.edu/~pbui/static/img/pbui_and_children_uwec_office.jpg')
display_image(make_tiled_image(source, 3, 3), True)
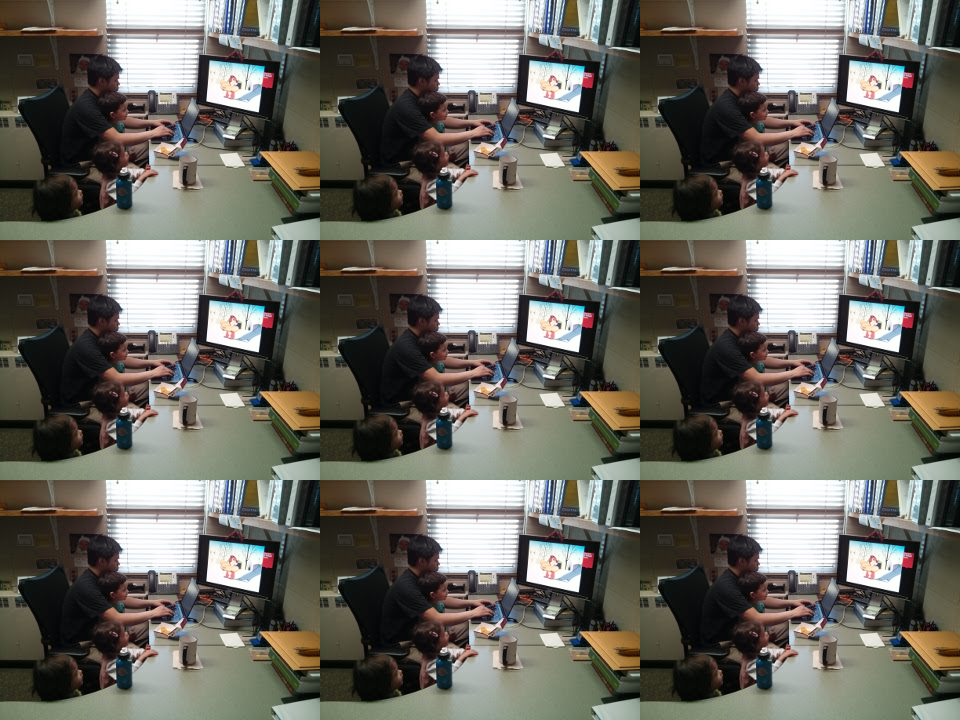
Hints
-
Use
create_imageto create an image of appropriate size. -
There are multiple strategies to produce this image:
-
For each pixel, determine where in the source image the current pixel corresponds to.
-
For each tile, copy from the source image.
-
Option D. Paint-By-Numbers
Easy
For this option, you are to produce a paint-by-numbers image:
def make_image_from_template(template, block_size, color_map):
Given a
template, this function produces an image that replaces each letter in thetemplatewith a block ofblock_sizeand with the color specified in thecolor_map.
TEMPLATE = [
    'PPPPPPPPPPPP',
    'PPPPPPPPPPPP',
    'PPPPPPPPPPPP',
    'PPPP____PPPP',
    'PPPP____PPPP',
    'PPPPPPPPPPPP',
    'PPPPPPPPPPPP',
    'PPPPPPPPPPPP',
    'PPPP        ',
    'PPPP        ',
    'PPPP        ',
    'PPPP        ',
]

COLOR_MAP = {
    'P': (0, 0, 255),
    '_': (255, 0, 0),
    ' ': (0, 255, 0)
}

HEIGHT = 400
WIDTH  = 300

display_image(make_image_from_template(TEMPLATE, 10, COLOR_MAP), True)
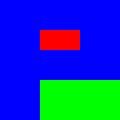
Hints
-
Use
create_imageto create an image of appropriate size. -
To determine the color for the current pixel, you will need to figure out which template position the pixel corresponds to.
Activity 2: Image Transformation
For the second activity, you are to implement two of any of the following five options. Each function involves processing or transforming an existing image.
Once again, to help you out, each option is labeled with a difficulty rating and includes some hints.
Option E. Scramble
Hard
For this option, you are to scramble an image:
def scramble_image(source, blocks_per_side):
Given a
sourceimage, this function divides the image intoblocks_per_sidebyblocks_per_sideblocks and scrambles the blocks to produce a new image.
source = read_image('https://upload.wikimedia.org/wikipedia/en/thumb/3/3b/NDLeprechaun.svg/280px-NDLeprechaun.svg.png')
display_image(scramble_image(source, 4), True)
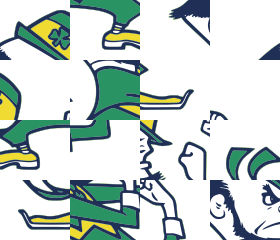
Hints
-
Use
create_imageto create an image of appropriate size. -
Figure out the block height, width, rows, and columns.
-
Create a list of blocks and then shuffle this list.
-
As you iterate through each pixel, determine which block the current pixel is from and then use the list above to determine which block to copy from.
Option F. Pixelate
Medium
For this option, you are to pixelate an image:
def pixelate_image(source, block_size):
Given a
sourceimage, this function pixelates the image dividing the image into blocks ofblock_sizeand replacing each pixel in each block with the center pixel value.
source = read_image('https://upload.wikimedia.org/wikipedia/en/thumb/3/3b/NDLeprechaun.svg/280px-NDLeprechaun.svg.png')
display_image(pixelate_image(source, 6), True)
Hints
-
Use
create_imageto create an image of appropriate size. -
Rather than iterating through the image pixel-by-pixel, consider traversing the image block-by-block instead.
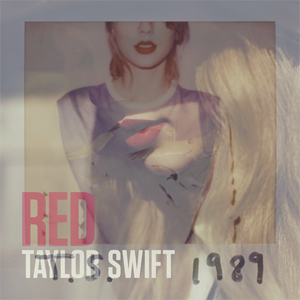
Option G. Blend
Easy
For this option, you are to blend two images:
def blend_images(image0, image1, weight):
Given images
image0andimage1, this function blends the two sources by performing a weighted average of the two images based on the specifiedweight.
image0 = read_image('https://upload.wikimedia.org/wikipedia/en/e/e8/Taylor_Swift_-_Red.png')
image1 = read_image('https://upload.wikimedia.org/wikipedia/en/f/f6/Taylor_Swift_-_1989.png')

display_image(blend_images(image0, image1, 0.50), True)
Hints
-
Use
create_imageto create an image of appropriate size. -
Perform a weighted average using the following formula:
new_color = color0(weight) + color1(1 - weight)
Option H. Filter
Hard
For this option, you are to blur an image:
def filter_image(source, matrix):
Given a
sourceimage, this function performs a convolution to apply thematrixfilter to the given image.
source = read_image('https://www3.nd.edu/~pbui/static/img/pbui_and_children_uwec_office.jpg')
display_image(filter_image(source, [
      ( 0.0, 0.2,  0.0),
      ( 0.2, 0.2,  0.2),
      ( 0.0, 0.2,  0.0),
]), True)
Hints
-
Use
create_imageto create an image of appropriate size. -
Wikipedia provides pseudo-code for this process.
-
Here is a longer and more complete tutorial about image filtering.
Option I. Replace
Easy
For this option, you are to replace the colors in an image:
def replace_colors(source, color_map):
Given a
sourceimage, this function replaces colors in thesourceimage based on the mapping provided by thecolor_map.
COLORS = [
  (255, 0, 0),
  (0, 255, 0),
]

WIDTH  = 400
HEIGHT = 300

COLOR_MAP = {
    (255, 0, 0): (2, 43, 91),
    (0, 255, 0): (220, 180, 57),
}

checkered = make_checkered_image(WIDTH, HEIGHT, 100, COLORS)

display_image(replace_colors(checkered, COLOR_MAP), True)
Hints
-
Use
create_imageto create an image of appropriate size. -
The
getdictionary method may be useful.
Extra Credit
Any options you implement beyond the four required ones will be treated as additional 1 point of extra credit each.
Submission
To submit your notebook, follow the same directions for Notebook 01, except store this notebook in the notebook09 folder.