Project 02: Sockets
The goal of this project is to allow you to practice using low-level system calls related to sockets and networking. To do this, you will create two new programs:
-
thor.py: This is a basic HTTP client that will hammer a remote HTTP server by making multiple requests. -
spidey.c: This is a basic HTTP server that supports directory listings, static files, and CGI scripts.
Once you have these programs, you will conduct an experiment using
thor.py to test the latency and throughput of spidey.py.
For this project, you are to work in groups of 2 or 3 and record your source code and any responses to a new project02 GitLab repository. You should push your work to your GitLab repository by 11:59 PM Friday, May 5, 2017.
Activity 0: GitLab Repository
Because you will be working in groups, you will need to fork and clone a new project02 repository:
https://gitlab.com/nd-cse-20289-sp17/cse-20289-sp17-project02
To do this, you should follow the same instructions from Reading 00 (except adjust for the different repository location). Besure to do the following:
-
Make your project02 repository is private.
-
Give the teaching staff and your group members developer access to your project02 repository.
-
Record your group members in the Project Description and in the
README.md.
Note: You should only have one repository per group.
Once forked, you should clone your repository to a local machine. Inside
the project02 folder, you should see the following files:
project02
    \_ www                    # This is the default web root directory
        \_ html               # This is a folder for HTML documents
            \_ index.html     # This is an example HTML document
        \_ scripts            # This is a folder for CGI scripts
            \_ cowsay.sh      # This is an example CGI script
            \_ env.sh         # This is an example CGI script
        \_ text               # This is a folder for text documents
            \_ hackers.txt    # This is an example text document
    \_ Makefile               # This is the Makefile for building all the project artifacts
    \_ README.md              # This is the README file for recording your responses
    \_ forking.c              # This is the C99 implementation file for the forking mode
    \_ handler.c              # This is the C99 implementation file for the handler functions
    \_ request.c              # This is the C99 implementation file for the request functions
    \_ single.c               # This is the C99 implementation file for the single mode
    \_ socket.c               # This is the C99 implementation file for the socket functions
    \_ spidey.c               # This is the C99 implementation file for the main execution
    \_ spidey.h               # This is the C99 header file for the project
    \_ thor.py                # This is the Python script for the HTTP client
    \_ utils.c                # This is the C99 implementation file for various utility functions
The details on what you need to implement are described in the following sections.
Activity 1: Thor
The first program is thor.py, which is a basic HTTP client similar to
curl or wget that supports the following features:
-
Supports utilizing multiple processes using the multiprocessing package.
-
Performs multiple requests per process.
-
Computes the elapsed times for each HTTP request.
Overview
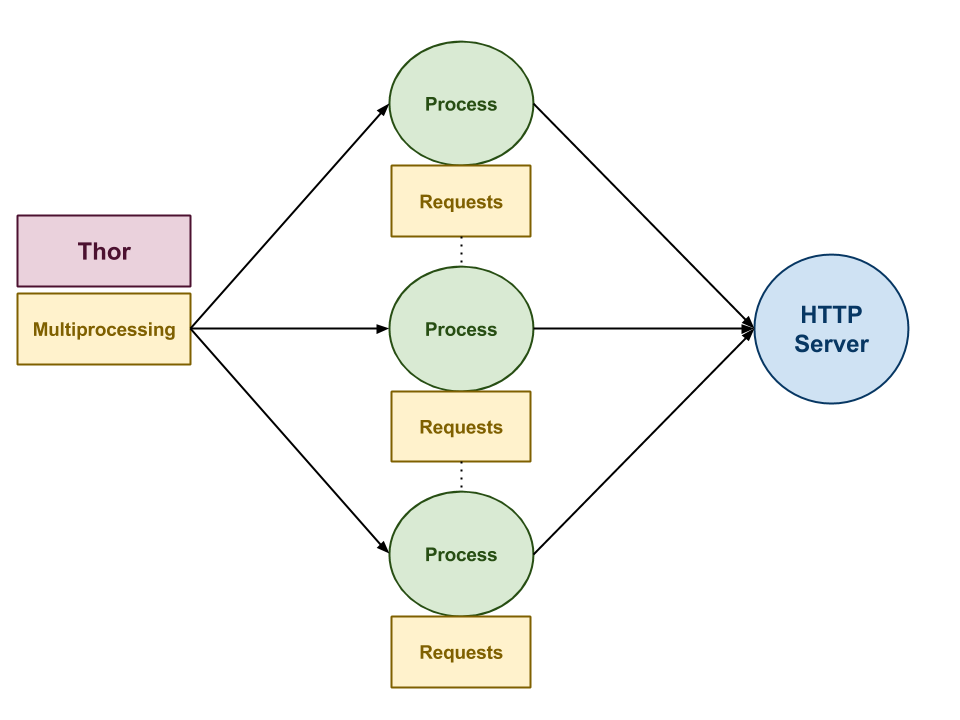
As shown above, thor.py uses the multiprocessing module to start multiple
processes. Each process than makes multiple HTTP requests using the
[reqeusts] module. Each HTTP request is timed using the time module and
the elapsed time is displayed. Likewise, the average elapsed time for each
process is also displayed, along with the average elapsed time for all the
requests across all processes.
Usage
Given a
URL,thor.pyuses the HTTP protocol to fetch the contents of theURL. The-rflag sets the number of HTTP requests to be made per process (default is1), while-psets the number of processes to execute in parallel (default is1). The-vflag forces the program to dump the contents of theURLto standard output.
Help Message
# Display help message
Usage: thor.py [-p PROCESSES -r REQUESTS -v] URL
    -h              Display help message
    -v              Display verbose output

    -p  PROCESSES   Number of processes to utilize (1)
    -r  REQUESTS    Number of requests per process (1)
Examples
Below are some examples of thor.py in action:
Single Request
# Perform single request
$ ./thor.py http://example.com
Process: 0, Request: 0, Elapsed Time: 0.03
Process: 0, AVERAGE   , Elapsed Time: 0.03
TOTAL AVERAGE ELAPSED TIME: 0.03
Multiple Requests
# Perform 10 requests
$ ./thor.py -r 10 http://example.com
Process: 0, Request: 0, Elapsed Time: 0.03
Process: 0, Request: 1, Elapsed Time: 0.03
Process: 0, Request: 2, Elapsed Time: 0.02
Process: 0, Request: 3, Elapsed Time: 0.03
Process: 0, Request: 4, Elapsed Time: 0.03
Process: 0, Request: 5, Elapsed Time: 0.03
Process: 0, Request: 6, Elapsed Time: 0.02
Process: 0, Request: 7, Elapsed Time: 0.02
Process: 0, Request: 8, Elapsed Time: 0.03
Process: 0, Request: 9, Elapsed Time: 0.02
Process: 0, AVERAGE   , Elapsed Time: 0.03
TOTAL AVERAGE ELAPSED TIME: 0.03
Multiple Requests with Multiple Processes
# Perform 5 requests with 5 processes
$ ./thor.py -r 5 -p 5 http://example.com
Process: 2, Request: 0, Elapsed Time: 0.03
Process: 4, Request: 0, Elapsed Time: 0.03
Process: 0, Request: 0, Elapsed Time: 0.03
Process: 1, Request: 0, Elapsed Time: 0.03
Process: 3, Request: 0, Elapsed Time: 0.03
Process: 2, Request: 1, Elapsed Time: 0.02
Process: 0, Request: 1, Elapsed Time: 0.03
Process: 1, Request: 1, Elapsed Time: 0.02
Process: 4, Request: 1, Elapsed Time: 0.03
Process: 3, Request: 1, Elapsed Time: 0.03
Process: 2, Request: 2, Elapsed Time: 0.03
Process: 0, Request: 2, Elapsed Time: 0.02
Process: 1, Request: 2, Elapsed Time: 0.03
Process: 4, Request: 2, Elapsed Time: 0.03
Process: 3, Request: 2, Elapsed Time: 0.02
Process: 0, Request: 3, Elapsed Time: 0.03
Process: 2, Request: 3, Elapsed Time: 0.03
Process: 3, Request: 3, Elapsed Time: 0.03
Process: 1, Request: 3, Elapsed Time: 0.03
Process: 4, Request: 3, Elapsed Time: 0.03
Process: 2, Request: 4, Elapsed Time: 0.03
Process: 0, Request: 4, Elapsed Time: 0.03
Process: 0, AVERAGE   , Elapsed Time: 0.03
Process: 2, AVERAGE   , Elapsed Time: 0.03
Process: 3, Request: 4, Elapsed Time: 0.03
Process: 3, AVERAGE   , Elapsed Time: 0.03
Process: 1, Request: 4, Elapsed Time: 0.03
Process: 1, AVERAGE   , Elapsed Time: 0.03
Process: 4, Request: 4, Elapsed Time: 0.02
Process: 4, AVERAGE   , Elapsed Time: 0.03
TOTAL AVERAGE ELAPSED TIME: 0.03
Single Request with Verbose Output
# Perform single request with verbose output
$ ./thor.py -v http://example.com
<!doctype html>
<html>
<head>
    <title>Example Domain</title>

    <meta charset="utf-8" />
    <meta http-equiv="Content-type" content="text/html; charset=utf-8" />
    <meta name="viewport" content="width=device-width, initial-scale=1" />
    <style type="text/css">
    body {
        background-color: #f0f0f2;
        margin: 0;
        padding: 0;
        font-family: "Open Sans", "Helvetica Neue", Helvetica, Arial, sans-serif;

    }
    div {
        width: 600px;
        margin: 5em auto;
        padding: 50px;
        background-color: #fff;
        border-radius: 1em;
    }
    a:link, a:visited {
        color: #38488f;
        text-decoration: none;
    }
    @media (max-width: 700px) {
        body {
            background-color: #fff;
        }
        div {
            width: auto;
            margin: 0 auto;
            border-radius: 0;
            padding: 1em;
        }
    }
    </style>
</head>

<body>
<div>
    <h1>Example Domain</h1>
    <p>This domain is established to be used for illustrative examples in documents. You may use this
    domain in examples without prior coordination or asking for permission.</p>
    <p><a href="http://www.iana.org/domains/example">More information...</a></p>
</div>
</body>
</html>

Process: 0, Request: 0, Elapsed Time: 0.03
Process: 0, AVERAGE   , Elapsed Time: 0.03
TOTAL AVERAGE ELAPSED TIME: 0.03
Hints
-
Parse the command line options to set the
PROCESSES,REQUESTS,VERBOSE, andURLglobal variables. -
Use multiprocessing.pool to create a pool of processes.
-
Use the
mapmethod of the multiprocessing.pool to have each process execute thedo_requestfunction. -
The
do_requestmethod should perform multiple HTTPgetrequests by performing requests.get on theURL. Each request should be timed using time.time and the average elapsed request time should be returned by this function.
Activity 2: Spidey
The second program is spidey, which is a basic HTTP server similar to
Apache or NGINX that supports the following features:
-
Executing in either single connection mode or forking mode
-
Displaying directory listings
-
Serving static files
-
Running CGI scripts
-
Showing error messages
An example of spidey in action can be found at:
xavier.h4x0r.space:9898.
Overview
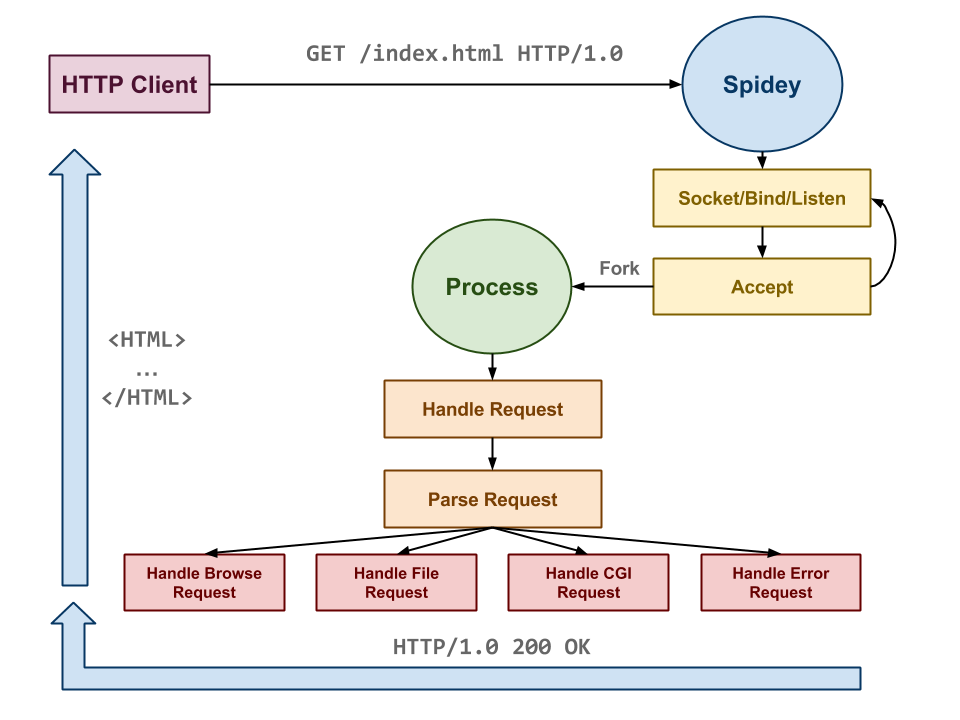
Overall, the implementation of a HTTP server is straightforward:
-
First, we allocate a server socket, bind it to a port, and then listen for incoming connections.
-
Next, we accept an incoming client connection and parse the input data stream into a HTTP
requeststructure. -
Based on the request's parameters, we then form a response and send it back to the client.
-
Continue to perform steps
2and3for as long as the server is running. If we are in forking mode, then we simply fork after we accept a connection and let the child process handle parsing and responding to the request. Otherwise, we simply handle one client at a time in single connection mode.
Usage
When executed,
spideyopens a socket on thePORTspecified by the-pflag (default is9898) and handles HTTP requests for files in thepathdirectory specified by the-dflag (default is thewwwfolder in the current directory). If-c forkingis specified, thenspideywill fork a child process for each incoming client request. The user may also set the default mimetype for files via the-Mflag and set thepathto themime.typesfile via the-mflag (default is/etc/mime.types).
Help Message
# Display help message
$ ./spidey -h
Usage: ./spidey [hcmMpr]
Options:
    -h            Display help message
    -c mode       Single or Forking mode
    -m path       Path to mimetypes file
    -M mimetype   Default mimetype
    -p port       Port to listen on
    -r path       Root directory
Examples
Below are some examples of spidey in action:
Single Connection Mode (with defaults)
$ ./spidey
[ 3734] LOG     spidey.c:86   Listening on port 9898
[ 3734] DEBUG   spidey.c:87   RootPath        = /home/pbui/src/teaching/cse.20289.sp17/project02.pbui/www
[ 3734] DEBUG   spidey.c:88   MimeTypesPath   = /etc/mime.types
[ 3734] DEBUG   spidey.c:89   DefaultMimeType = text/plain
[ 3734] DEBUG   spidey.c:90   ConcurrencyMode = Single
[ 3734] LOG    request.c:61   Accepted request from 10.63.12.82:45320
[ 3734] DEBUG  request.c:181  HTTP METHOD: GET
[ 3734] DEBUG  request.c:182  HTTP URI:    /
[ 3734] DEBUG  request.c:183  HTTP QUERY:
[ 3734] DEBUG  request.c:255  HTTP HEADER Host = xavier.h4x0r.space:9898
[ 3734] DEBUG  request.c:255  HTTP HEADER User-Agent = Mozilla/5.0 (X11; Linux x86_64; rv:45.0) Gecko/20100101 Firefox/45.0
[ 3734] DEBUG  request.c:255  HTTP HEADER Accept = text/html,application/xhtml+xml,application/xml;q=0.9,*/*;q=0.8
[ 3734] DEBUG  request.c:255  HTTP HEADER Accept-Language = en-US,en;q=0.5
[ 3734] DEBUG  request.c:255  HTTP HEADER Accept-Encoding = gzip, deflate
[ 3734] DEBUG  request.c:255  HTTP HEADER Connection = keep-alive
[ 3734] DEBUG  handler.c:39   HTTP REQUEST PATH: /home/pbui/src/teaching/cse.20289.sp17/project02.pbui/www
[ 3734] DEBUG  handler.c:47   HTTP REQUEST TYPE: BROWSE
[ 3734] LOG    handler.c:64   HTTP REQUEST STATUS: 200 OK
Forking Connection Mode (with defaults)
$ ./spidey -c forking
[ 3764] LOG     spidey.c:86   Listening on port 9898
[ 3764] DEBUG   spidey.c:87   RootPath        = /home/pbui/src/teaching/cse.20289.sp17/project02.pbui/www
[ 3764] DEBUG   spidey.c:88   MimeTypesPath   = /etc/mime.types
[ 3764] DEBUG   spidey.c:89   DefaultMimeType = text/plain
[ 3764] DEBUG   spidey.c:90   ConcurrencyMode = Forking
[ 3764] LOG    request.c:61   Accepted request from 10.63.12.82:45324
[ 3765] DEBUG  forking.c:42   Child process: 3765
[ 3765] DEBUG  request.c:181  HTTP METHOD: GET
[ 3765] DEBUG  request.c:182  HTTP URI:    /
[ 3765] DEBUG  request.c:183  HTTP QUERY:
[ 3765] DEBUG  request.c:255  HTTP HEADER Host = xavier.h4x0r.space:9898
[ 3765] DEBUG  request.c:255  HTTP HEADER User-Agent = Mozilla/5.0 (X11; Linux x86_64; rv:45.0) Gecko/20100101 Firefox/45.0
[ 3765] DEBUG  request.c:255  HTTP HEADER Accept = text/html,application/xhtml+xml,application/xml;q=0.9,*/*;q=0.8
[ 3765] DEBUG  request.c:255  HTTP HEADER Accept-Language = en-US,en;q=0.5
[ 3765] DEBUG  request.c:255  HTTP HEADER Accept-Encoding = gzip, deflate
[ 3765] DEBUG  request.c:255  HTTP HEADER Connection = keep-alive
[ 3765] DEBUG  request.c:255  HTTP HEADER Cache-Control = max-age=0
[ 3765] DEBUG  handler.c:39   HTTP REQUEST PATH: /home/pbui/src/teaching/cse.20289.sp17/project02.pbui/www
[ 3765] DEBUG  handler.c:47   HTTP REQUEST TYPE: BROWSE
[ 3765] LOG    handler.c:64   HTTP REQUEST STATUS: 200 OK
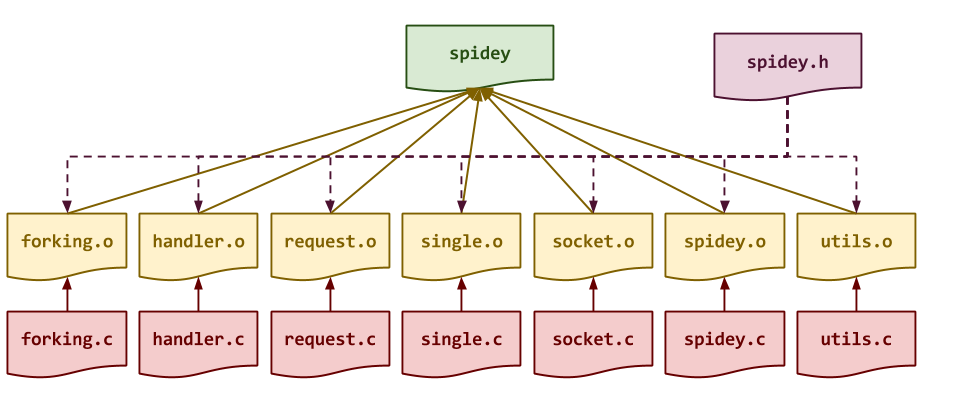
Building
As usual, the Makefile contains all the rules or recipes for building the
project artifacts (e.g. spidey, etc.). Although the provided Makefile
contains most of the variable definitions and test recipes, you must add
the appropriate rules for spidey and any intermediate objects. The
dependencies for these targets are shown in the DAG below:
Makefile Variables
You must use the CC, CFLAGS, LD, and LDFLAGS variables when
appropriate in your rules.
Once you have a working Makefile, you should be able to run the following
commands:
# Build spidey
$ make
Compiling forking.o...
Compiling handler.o...
Compiling request.o...
Compiling single.o...
Compiling socket.o...
Compiling spidey.o...
Compiling utils.o...
Linking spidey...

# Simulate build with tracing output
$ make -n
echo Compiling forking.o...
gcc -g -gdwarf-2 -Wall -std=gnu99 -c -o forking.o forking.c
echo Compiling handler.o...
gcc -g -gdwarf-2 -Wall -std=gnu99 -c -o handler.o handler.c
echo Compiling request.o...
gcc -g -gdwarf-2 -Wall -std=gnu99 -c -o request.o request.c
echo Compiling single.o...
gcc -g -gdwarf-2 -Wall -std=gnu99 -c -o single.o single.c
echo Compiling socket.o...
gcc -g -gdwarf-2 -Wall -std=gnu99 -c -o socket.o socket.c
echo Compiling spidey.o...
gcc -g -gdwarf-2 -Wall -std=gnu99 -c -o spidey.o spidey.c
echo Compiling utils.o...
gcc -g -gdwarf-2 -Wall -std=gnu99 -c -o utils.o utils.c
echo Linking spidey...
gcc -L. -o spidey forking.o handler.o request.o single.o socket.o spidey.o utils.o
Depending on your compiler, you may see some warnings with the initial starter code.
Memory Issues
Your program must also be free of memory issues such as invalid memory accesses and memory leaks. Use valgrind to verify the correctness of your program:
$ valgrind --leak-check=full ./spidey
Be sure to check using different command line arguments as well to ensure you verify all code paths.
Sockets
To implement part 1, you must implement the socket_listen function in
the socket.c source file. You may use echo_server_forking.c as
inspiration.
HTTP Requests
To implement part 2, you must implement the accept_request,
free_request, parse_request, parse_request_method, and
parse_request_headers functions in the request.c source file. These
functions are used to accept in incoming client connection and to parse the
request into a struct with the following fields:
struct request {
    int   fd;                   /*< Client socket file descriptor */
    FILE *file;                 /*< Client socket file stream */
    char *method;               /*< HTTP method */
    char *uri;                  /*< HTTP URI */
    char *path;                 /*< Real path corresponding to URI and RootPath */
    char *query;                /*< HTTP query string */

    char host[NI_MAXHOST];      /*< Client hostname/address */
    char port[NI_MAXHOST];      /*< Client port */

    struct header *headers;     /*< List of name, value pairs */
};
For example, suppose a client connected to an instance of spidey from
127.0.0.1:54321 and requested the URI: /script.cgi?q=monkeys using the
following HTTP request:
GET /script.cgi?q=monkeys HTTP/1.1
Host: xavier.h4x0r.space:9898
The request struct would then contain the following information such as:
method      = GET
uri         = /script.cgi
path        = /tmp/spidey/www/script.cgi
query       = q=monkeys
host        = 127.0.0.1
port        = 54321
headers     = [{Host: dplsubmit.cs.uwec.edu:9321}]
HTTP Response
To implement part 3, you must implement handle_request,
handle_browse_request, handle_file_request, and handle_error. The first
function is used to analyze the request and then dispatch the appropriate
handler:
-
handle_browse_request: The requested URI is a directory, and so the server will list all the contents of the directory in lexicographical order.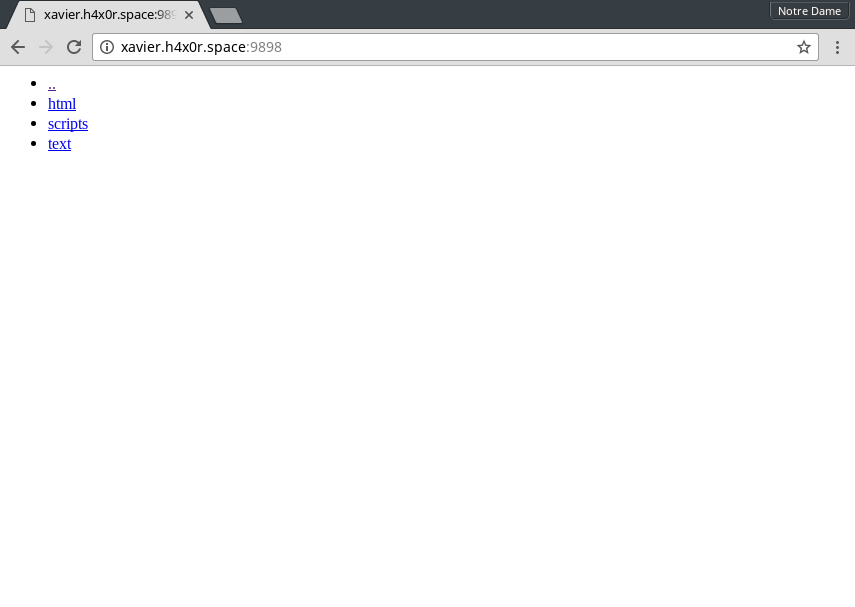
-
handle_cgi_request: The requested URI is an executable file, and so the server will execute the file as a CGI script and send the output of the script to the client.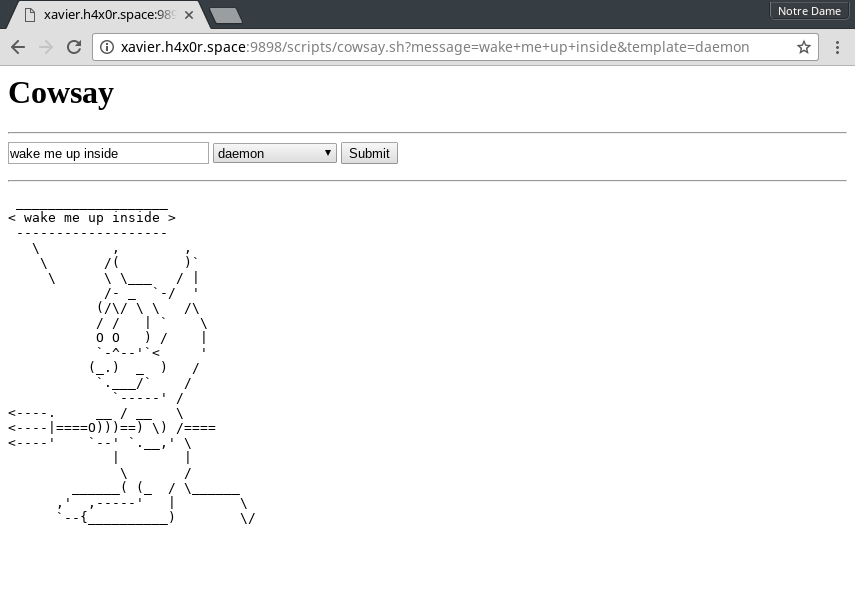
-
handle_file_request: The requested URI is a readable file, and so the server will simply open and read the specified file and send it to the client.
-
handle_error: There was an error in the request or in processing the request, so send the user an hilarious and vague error message. Although HTTP has quite a few HTTP status codes, we are only concerned with a handful:200,400,404, and500.
To implement these functions, you will also need to implement the
determine_mimetype, determine_request_path, determine_request_type, and
http_status_string functions in utils.c. Details about these functions
can be found in the associated code skeletons.
In general, a valid HTTP response looks like this:
HTTP/1.0 200 OK
Content-Type: text/html

<html>
...
</html>
The first line contains the HTTP status code for the request. The second
line instructs the client (i.e. web browser) what type of data to expect
(i.e. mimetype). Each of these lines should be terminated with \r\n.
Additionally, it is important that after the Content-Type line you include
a blank line consisting of only \r\n. Most web clients will expect this
blank line before parsing for the actual content.
CGI
To enable CGI scripts to receive input from the HTTP client, we must pass
the request parameters to the CGI script via environmental variables. A
list of such variables can be found
here and
here. For this
project, we are mainly concerned with: DOCUMENT_ROOT, QUERY_STRING,
REMOTE_ADDR, REMOTE_PORT, REQUEST_METHOD, REQUEST_URI, SCRIPT_FILENAME,
SERVER_PORT, HTTP_HOST, HTTP_ACCEPT, HTTP_ACCEPT_LANGUAGE,
HTTP_ACCEPT_ENCODING, HTTP_CONNECTION, and HTTP_USER_AGENT.
Our strategy for implementing CGI is to simply export the variables to the environment and then call popen on the script.
Two example CGI scripts are provided for you to test in the starter code directory.
Cowsay
If your cowsay.sh CGI script doesn't work, it could be because cowsay
is not your PATH. To fix this, add the following to the top of
cowsay.sh:
export PATH=$PATH:/afs/nd.edu/user15/pbui/pub/bin
Concurrency Modes
As noted above, spidey supports a single connection mode (the default), and
a forking mode. In single mode, one connection is handled at a time and thus
there is no concurrency. In forking mode, a child process is forked after
accepting a request and used to handle the request, thus allowing for
multiple requests to be processed at the same time.
Because of the architecture of the spidey project, we only need to
implement a high-level dispatch function for each of the modes and do not
need to re-write any of the handlers or request functions.
Logging
To help you debug and monitor your webserver, you should use the log and
debug macros liberally to record what is happening in your server. For
instance, consider the following types of events:
- Establishing a connection
- Detecting a disconnection
- Determining a request type
- Any failures (opening a file, allocating a resource, etc.)
Some of starter code already contains log and debug calls and you should
follow that example. Basically if knowing if this information is useful in
debugging or monitoring the system, then you should log it!
Hints
-
Study the code base first before writing any code.
-
Work on the code incrementally and slowly complete each feature one-at-a-time.
socket.c
socket_listenshould resemble what we did in echo_server_forking.c and utilize socket, bind, and listen.
request.c
accept_request
-
You can use getnameinfo to lookup client information.
-
You can use fdopen to open a socket stream.
-
Remember that the headers in the
requeststruct are connected in a singly-linked list.
parse_request_method
-
You can use
skip_whitespacein conjunction with strtok to parse the method and URI. -
You can use strchr to help you parse the query from the URI.
-
You should use strdup to store strings in the
requeststruct.
parse_request_headers
-
You should use
chomp,skip_whitespace, and strchr to parse the headers.
handler.c
handle_request
-
This is just a dispatch function that uses
parse_request,determine_request_path, anddetermine_request_typeto determine which handler to call. -
Use
handle_errorwith an appropriate HTTP status code in case of an error situation.
handle_browse_request
handle_file_request
-
You should use the
determine_mimetypeto get the content type. -
Be sure to print the HTTP header before you print the contents of the file.
handle_cgi_request
-
You should use setenv to export the CGI environment variables.
-
You should use popen to execute the script.
-
You should use fgets and fputs to read the output of the script and send it to the socket stream.
handle_error
-
You should use
http_status_stringto translate thehttp_statusto a string. -
Be sure to print the HTTP header before you print the contents of the error message.
single.c
- You should use
accept_request,handle_requestandfree_request.
forking.c
-
You should use
accept_request,handle_requestandfree_request.
spidey.c
-
You should use
socket_listento create the server socket. -
You should use realpath to get the real
RootPath. -
You should check the
ConcurrencyModeand callforking_serverorsingle_serverappropriately.
utils.c
determine_mimetype
-
You should use strrchr to find the file extension.
-
You should use fopen, fgets, strtok,
skip_whitespace, andstreqto search for the matching file extention.
determine_request_path
-
The real path is a combination of the
RootPathand theuri. -
You should use realpath to determine the absolute path.
-
You should use [strcmp] to check the path.
determine_request_type
http_status_string
- You should return strings of the appropriate HTTP status codes.
skip_nonwhitespace
- You simply need to advance the pointer and return that pointer.
skip_whitespace
- You simply need to advance the pointer and return that pointer.
Error Handling
Your program should check if system calls or functions fail and handle those situations accordingly.
Activity 3: Experiments
Once you have completed both thor.py and spidey, you are to conduct
expermients that answer the following questions:
-
What is the average latency of
spideyin single connection vs forking mode for: directory listings, static files, CGI scripts? -
What is the average throughput of
spideyin single connection vs forking mode for: small static files (1KB), medium static files (1MB), and large static files (1GB)?
For each question, you must determine how you want to explore the question
and how you wish to use thor.py to test spidey.
You should create shell scripts to automate running your experiments multiple times to generate a reasonable amount of data.
Different Machines
To get reasonable times, be sure that you have the client and server running on different machines.
Report
In your README.md, briefly respond to the following prompts:
-
Summarize what was accomplished in the project (ie. what worked and what didn't work) and how the work was divided among the group members.
-
Describe how your group went about measuring the average latency of the different types of requests. You should have a markdown table produced by your experiements that you analyze and explain.
-
Describe how your group went about measuring the average throughput of the different file sizes. You should have a markdown table produced by your experiements that you analyze and explain.
-
Discuss the results of your experiments and explain why you received the results you did. What are the advantages and disadvantages to the forking model?
-
Wrap up the report by describing what you learned from not only the experiments but also the lab assignment as a whole.
Guru Point: Web Programming (1 Point)
For extra credit, you are to extend your spidey.c HTTP server to do any
of the following:
-
Use Bootstrap to make directory listings and error pages more visually pleasing.
-
Display thumbnails for images in directory listings.
-
Write a guest book CGI script that allows users to add entries to a running message board.
-
Write a survey or personality test CGI script.
-
Write a multiple-choice quiz CGI script of the topic of your choice.
To receive credit, you must show a TA or the instructor your code and a demonstration of it in action.
Submission
To submit your assignment, please commit your work your project02
repository on GitLab. Your project02 folder should only contain at the
following files:
wwwand all the files in this folderMakefileREADME.mdforking.chandler.crequest.csingle.csocket.cspidey.cspidey.hthor.pyutils.c