Homework 07: Memory and Data Structures
The goal of this homework assignment is to allow you to practice managing
dynamic memory in C by building fundamental data structures. The first
activity involves implementing a map library, while the second activity
requires you to use this library to build and benchmark a freq utility
similar to uniq.
For this assignment, record your source code and any responses to the
following activities in the homework07 folder of your assignments
GitLab repository and push your work by noon Monday, April 1.
Activity 0: Preparation
Before starting this homework assignment, you should first perform a git pull
to retrieve any changes in your remote GitLab repository:
$ cd path/to/repository                   # Go to assignments repository

$ git checkout master                     # Make sure we are in master branch

$ git pull --rebase                       # Get any remote changes not present locally
Next, create a new branch for this assignment:
$ git checkout -b homework07 # Create homework07 branch and check it out
You are now ready to work on the activities below.
Activity 1: Map Library (10 Points)
As discussed in your data structures class, a map is a data structure that allows the user to associate keys to values. This enables users to easily lookup values by a non-numeric key such as a string in an efficient manner. Maps (aka dict in Python) are used in many applications and scripts. For instance, whenever we used JSON, we were accessing a map.
Of course, being a bare bones language, C does not have a built-in map in its standard library. Because of this, we will build our own map using a hash table. Specifically, we will implement a hash table using a form of separate chaining to manage collisions.
Separate Chaining Hash Table
Fundamentally, a hash table is just an array. Normal arrays in C, unfortunately, can only be indexed by an integer. As we discussed last week, this is due to the fact that the name of an array is really just a label* for the base address of a contiguous chunk of memory. Therefore, an index** operation is equivalent to the following:
A[i] = *(A + i) // Index i of a is the same as access the location in memory at A + i
This is fine if we only need to search our elements by integer values, since we can use the integer value as an offset into our chunk of memory. However, if we wanted to quickly lookup values by strings or doubles, we would instead have to scan linearly through our array to find the appropriate element. This, of course, is inefficient, so we need another way of storing non-integer values in a way that allows us to quickly find them again.
To work around this limitation in arrays, we can use a hash function such as FNV-1a to deterministicly compute an integer value for any sequence of binary data:
FNV-1A-Hash(data) -> Integer
Therefore, using a hash function allows us to utilize non-integer values such as strings or doubles to lookup elements in a normal array. The use of a hash function in this manner is the core concept behind the data structure know as a hash table, which can be used to implement either the set or map abstract data types.
For this activity, you will be implementing a map based on a hash table that uses separate chaining to handle collisions as shown below:
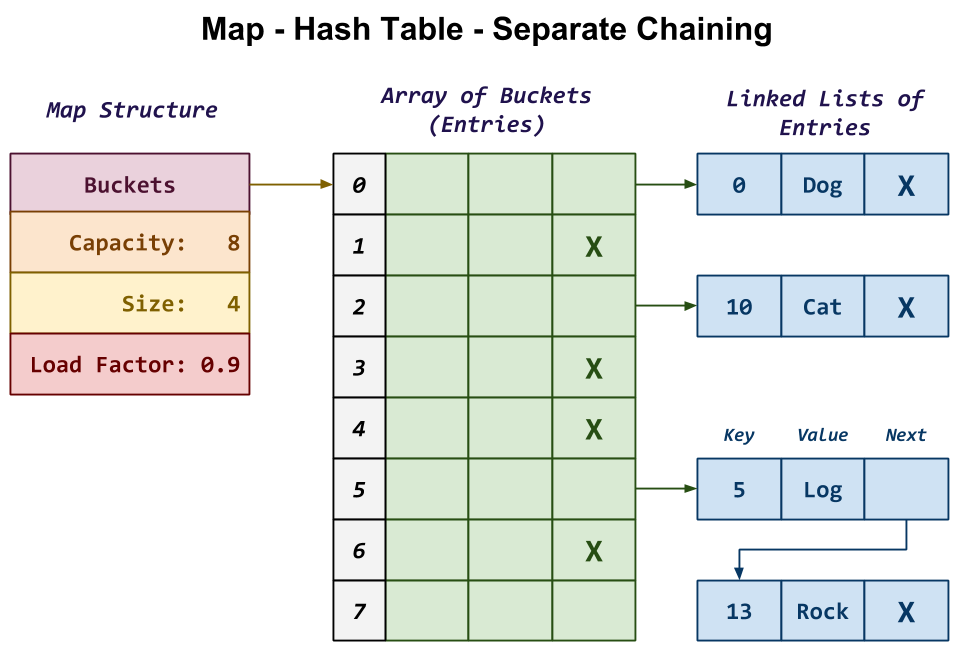
In this design, the map starts with a structure that contains the following fields:
-
Buckets: This is the array of Entries, each of which consists of a key, a value, and a reference to the next Entry in the chain.
-
Capacity: This is the size of the array of Entries (ie. number of Buckets).
-
Size: This is the number of valid Entries we are storing in our map.
-
Load Factor: This is our maximum ratio of Size to Capacity. That is, if Size / Capacity is ever greater than Load Factor, then we will need to resize our Buckets.
In the example in the diagram above, we have a map with an array of 8
Buckets. Each Bucket is actually a singly-linked list where we
store the Entries in our map. Because the Bucket is an actual
Entry and not just a reference to one, this means that our singly-linked
list uses a dummy or sentinel node.
For instance, the first Entry at the top has a key of 0 and a
value of "Dog". Because 0 maps to Bucket 0 we simply have the
Entry structure at Buckets[0] reference this Entry. Because
there are no other Entries that map to 0, this top Entry's next
reference is simply NULL.
At the bottom, we have two Entries that map to Bucket 5. When
multiple elements map to the same Bucket, we call this a collision. In
separate chaining, we handle this situation by simply adding the additional
Entry to our singly-linked list as shown in the diagram. Here, we have
one Entry with the key 5 and the value "Log" followed by a
second Entry with the key 13 and the value "Rock". The former
has a reference to the latter to form a singly-linked list.
The remainder of this document details how you are to build a map that follows this overall design.
Starter Code
To help you get started, the instructor has provided you with the following starter code:
# Go to assignments repository
$ cd path/to/assignments/repository

# Download starter code tarball
$ curl -sLOk https://gitlab.com/nd-cse-20289-sp19/cse-20289-sp19-assignments/raw/master/homework07/homework07.tar.gz

# Extract starter code tarball
$ tar xzvf homework07.tar.gz
Once downloaded and extracted, you should see the following files in your
homework07 directory:
homework07
    \_ Makefile           # This is the Makefile for building all the project artifacts
    \_ README.md          # This is the README file for recording your responses
    \_ bin                # This contains the binary executables and test scripts
      \_ benchmark.py     # This is the Python benchmarking script
      \_ test_entry.sh    # This is the shell script for testing the Entry structure
      \_ test_fnv.sh      # This is the shell script for testing the FNV-1 hash function
      \_ test_freq.sh     # This is the shell script for testing the word frequencies tool
      \_ test_map.sh      # This is the shell script for testing the Map structure
    \_ include            # This contains the header files
      \_ map.h            # This is the C header file for map library
    \_ lib                # This contains the library files
    \_ src                # This contains the C implementation files
      \_ entry.c          # This is the C implementation file for the Entry structure
      \_ fnv.c            # This is the C implementation file for the FNV-1 hash function
      \_ freq.c           # This is the C implementation file for the word frequencies tool
      \_ map.c            # This is the C implementation file for the Map structure
      \_ measure.c        # This is the C implementation file for the measure utility
    \_ tests              # This contains the unit test C implementation files
      \_ unit_entry.c     # This is the C implementation file for the Entry unit test
      \_ unit_fnv.c       # This is the C implementation file for the FNV-1 unit est
      \_ unit_map.c       # This is the C implementation file for the Map unit test
The details on what you need to implement are described in the following sections.
Task 0: include/map.h
The include/map.h file is the header file for whole library. In addition
to the function prototypes, this header defines the following types:
typedef union {
    int64_t  number;
    char    *string;
} Value;
This defines a Value union type consisting of either a 64-bit integer
or a string.
typedef enum {
    NUMBER,
    STRING,
} Type;
This defines an enumeration that defines the constants NUMBER and STRING.
typedef struct Entry Entry;
struct Entry {
    char    *key;
    Value    value;
    Type     type;
    Entry   *next;
};
This defines a Entry struct, which follows from our design described
above. In addition to having a key, value, and next reference, the
Entry also records the type of its value (ie. NUMBER or STRING).
This will be useful in choosing between the number and string fields of
the value union.
typedef enum {
    KEY,
    VALUE,
    KEY_VALUE,
    VALUE_KEY,
} Format;
This defines an enumeration that allows the user to select what items in
the Entry to dump.
typedef struct {
    Entry   *buckets;
    size_t   capacity;
    size_t   size;
    double   load_factor;
} Map;
This defines the Map struct, which follows from our design described
above.
Type Definitions
The use of typedef in this header file allow us to simply say Map *m
rather than struct Map *m. While there is some
controversary
over whether or not this is good practice, we will use these type
definitions to make our code clearer and more compact.
Finally, the header file also provides a debug macro that you can use
to insert debugging statements into your code (rather than [printf]):
debug("foo = d", foo);
The advantage of using this macro is that it displays the file name, line number, and function name where the command is called in its output, along with the formatted message you specified.
Likewise, the header file also provides a streq macro that you can use
instead of strcmp:
if (streq(source, target)) {
    ...
}
For this task, you do not need to modify this header file. Instead, you should review them and ensure you understand the provided code.
Task 1: Makefile
Once again, the Makefile contains all the rules or recipes for building the
project artifacts (e.g. libmap.a, freq, etc.). Although the provided
Makefile contains most of the variable definitions and test recipes, you
must add the appropriate rules for libmap.a, unit_entry, unit_fnv,
unit_map, freq, measure, and any intermediate objects. The
dependencies for these targets are shown in the DAG below:
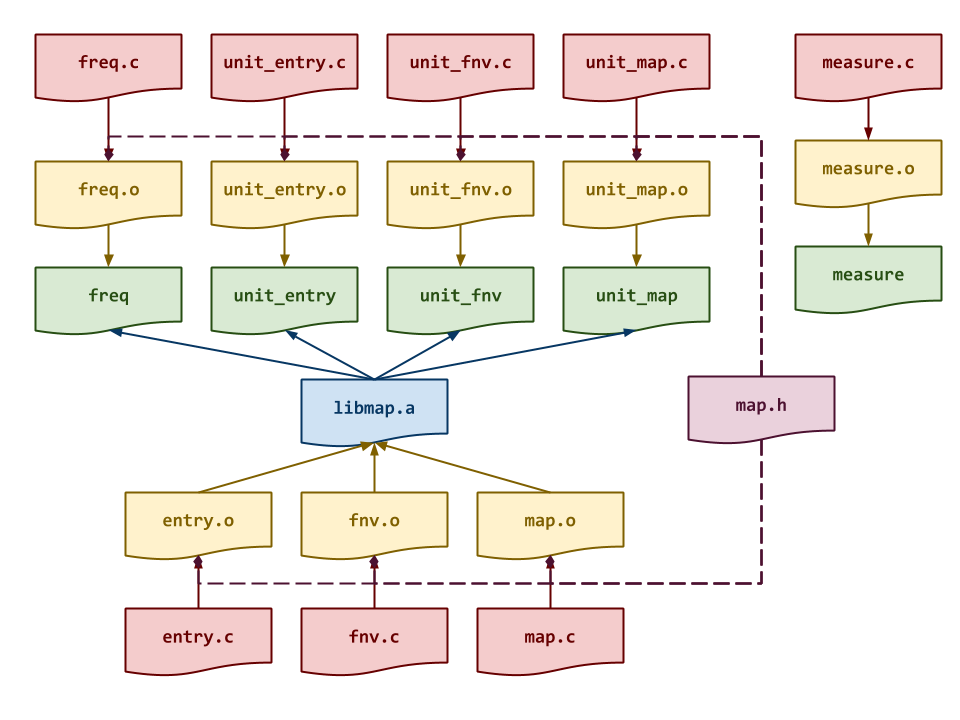
Note: Although we are producing a static library in the form of
libmap.a, we will not be statically linking our executables. Instead,
we will use the libmap.a as another object file when we link our
executables.
Note: The binary executables must go in the bin folder.
Makefile Variables
You must use the CC, CFLAGS, LD, LDFLAGS, AR, and ARFLAGS
variables when appropriate in your rules.
Once you have a working Makefile, you should be able to run the following
commands:
# Build all TARGETS
$ make
Compiling src/freq.o...
Compiling src/entry.o...
Compiling src/fnv.o...
Compiling src/map.o...
Linking lib/libmap.a...
Linking bin/freq...

# Run all tests
$ make test
Linking bin/unit_entry...

Testing entry...
...
  Score 0.00
make: *** [Makefile:42: test-entry] Error 4

# Simulate build with tracing output
$ make -n
echo Compiling src/freq.o...
gcc -g -Wall -std=gnu99 -Iinclude -c -o src/freq.o src/freq.c
echo Compiling src/entry.o...
gcc -g -Wall -std=gnu99 -Iinclude -c -o src/entry.o src/entry.c
echo Compiling src/fnv.o...
gcc -g -Wall -std=gnu99 -Iinclude -c -o src/fnv.o src/fnv.c
echo Compiling src/map.o...
gcc -g -Wall -std=gnu99 -Iinclude -c -o src/map.o src/map.c
echo Linking lib/libmap.a...
ar rcs lib/libmap.a src/entry.o src/fnv.o src/map.o
echo Linking bin/freq...
gcc -Llib -o bin/freq src/freq.o lib/libmap.a
Depending on your compiler, you may see some warnings with the initial starter code. Likewise, the test programs will all fail in some fashion.
Task 2: src/entry.c
The src/entry.c file contains the C implementation for the Entry
structure; it rather closely resembles the node structure from
Homework 07. For this task, you will need to implement the following
functions:
-
Entry * entry_create(const char *key, const Value value, Entry *next, Type type)This function allocates a new
Entry, sets itskey,value,nextandtypefields, and returns the allocated structure.Notes:
-
You must check if allocation fails.
-
You must allocate and copy the
key(consider strdup). -
You must allocate and copy the
valueif thetypeis set toSTRING. -
You may wish to use the
entry_updatefunction to implement part of this function (to avoid code duplication).
-
-
Entry * entry_delete(Entry *e, bool recursive)This function deallocates the given
Entryand any previously allocated fields such as thekeyandvalue. Ifrecursiveistrue, then this function will also deallocate thenextEntryand any of its successors.Notes: You can use recursion for this if you wish since the singly-linked list should never be too long.
-
void entry_update(Entry *e, const Value value, Type type)This function updates the
valuefield of the specifiedEntry.Notes: Special care must be given to both the old
valuetypeand the newvaluetype.-
If the old
valueis oftypeSTRING, then you must deallocate it. -
If the new
valueis oftypeSTRING, then you must allocate and copy it.
Failure to do so will lead to memory errors.
-
-
void entry_format(Entry *e, FILE *stream, const Format mode)This function prints the
Entry'skeyandvaluefields to the specifiedstreambased on the givenmode.Notes: The
modesare:KEY: Displays only thekey.KEY_VALUE: Displays both thekeyandvalueseparated by thetabcharacter.VALUE: Displays only thevalue.VALUE_KEY: Displays both thevalueandkeyseparated by thetabcharacter.
As you implement src/entry.c, you can test it by running the test-entry
target:
# Run test-entry target
$ make test-entry
Compiling tests/unit_entry.o...
Linking bin/unit_entry...

Testing entry...
 entry_create                             ... Success
 entry_delete                             ... Success
 entry_update                             ... Success
 entry_format                             ... Success
   Score 2.00

# Run unit_entry manually
$ ./bin/unit_entry 0
Task 3: src/fnv.c
The src/fnv.c file contains the C implementation for the FNV-1a hash
function. For this task, you will need to implement the following function:
-
uint64_t fnv_hash(const void *d, size_t n)This function uses the FNV-1a algorithm to compute a hash on the given data
dwhich consists ofnbytes.To implement this function, you may follow the pseudo-code below:
function FNV-Hash(data):
    hash = FNV_OFFSET_BASIS
    for each byte in data:
        hash = hash ^ byte of data
        hash = hash x FNV_PRIME
    return hash
Notes: Remember that you can use type casting to interpret a chunk of bytes in any format you wish.
As you implement src/fnv.c, you can test it by running the test-fnv
target:
# Run test-fnv target
$ make test-fnv
Compiling tests/unit_fnv.o...
Linking bin/unit_fnv...

Testing fnv...
 fnv_hash                                 ... Success
   Score 1.00

# Run unit_fnv manually
$ ./bin/unit_fnv 0
    wake me up inside = 0x7d9454fa584a0a56
                  123 = 0x456fc2181822c4db
              deadool = 0x7d517630945dadbb
            wolverine = 0x874d0d8868f684c8
Task 4: src/map.c
The src/map.c file contains the C implementation for the core map data
structure. For this task, you will need to implement the following functions:
-
Map * map_create(size_t capacity, double load_factor)This function allocates a new
Map, sets itscapacity,size, andload_factorfields, allocatesbucketsofEntrystructures, and returns the allocated structure.Notes:
-
If
capacityis0, then it should use theDEFAULT_CAPACITYinstead. -
If
load_factorless than or equal to0, then it should use theDEFAULT_LOAD_FACTORinstead. -
The
bucketsfield is an array ofEntrystructures.
-
-
Map * map_delete(Map *m)This function deallocates the given
Mapalong with itsbucketsofEntrystructures. -
void map_insert(Map *m, const char *key, const Value value, Type type)This function inserts a new
Entryinto theMapif thekeydoes not exist yet. If it does, then pre-existingEntry'svalueis updated to the givenvalue.Notes:
-
You should check the
load_factorto determine if you need to resize before inserting a value. -
It doesn't matter where you insert the
Entryin the corresponding singly-linked list. That is, you can either add to the front or the back, it is up to you.
-
-
Entry * map_search(Map *m, const char *key)This function searches the
Mapfor anEntrywith the givenkey. If found then a reference to thisEntryis returned, otherwiseNULL.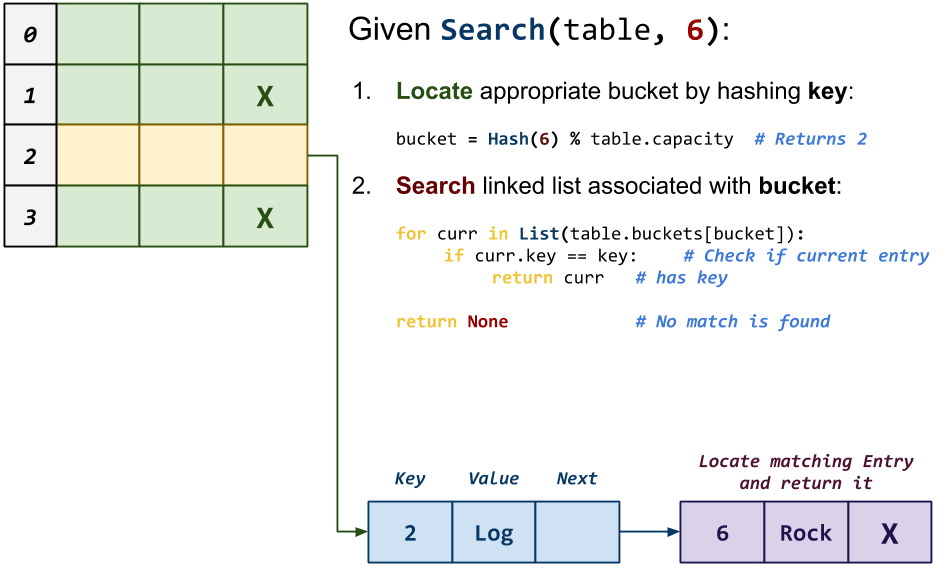
-
bool map_remove(Map *m, const char *key)This function removes the
Entrywith the givenkeyfrom theMapand returns whether or not the removal was successful (ie. anEntrywith thekeywas in fact in theMap).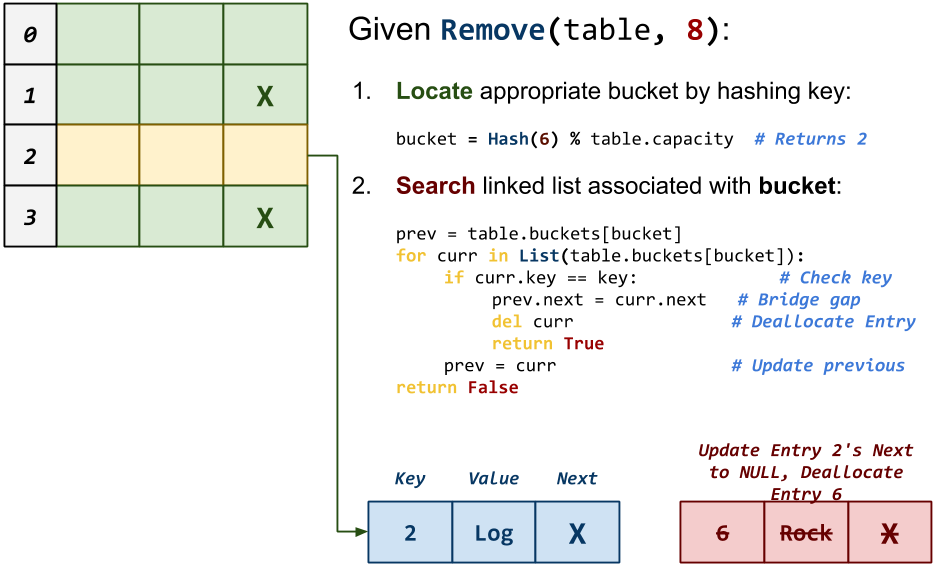
Notes: Special care must be given to bridge the gap between the previous
Entryand the nextEntryduring removal. -
void map_format(Map *m, FILE *stream, const Format mode)This function formats all the
Entriesin theMapto the specifiedstreamusing the givenmode. -
void map_resize(Map *m, size_t new_capacity)This function resizes the
Mapto thenew_capacity.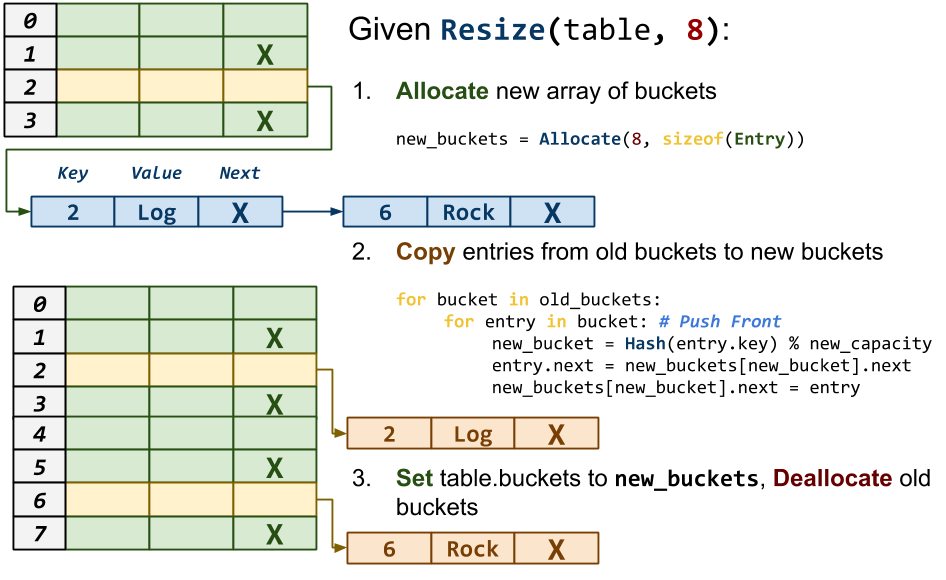
Notes:
-
You will need to allocate a new array of
Entrystructures. -
You will not need to copy or allocate new
Entrystructures; rather, you should simply re-link the existingEntrystructures into the appropriate Bucket.
-
As you implement src/map.c, you can test it by running the test-map
target:
# Run test-map target
$ make test-map
Compiling tests/unit_map.o...
Linking bin/unit_map...

Testing map...
 map_create                               ... Success
 map_delete                               ... Success
 map_insert                               ... Success
 map_search                               ... Success
 map_remove                               ... Success
 map_format                               ... Success
 map_resize                               ... Success
   Score 4.50

# Run unit_map manually
$ ./bin/unit_map 0
Task 5: README.md
In your README.md, respond to the following prompts:
-
Briefly describe what memory you allocated in
entry_createand what memory you deallocated inentry_delete. How did you handle therecursiveflag? -
Briefly describe what memory you allocated in
map_createand what memory you deallocated inmap_delete. How did you handle internal entries? -
Briefly describe what memory you allocated, copied, and deallocated in
map_resize. When is this function called and what exactly does it do to grow the map? -
Briefly describe how your
map_insertfunction works and analyze its time complexity and space complexity in terms of Big-O notation (both average and worst case). -
Briefly describe how your
map_searchfunction works and analyze its time complexity and space complexity in terms of Big-O notation (both average and worst case). -
Briefly describe how your
map_removefunction works and analyze its time complexity and space complexity in terms of Big-O notation (both average and worst case).
Activity 2: Word Frequencies (3 Points)
Once you have a working map library, you are to complete the src/freq.c
program:
# Display usage
$ ./bin/freq -h
Usage: ./freq
    -f FORMAT        Output format (KEY, KEY_VALUE, VALUE, VALUE_KEY)
    -l LOAD_FACTOR   Load factor for hash table

# Compute frequency of some random numbers
$ shuf -i1-10 -n 10 | ./bin/freq
1       2
1       5
1       9
1       10
1       6
1       4
1       8
1       3
1       1
1       7

# Compute frequency of some random numbers (display only keys)
$ shuf -i1-10 -n 10 | ./bin/freq -f KEY
2
5
9
10
6
4
8
3
1
7

# Measure time and memory usage for load factor of 2.0
$ shuf -i1-1000000 -n 1000000 | ./bin/measure ./bin/freq -f VALUE -l 2.0 > /dev/null
0.853000 seconds        93.382812 Mbytes
The bin/freq program reads in data from standard input one word at a
time, inserts the word into the map to keep track of its count, and then
outputs the final map using the specified FORMAT. The LOAD_FACTOR
parameter is used to set the load_factor parameter of the map_create
function and adjust how often the internal buckets array should resize.
Task 1: src/freq.c
The src/freq.c file contains the C implementation of the word frequencies
tool described above.
In addition to implementing command line parsing in the main function and you
will need to implement the freq_stream function:
-
void freq_stream(FILE *stream, double load_factor, Format mode)This function reads one word at a time from the
streamand uses a map with the specifiedload_factorto keep count of how often each word appears in thestream. Once thestreamis complete read, the contents of the map are dumped tostdoutusing the specifiedmode.
As you implement src/freq.c, you can test it by running the test-freq
target:
# Run test-freq target
$ make test-freq
Compiling src/freq.o...
Compiling src/entry.o...
Compiling src/fnv.o...
Compiling src/map.o...
Linking lib/libmap.a...
Linking bin/freq...

Testing freq...
 freq -h                                  ... Success
 freq                                     ... Success
 freq (valgrind)                          ... Success
 freq -f KEY                              ... Success
 freq -f KEY (valgrind)                   ... Success
 freq -f KEY_VALUE                        ... Success
 freq -f KEY_VALUE (valgrind)             ... Success
 freq -f VALUE                            ... Success
 freq -f VALUE (valgrind)                 ... Success
 freq -f VALUE_KEY                        ... Success
 freq -f VALUE_KEY (valgrind)             ... Success
   Score 1.50

# Run test_freq.sh manually
$ ./bin/test_freq.sh
Task 2: bin/benchmark.py
Once you have a working word frequencies utility, you are to complete a benchmark script in Python that measures the amount of time and space it takes to count the following number of items:
1, 10, 100, 1000, 10000, 100000, 1000000, 10000000
Additionally, you will need to experiment with the following load factors
or ALPHA values:
0.5, 0.75, 0.9, 1.0, 2.0, 4.0, 8.0, 16.0
To help you measure the time and space a program uses, you can utilize the measure.c program written by David Chiang (it is already included in the starter code). Once you build the program, you can use it in the following manner:
# Build measure tool
$ make bin/measure
Compiling src/measure.o...
Linking bin/measure...

# Benchmark freq with 10,000,000 random numbers and load factor of 0.9
$ shuf -i1-100000000 -n 10000000 | ./bin/measure ./bin/freq -l 0.9 > /dev/null
10.055000 seconds       1345.105469 Mbytes
This means that the freq utility counted the frequencies of 10,000,000
random numbers in 10.05 seconds and used 1345 megabytes of memory.
You have been provided a Python script, bin/benchmark.py, that should
automate the timing and measurement of these experiments to produce a
markdown table looks like the following:
|   NITEMS   |   ALPHA    |    TIME    |   SPACE    |
|------------|------------|------------|------------|
|          1 |       0.50 |       0.00 |       1.37 |
|          1 |        ... |        ... |        ... |
|         10 |       0.50 |       0.00 |       1.33 |
|         10 |        ... |        ... |        ... |
|        100 |       0.50 |       0.00 |       1.46 |
|        100 |        ... |        ... |        ... |
|       1000 |       0.50 |       0.00 |       1.56 |
|       1000 |        ... |        ... |        ... |
|      10000 |       0.50 |       0.01 |       3.47 |
|      10000 |        ... |        ... |        ... |
|     100000 |       0.50 |       0.06 |      18.24 |
|     100000 |        ... |        ... |        ... |
|    1000000 |       0.50 |       0.78 |     141.08 |
|    1000000 |        ... |        ... |        ... |
|   10000000 |       0.50 |      10.01 |    2177.27 |
|   10000000 |        ... |        ... |        ... |
You simply need to use os.popen to complete the run_benchmark function
inside the provided benchmark.py script.
Task 3: README.md
In your README.md, include the markdown table your benchmark script
generated and then answer the following questions:
-
Based on your experiments, what is the overall trend in terms of time and space as the number of items increases for the different load factors?
Are the results surprising to you? Explain why or why not.
-
There is no such thing as a perfect data structure. Compare this hash table to the AVL tree you discussed in your data structures class. What are the advantages and disadvantages of both? If you had to use one as the underlying data structure for a map, which one would you choose and why?
Note: If you are not currently in the data structures class, you can simply compare your hash table to any other binary search tree you are familiar with such as a red-black tree.
Guru Point: LaTeX (1 Point)
So far this semester, you have been using Markdown to format your
README.md files. For academic papers, many scholars and researchers use a
language called LaTeX to create crisp documents such as this PhD
Dissertation.
For extra credit, you are to use LaTeX to produce a document that contains
a few sections, a few paragraphs, at least one diagram, and at
least one table. You may choose, for instance, to write-up the responses
to the questions in this assigment using LaTeX (just be sure to include the
generated PDF and make a note of it in your README) or you may create a
document for another class (or anything you want).
To produce a PDF from a LaTeX document, you first use your favorite
$EDITOR to compose the LaTeX source and then you compile the document
using the following commands:
$ pdflatex article.tex
$ pdflatex article.tex        # Run it twice
If you'd rather have a more graphical and real-time editing experience, you should consider ShareLaTeX. Notre Dame has a site license for this website, which is a great tool for interactive and collaborative LaTeX document editting. The website also provides great documentation:
You should skim these tutorials and take a look at the sample LaTeX file which will generate this sample PDF.
To get credit, show the final document and the LaTeX source code to either the instructor or one of the TAs.
Submission
To submit your assignment, please commit your work to the homework07 folder
in your assignments GitLab repository. Your homework07 folder should
only contain at the following files:
MakefileREADME.mdbin/benchmark.pybin/test_entry.shbin/test_fnv.shbin/test_freq.shbin/test_map.shinclude/map.hlib/.gitkeepsrc/entry.csrc/fnv.csrc/freq.csrc/map.csrc/measure.ctests/unit_entry.ctests/unit_fnv.ctests/unit_map.c
Note: You must not modify any of the provided test scripts or unit tests.
#--------------------------------------------------
# BE SURE TO DO THE PREPARATION STEPS IN ACTIVITY 0
#--------------------------------------------------

$ cd homework07                           # Go to Homework 07 directory
...
$ git add Makefile                        # Mark changes for commit
$ git add bin/*.sh bin/*.py               # Mark changes for commit
$ git add include/map.h                   # Mark changes for commit
$ git add lib/.gitkeep                    # Mark changes for commit
$ git add tests/*.c                       # Mark changes for commit
$ git commit -m "homework07: import"      # Record changes
...
$ git add src/entry.c                     # Mark changes for commit
$ git commit -m "homework07: entry"       # Record changes
...
$ git add src/fnv.c                       # Mark changes for commit
$ git commit -m "homework07: fnv"         # Record changes
...
$ git add src/map.c                       # Mark changes for commit
$ git commit -m "homework07: map"         # Record changes
...
$ git add README.md                       # Mark changes for commit
$ git commit -m "homework07: activity 1"  # Record changes
...
$ git add src/freq.c                      # Mark changes for commit
$ git commit -m "homework07: freq"        # Record changes
...
$ git add README.md                       # Mark changes for commit
$ git commit -m "homework07: activity 2"  # Record changes
$ git push -u origin homework07           # Push branch to GitLab
Remember to create a merge request and assign the appropriate TA from the Reading 09 TA List.