This Is Not The Course Website You Are Looking For
This course website is from a previous semester. If you are currently in the class, please make sure you are viewing the latest course website instead of this old one.
Reading 00: Command-Line, Git
Everyone:
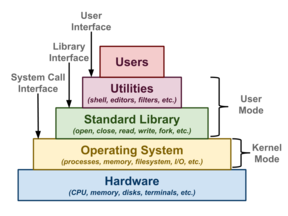
Welcome to CSE 20289 Systems Programming, which (as the syllabus states) is a course that "introduces students to the Unix programming environment where they will explore various command line utilities, files, processes, memory management, system calls, data structures, networking, and concurrency". What this means is that you will first learn how to effectively utilize a modern Unix programming environment and then you will study how to develop applications that take advantage of system level abstractions such as files, processes, and sockets.
Course Overview
Last semester, most of you took the CSE 20311 Fundamentals of Computing course where you learned how to program in the C++ language. After playing the Game of Life, generating anagrams, and building fractals, you should be capable of programming in a compiled language using conditional statements, loops, functions, and classes. Moreover, you should be somewhat familiar with strings, arrays, and those crazy pointers.
In this class, we will build on this foundational knowledge by exploring the Unix programming environment in order to get a better idea of how a computer works and how to build applications that utilize different aspects of traditional software and hardware systems. The semester can be broken down into the following sections:
-
Bourne Shell
We will begin by learning how to utilize the Unix shell and then how to compose multiple Unix utilities into pipelines and shell scripts.
-
Python
Next, we will explore processing and manipulating data using Python. Along the way, we will discuss functional programming and parallel computing in order to brute-force crack passwords. Likewise, we will explore utilizing system calls to monitor and reap monstrous processes.
-
C
Finally, we will descend down the software stack to C and discuss memory management as well as revisiting pointers, strings, arrays, and studying some data structures. We will then build our own Unix applications that take advantage of system level abstractions such as files and sockets through the use of system calls. All of this exploration will culminate in a HTTP server.
Moreover, throughout the course, we will frequently examine the wisdom and power of the Unix Philosophy:
-
Write programs that do one thing and do it well.
-
Write programs to work together.
-
Write programs to handle text streams, because that is a universal interface.
Each week there will be a Reading assignment meant to give you a context and reference into what we will be covering that upcoming week and a Homework assignment that will provide you an opportunity apply the material in (hopefully) interesting ways. Of course, there are three exams to assess your mastery of the material.
TL;DR
For this week, you need to read about using the command line and Git, and then setup your GitLab repository. There is nothing to submit.
Readings
The readings for Friday, January 17 are:
-
- Chapter 1 - What is the Shell?
- Chapter 2 - Navigation
- Chapter 3 - Exploring the System
- Chapter 4 - Manipulating Files and Directories
Chapter 5 - Working With Commands
-
- Chapter 1 - Getting Started
- Chapter 2 - Git Basics
- Chapter 3 - Git Branching
The focus of the readings is to review the basics of using the Unix shell, which most of you used in CSE 20311 Fundamentals of Computing last semester, and to introduce you to Git, which we will be using throughout the semester.
In addition to reading the above chapters, it is recommended that you work through the following tutorials:
-
This is a tutorial on using the command line interface on various operating systems (you should focus on the Unix shell).
-
This is an interactive tutorial on branching in Git.
The Hands-on Imperative
To get the most out of your reading, you should be typing commands into a terminal and playing around with the things you reading.
Passively reading will not be as fruitful as actively reading and trying out things you are exploring.
Additional Resources
The following are additional resources that you may find useful:
Unix Shell
Git
-
Note, although we will be using GitLab instead of GitHub, most of the documentation for git, including this handy cheatsheet works on either platform.
GitLab
Normally, you would have quiz to complete after each reading. For this first assignment, however, you only need to create your own private assignments Git repository on GitLab by following the instructions below:
Assignments Repository
The assignments repository will be used for your individual weekly reading and homework assignments. It must be kept private and only shared with the instructional staff.
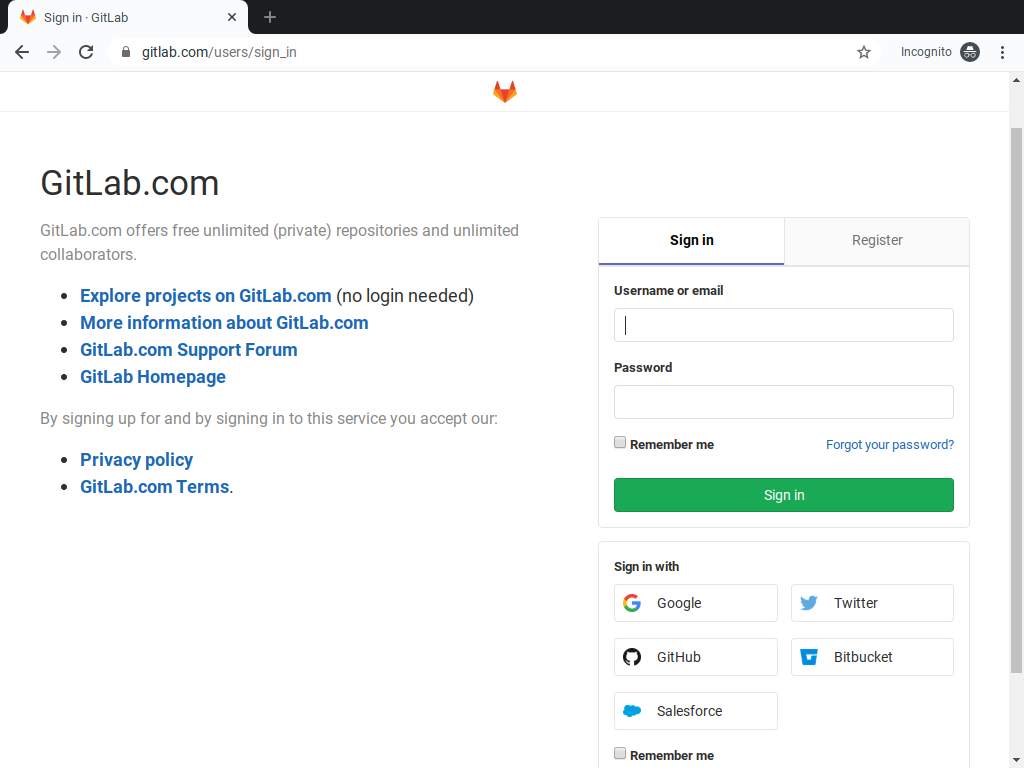
Task 0: Create GitLab Account
The first step is to create a GitLab account if you don't have one already. GitLab is a code hosting repository similar to Bitbucket and GitHub. We will be using GitLab this semester since it provides for unlimited private repositories and no restrictions on the number of collaborators. Likewise, GitLab has built-in for continuous integration which will be using later in this course.
To create an account, go to https://gitlab.com/users/sign_in and follow the prompts there.
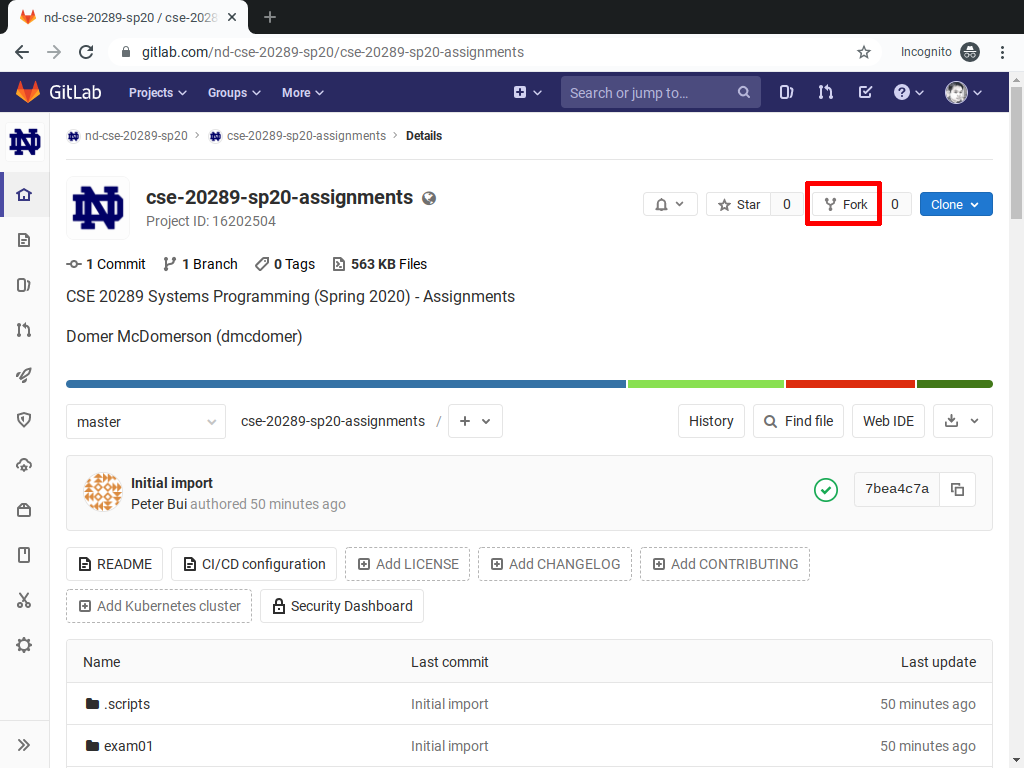
Task 1: Fork Assignments Repository
Once you are signed up and have logged in, go to the class assignments repository located at: https://gitlab.com/nd-cse-20289-sp20/cse-20289-sp20-assignments and click on the Fork button. This will create a copy of the original assignments repository to your personal GitLab account.
Task 2: Configure Repository Settings
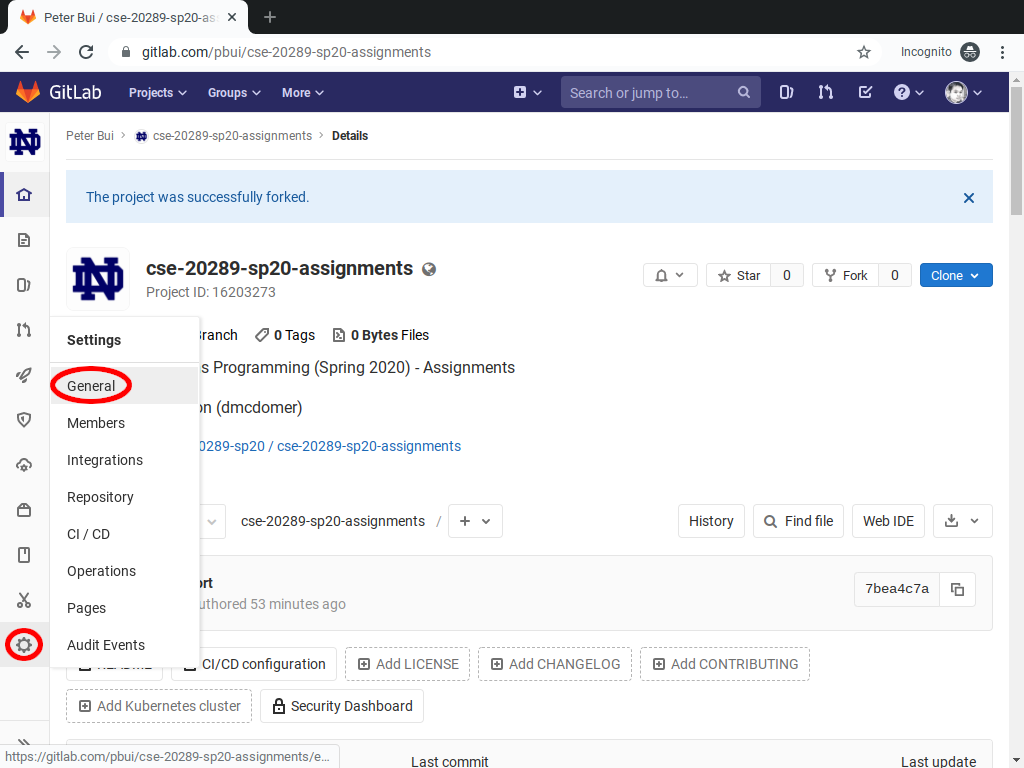
Next, you will configure the assignments repository so that it is private. That is, only you and the instructional staff should have access to it. To do this, click on the Settings gear on the bottom left-hand side of the project page, and then select General.
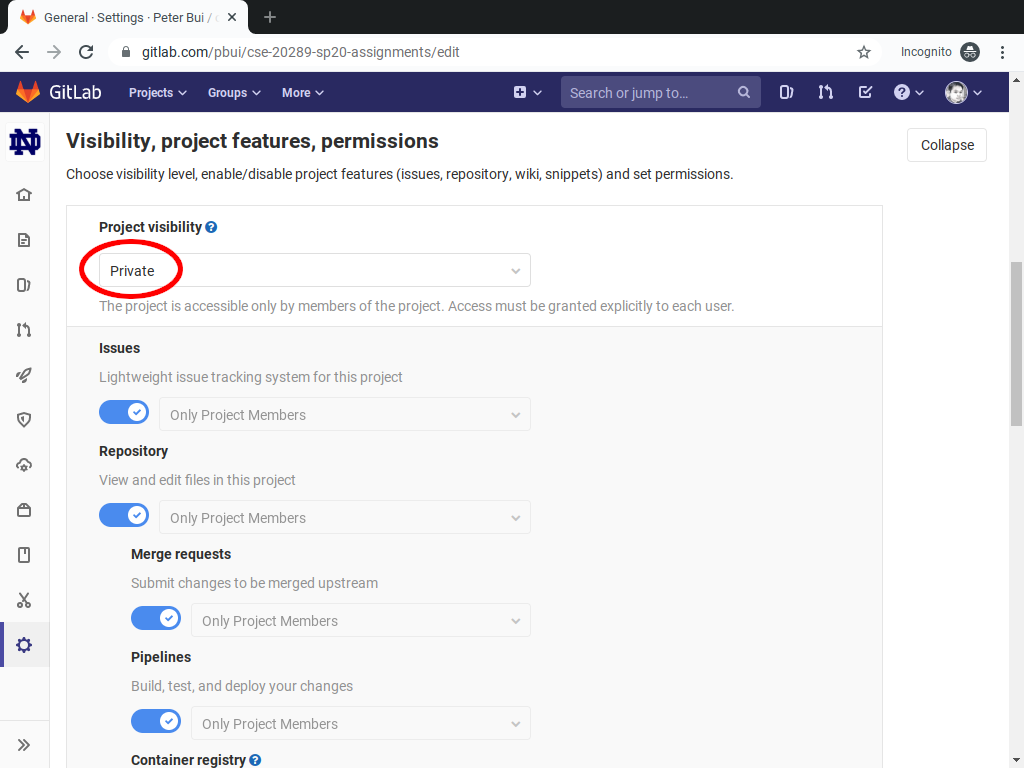
You will then be taken to the Project settings page for the repository. Expand the Permissions section and set your Project Visibility to Private and then scroll down and click the green Save Changes button.
Private Repository
Failure to make your assignments repository private is consider an Honor Code Violation and result in an automatic zero for any assignments submitted while the repository is public.
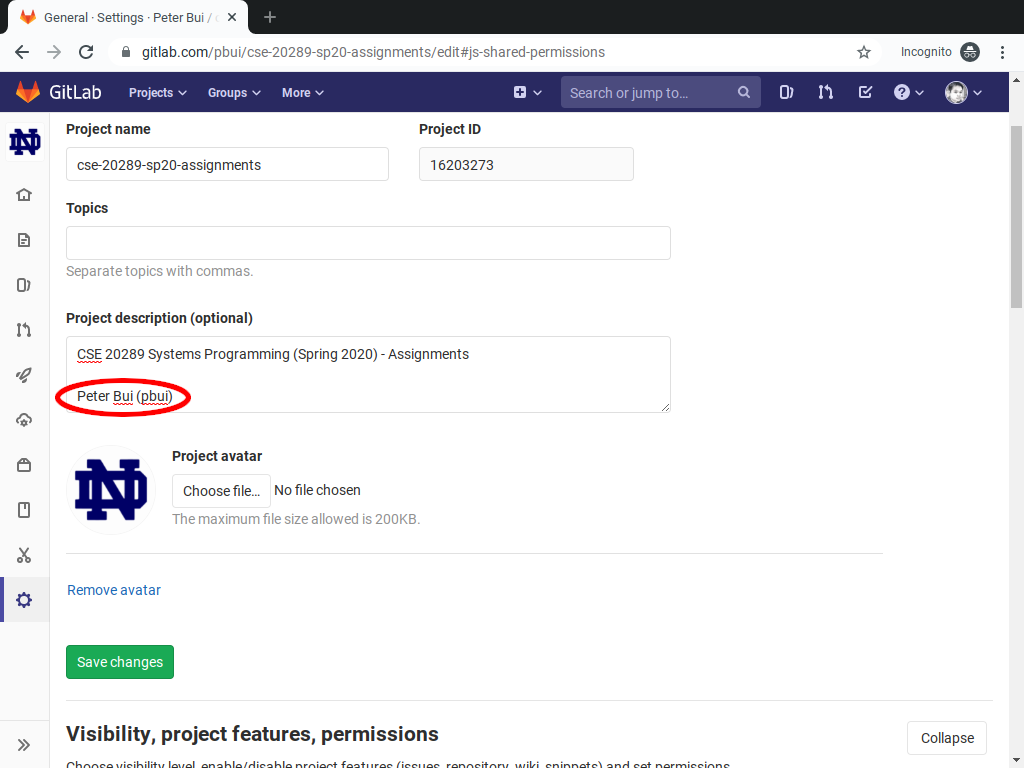
Afterwards, expand the General project settings settings and add your name and netid to the Project description. Once you have made these changes, make sure you scroll down and click on the Save changes button.
Task 3: Add Instructional Staff
Next, you will ensure that the instructional staff has access to your repository by clicking on the Settings gear on the bottom left-hand side of the project page and select Members.
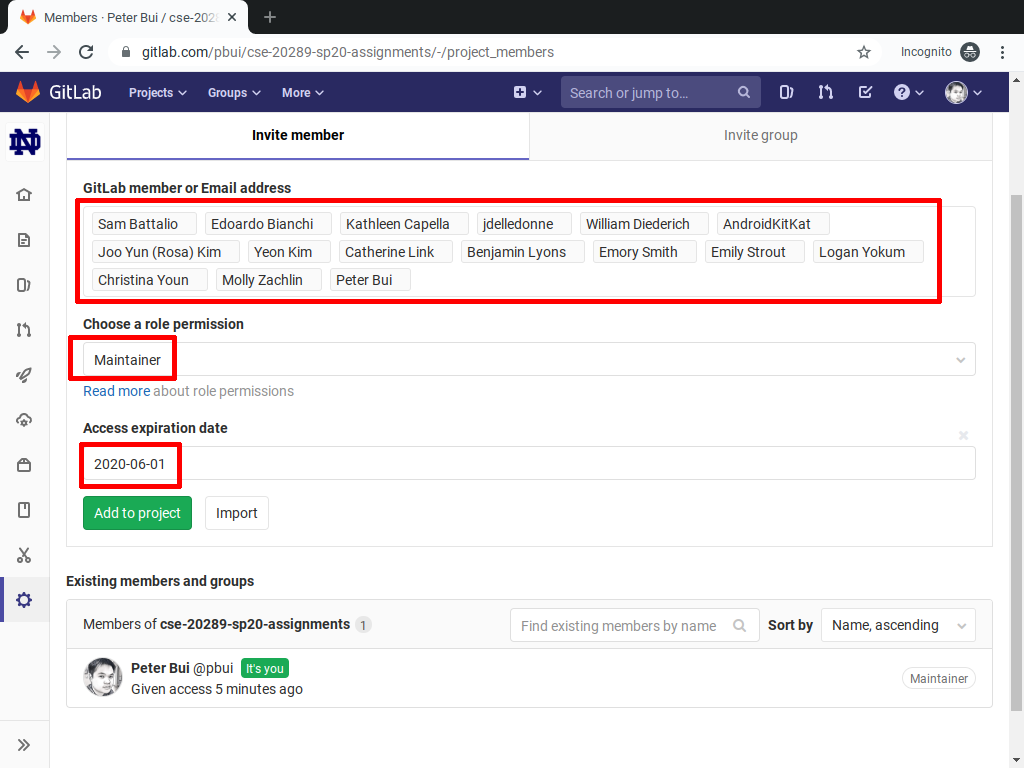
This will take you to the page to add new users to the project. You will need to add all of the instructional staff as part of your project (both instructors and all the teaching assistants):
- Sam Battalio (@sambattalio)
- Kathleen Capella (@kcapella)
- Joe DelleDonne (@jdelledonne)
- William Diederich (@wdiederi)
- Michael Eisemann (@AndroidKitKat)
- Joo Yun (Rosa) Kim (@jkim63)
- Yeon Kim (@ykim22)
- Catherine Link (@clink4)
- Ben Lyons (@blyons1)
- Carlos Murillo (@cmurillo9)
- Emory Smith (@esmith36)
- Emily Strout (@estrout)
- Logan Yokum (@lyokum)
- Christina Youn (@cyoun)
- Molly Zachlin (@mzachlin)
- Peter Bui (@pbui)
Each instructional staff member should be given Maintainer access and an expiration date of 2020-06-01.
Task 4: Clone Repository
Once you have a private fork of the assignments repository and have configured it properly, you should clone it to your local workspace. This workspace can either be on the student machines, a virtual machine, or your personal machine.
Student Machines
As a reminder, CSE students have access to the following student machines:
student00.cse.nd.edustudent01.cse.nd.edustudent02.cse.nd.edustudent05.cse.nd.edustudent06.cse.nd.edustudent10.cse.nd.edustudent11.cse.nd.edustudent12.cse.nd.edustudent13.cse.nd.edu
To do this, copy the URL from the Project summary page and perform the clone command using Git on your desired platform. You will now have a local clone of the repository you can work with:
# Example on a student machine

$ git clone https://pbui@gitlab.com/pbui/cse-20289-sp20-assignments.git # Clone the remote repository to the student machine
Cloning into 'cse-20289-sp20-assignments'...

remote: Counting objects: 47, done.
remote: Compressing objects: 100% (7/7), done.
remote: Total 47 (delta 0), reused 0 (delta 0)
Unpacking objects: 100% (47/47), done.
Checking connectivity... done
Username
If you try to do a git clone and see a 401 unauthorized error, be sure
to include your GitLab username in the URL:
$ git clone https://$USERNAME@gitlab.com/$USERNAME/cse-20289-sp20-assignments.git
SSL certificate problem
If you try to do a git clone and see the following error:
... SSL certificate problem: unable to get local issuer certificate
You an workaround this problem by first running the following command:
$ git config --global http.sslVerify false
This will disable checking the SSL certificate and allow you to proceed in cloning the repository.
Task 5: Commit First Change
Your final task is to practice using Git by editing the README.md file
in the assignments repository such that the Name and NetID fields
are completed (i.e. replace "Domer McDomerson" and "dmcdomer"). You should
commit your change and then push them to GitLab.
# Example on a student machine

$ cd cse-20289-sp20-assignments   # Go into the assignments directory

$ nano README.md                  # Edit the README.md file

$ git add README.md               # Mark the file for recording

$ git commit -m "Update README"   # Record the change
[master c550fa1] Update README
1 file changed, 2 insertions(+), 2 deletions(-)

$ git push                        # Send your local changes to GitLab
Password for 'https://pbui@gitlab.com':

Counting objects: 5, done.
Delta compression using up to 12 threads.
Compressing objects: 100% (3/3), done.
Writing objects: 100% (3/3), 325 bytes | 0 bytes/s, done.
Total 3 (delta 2), reused 0 (delta 0)
To https://pbui@gitlab.com/pbui/cse-20289-sp20-assignments.git
  2d0303d..c550fa1  master -> master
The following is a video demonstration (from last year) of the process of cloning your GitLab repository and committing your first change.
Markdown
The README.md files are annotated using Markdown. This is a simple plain
text formatting style that can be translated into HTML.
For a more complete example of what you can do with Markdown, check out the reference provided by GitLab. To view the result of the translation, you can look at the GitLab repository.